Managing purchase suggestions
You can create purchase suggestions via the staff interface either for the library or on the patron’s behalf from their record. Depending on your settings in the suggestion system preference, patrons may also be able to make purchase suggestions via the OPAC.
Note
Staff members must have the suggestions_manage permission (or the superlibrarian permission) in order to view and manage purchase suggestions.
If staff members have the suggestions_manage permission but not any of the acquisitions permissions, they can access the suggestion management tool from ‘Suggestions’ under the ‘More’ menu in the header bar.
When a suggestion is waiting for library review, it will appear on the Acquisitions home page next to the vendor search. The suggestions for the branch where you are logged in will be separated from the rest of the suggestions. Clicking the library name will take you to the suggestion management tool.

It will also appear on the main staff dashboard under the module labels.

If there are no pending suggestions you can access the suggestion management tool by going to the ‘More’ menu and choosing ‘Suggestions’ or by clicking the ‘Manage suggestions’ link on the menu on the left of the Acquisitions module home page.
Note
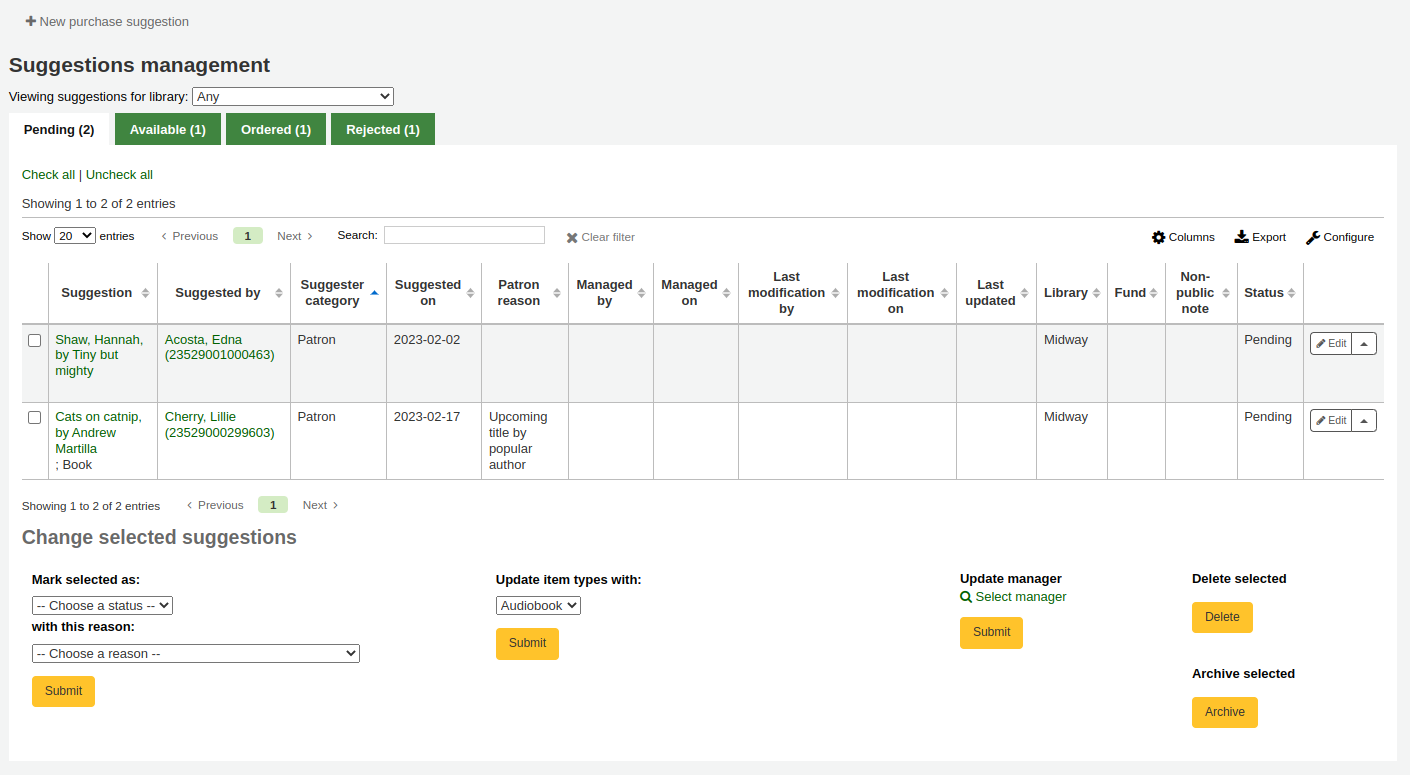
You can customize the columns of this table in the ‘Table settings’ section of the Administration module (table id: suggestions).
Your suggestions will be sorted into several tabs: Pending, Accepted, Checked, Ordered and Rejected.
Pending: A ‘Pending’ suggestion is one that is awaiting action from the library.
Accepted: An ‘Accepted’ suggestion is one that you have marked as ‘Accepted’ using the form below the suggestions.
Checked: A ‘Checked’ suggestion is one that has been marked as ‘Checked’ using the form below the suggestions.
Ordered: An ‘Ordered’ suggestion is one that has been ordered using the From a purchase suggestion link in an order basket.
Rejected: A ‘Rejected’ suggestion is one that you have marked as ‘Rejected’ using the form below the list of suggestions.
Note
If your workflow requires more statuses for suggestion management, you can add more using the SUGGEST_STATUS authorized values category.
Each suggestion will show the name of the staff member who managed the suggestion as well as the date when it was managed.
Accepted and rejected suggestions will show the reason for accepting or rejecting it under ‘Status’.
For libraries with a lot of suggestions, there are filters on the left hand side of the Manage Suggestions page to assist in limiting the number of titles displayed on the screen.
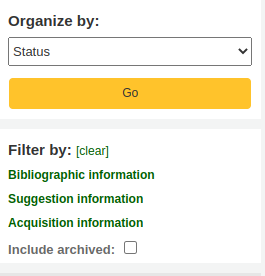
Clicking on the blue headings will expand the filtering options and clicking ‘[clear]’ will clear all filters and show all suggestions.
Note
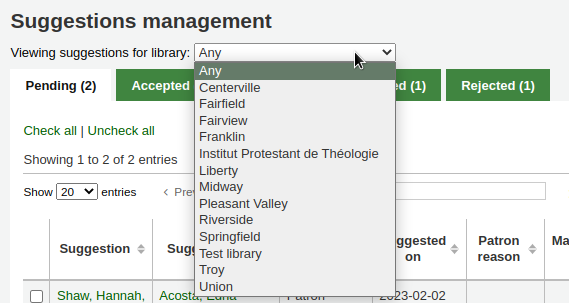
The suggestions page will automatically be limited to suggestions for your library. To see information for all (or any other) libraries change the library in the ‘Viewing suggestions for library’ dropdown menu.
When changing the status of a purchase suggestion (pending, accepted, rejected, checked, or ordered), the suggestion will be moved to the matching tab. The status will also be updated on the patron’s account in the OPAC and an email notice will be sent to the patron using the template that matches the status you have chosen.
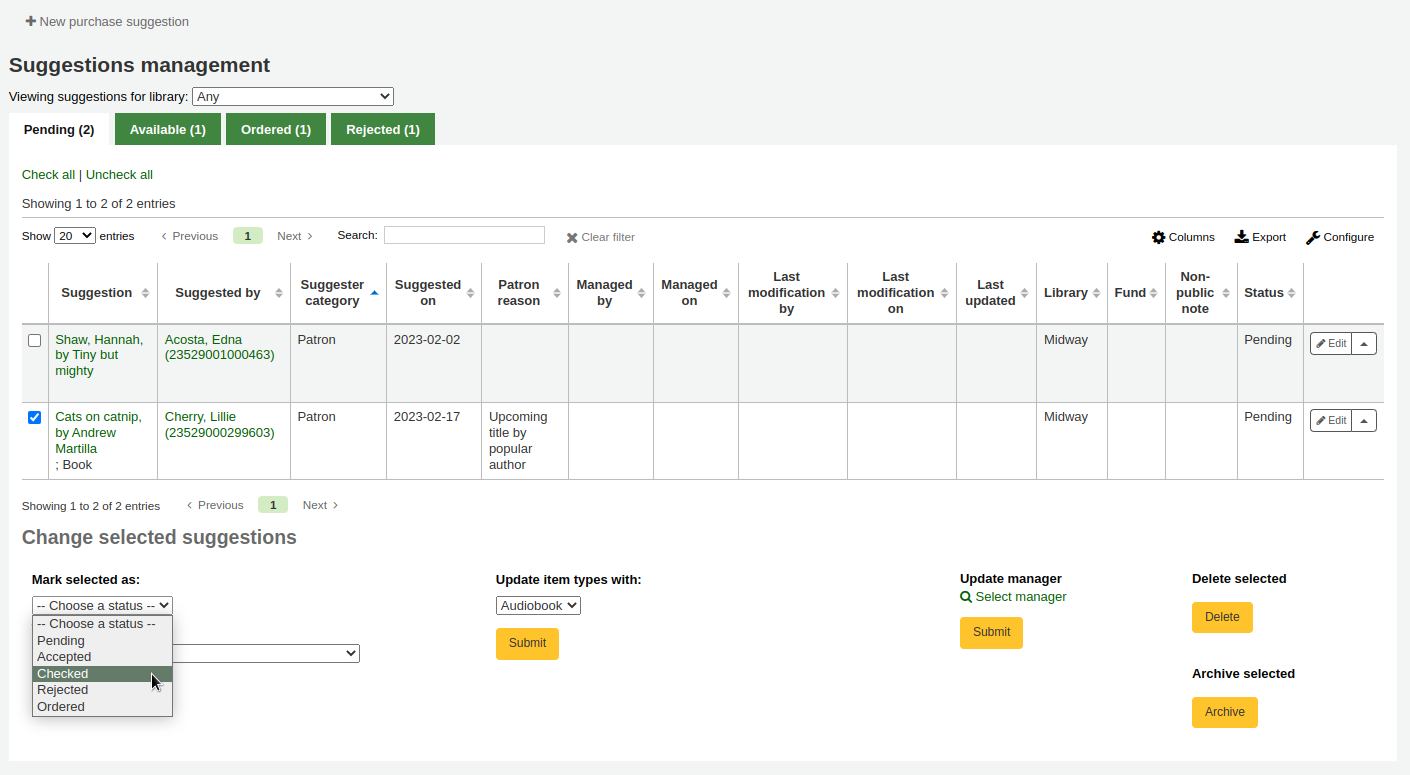
When reviewing ‘Pending’ suggestions check the boxes next to the purchase suggestions you want to approve or reject and then choose the status and reason for your selection in the ‘Change selected suggestions’ section below.
Note
If your workflow requires more statuses for suggestion management, you can add more using the SUGGEST_STATUS authorized values category.
Reasons for accepting and rejecting suggestions are defined by the SUGGEST authorized value category.
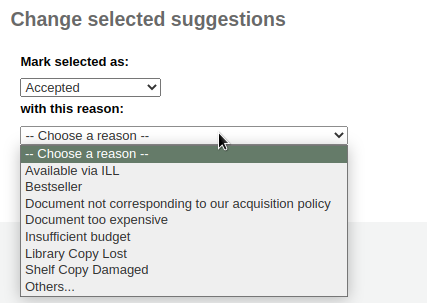
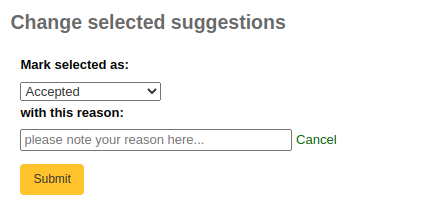
If you choose ‘Others…’ as your reason, you will be prompted to enter your reason in a text box. Clicking ‘Cancel’ to the right of the box will bring back the pull down menu with authorized reasons.
It is also possible to approve or reject suggestions one by one by clicking on the title of the suggestion to open a summary of the suggestion.
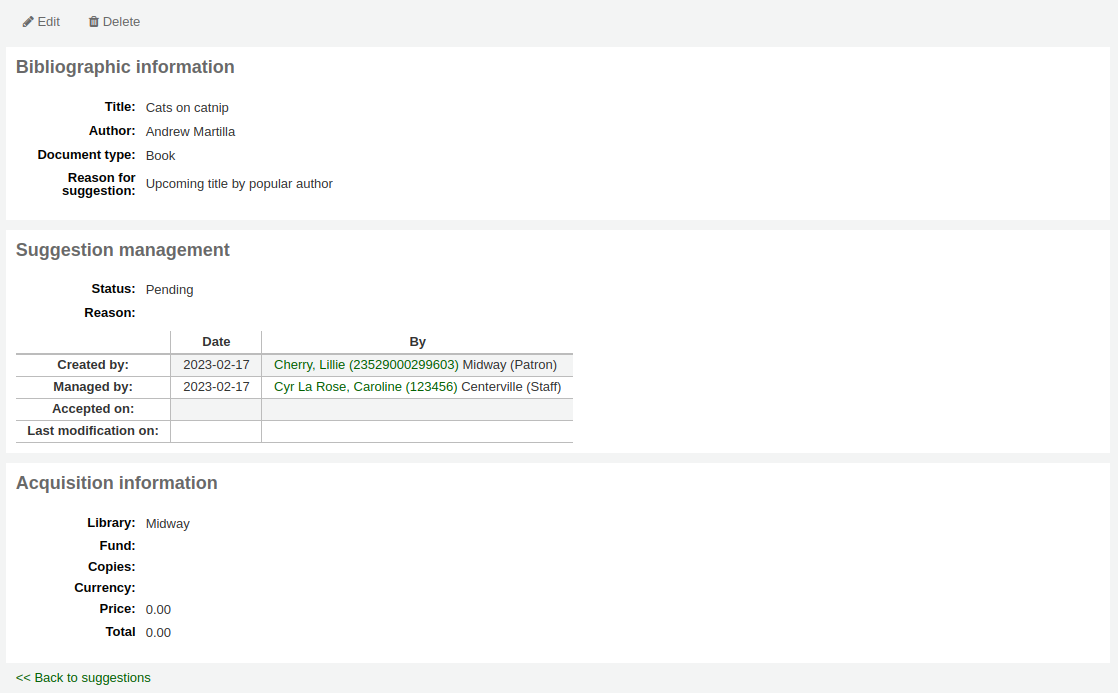
Click ‘edit’ at the top of the suggestion detail page to open the suggestion editing page.
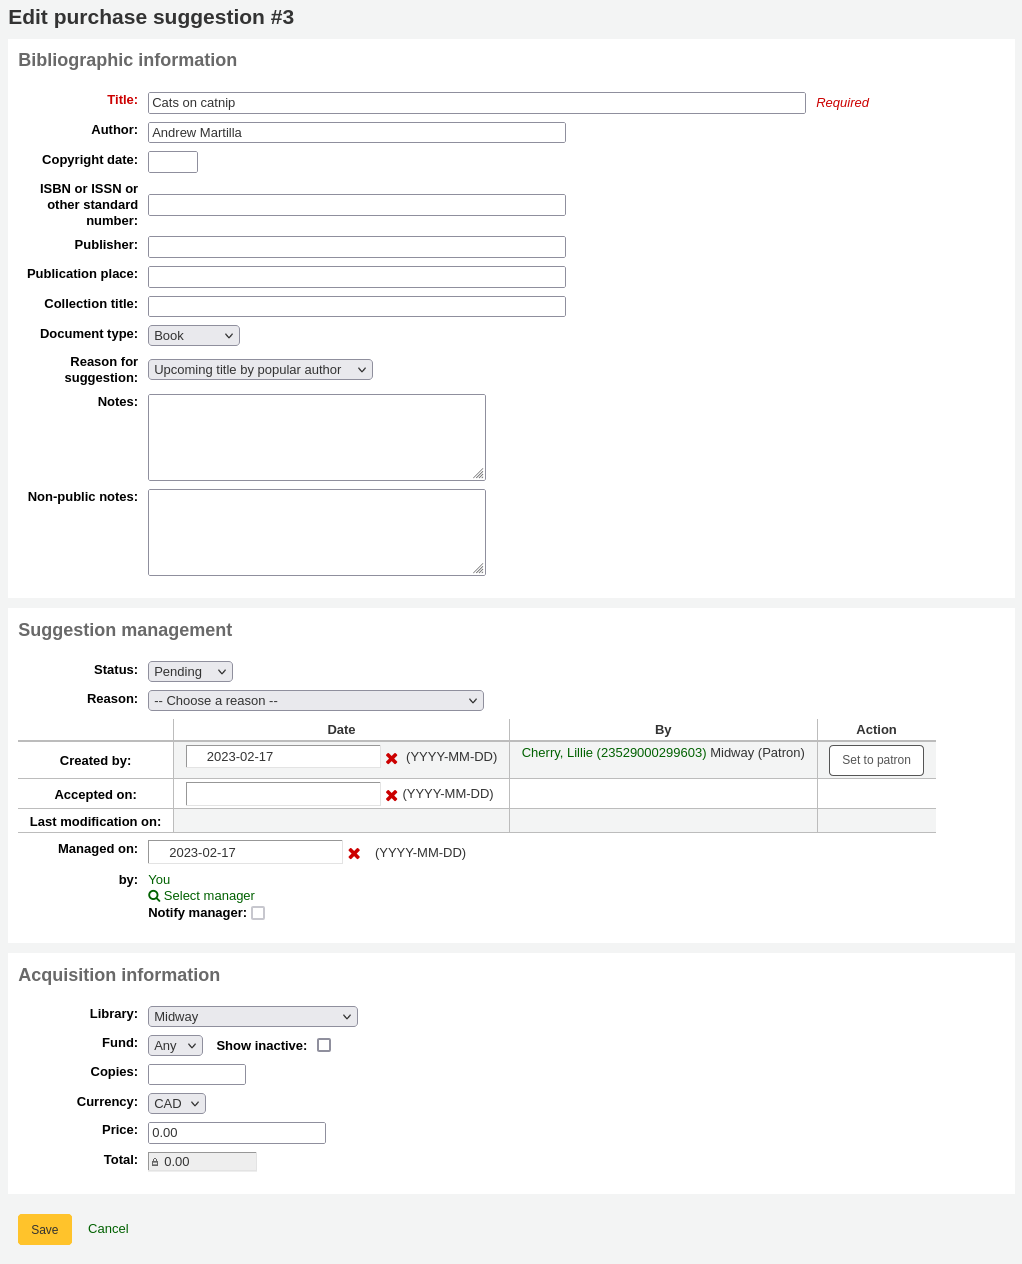
From there, change the status in the ‘Suggestion management’ section and click ‘Save’.
A suggestion’s status change will trigger a notice to be sent to the patron who made the suggestion. The notices can be edited in the Notices and slips tool.
The ‘Accepted’ status will trigger the ACCEPTED notice
The ‘Rejected’ status will trigger the REJECTED notice
The ‘Ordered’ status will trigger the ORDERED notice
Note
The ‘Ordered’ status will automatically be set when ordering from a suggestion and the corresponding notice will also be sent at that time.
Change to this status manually only if you don’t use the acquisitions module to enter your orders.
Note
If you add custom statuses in the SUGGEST_STATUS authorized values, you can add corresponding notices with the same names, taking care to choose the ‘Suggestions’ module when creating the new notices.
Other than changing the status to accept or reject the purchase suggestions, you can also change various attributes while managing the suggestions.
Edits can be done in a batch by selecting the suggestions and choosing the new values in the ‘Change selected suggestions’ section at the bottom of the page.
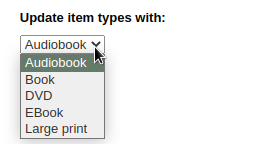
You can change the item type of the suggestions by selecting them and choosing the new item type in the ‘Update item types with’ drop down menu.
Note
The item types in this list are populated by the SUGGEST_FORMAT authorized value category.
You can also change the manager of the selected suggestions by clicking the ‘Select manager’ link and searching your user database. The new manager will receive the NOTIFY_MANAGER notice.
Note
Only users who have the suggestions_manage permission (or the superlibrarian permission) will show in the results.
It is also possible to edit suggestions one by one by clicking on the ‘Edit’ button to the right of the suggestion or by clicking on the title of the suggestion.

Clicking ‘edit’ at the top of the suggestion detail page will open a suggestion editing page.

From this form you can make edits to the suggestion (adding more details or updating incorrect information provided by the patron). You can also choose to accept or reject the suggestion on an individual basis.
In the ‘Bibliographic information’ section, you can add missing information, such as the ISBN, publisher, etc. or correct wrong information provided by the patron.
This information will be used to create a bibliographic record should you order this title from the suggestion.
In the ‘Suggestion management’ section, you can edit the status, add a reason for accepting or rejecting the suggestion, or adjust the dates if needed.
Choosing to mark a suggestion as ‘Pending’ will move it back to the ‘Pending’ tab.
The ‘Notify manager’ checkbox can be used to send a notice to the staff member who previously managed the suggestion to inform them the suggestion was modified. The notice sent is NOTIFY_MANAGER notice.
In the ‘Acquisitions information’ section, you can edit the fund, price, currency, etc.
Assigning the suggestion to a fund will trigger a notice to be sent to the fund owner to inform them that there is a suggestion ready for them to manage.
The notice_unprocessed_suggestions.pl cronjob is necessary to generate these notices.
The notice used is TO_PROCESS, it can be edited in the Notices & slips tool.
Archiving purchase suggestionsOnce the suggestion has completed the acquisitions process, it is possible to archive them. If you have a lot of suggestions, and the page takes a long time to load, archiving old suggestions will improve the performance.
Select the suggestions you want to archive and click the ‘Archive’ button in the ‘Archive selected’ box.
You can also archive the purchase suggestion by clicking the small arrow next to the ‘Edit’ button and choosing ‘Archive’.

Archived suggestions will disappear from the list, but they can be viewed by checking the ‘Include archived’ checkbox in the filters.

Archived suggestions will have a the mention ‘Archived’ under the title information when they are viewed.

Note
Archived suggestions will disappear from the ‘Your purchase suggestions’ section of the patron’s file on the OPAC.
Once you no longer need the purchase suggestions, you can completely delete them from the system.
To delete purchase suggestions in batch, select the suggestions you want to delete completely and click the ‘Delete’ button in the the ‘Delete selected’ box.
You can also delete a purchase suggestion by clicking the small arrow next to the ‘Edit’ button and choosing ‘Delete’.

It is also possible to delete purchase suggestions by clicking on the title of the suggestion to access the suggestion detail page and clicking the ‘Delete’ button from there.

Old purchase suggestions can be automatically deleted using the purge_suggestions.pl cronjob.
