Patron information
When viewing a patron record you have the option to view information from one of many tabs found on the left hand side of the record.
Get there: Patrons > Browse or search for patron > Click patron name
Check outFor instruction on checking items out, view the Checking out section of this manual.
Staff members can access their own check out screen by clicking their username in the top right of the staff client and choosing ‘My checkouts’

Note
Staff members can access their own account details by clicking their username in the top right of the staff client and choosing ‘My account’

All patron information will appear in the Details tab. This includes all the contact information, notes, custom patron attributes, messaging preferences, etc. entered when adding the patron.
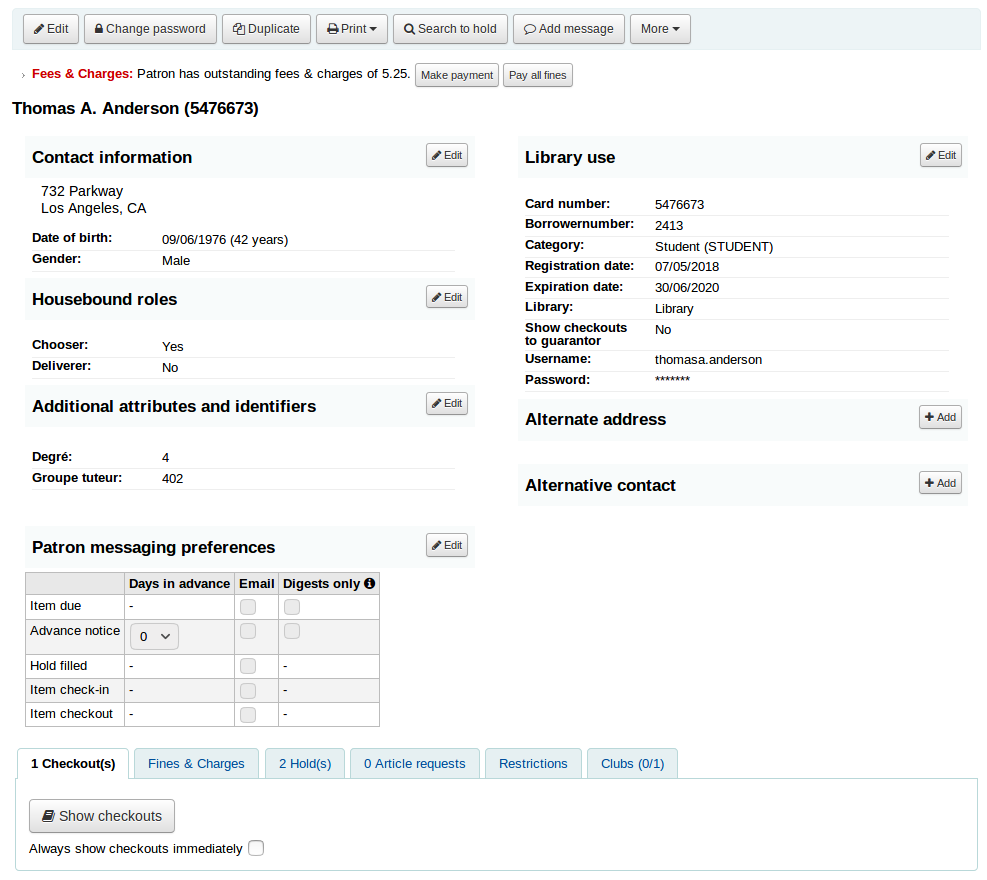
In the case of patrons who are marked as ‘Child’ or ‘Professional’ and their guarantors additional information will appear on their record.
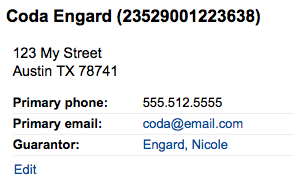
A child patron will list their guarantor
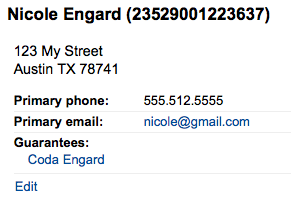
On the guarantor’s record, all children and/or professionals will be listed
If the age of the patron is outside the age range defined in their patron category a warning will appear on their record.

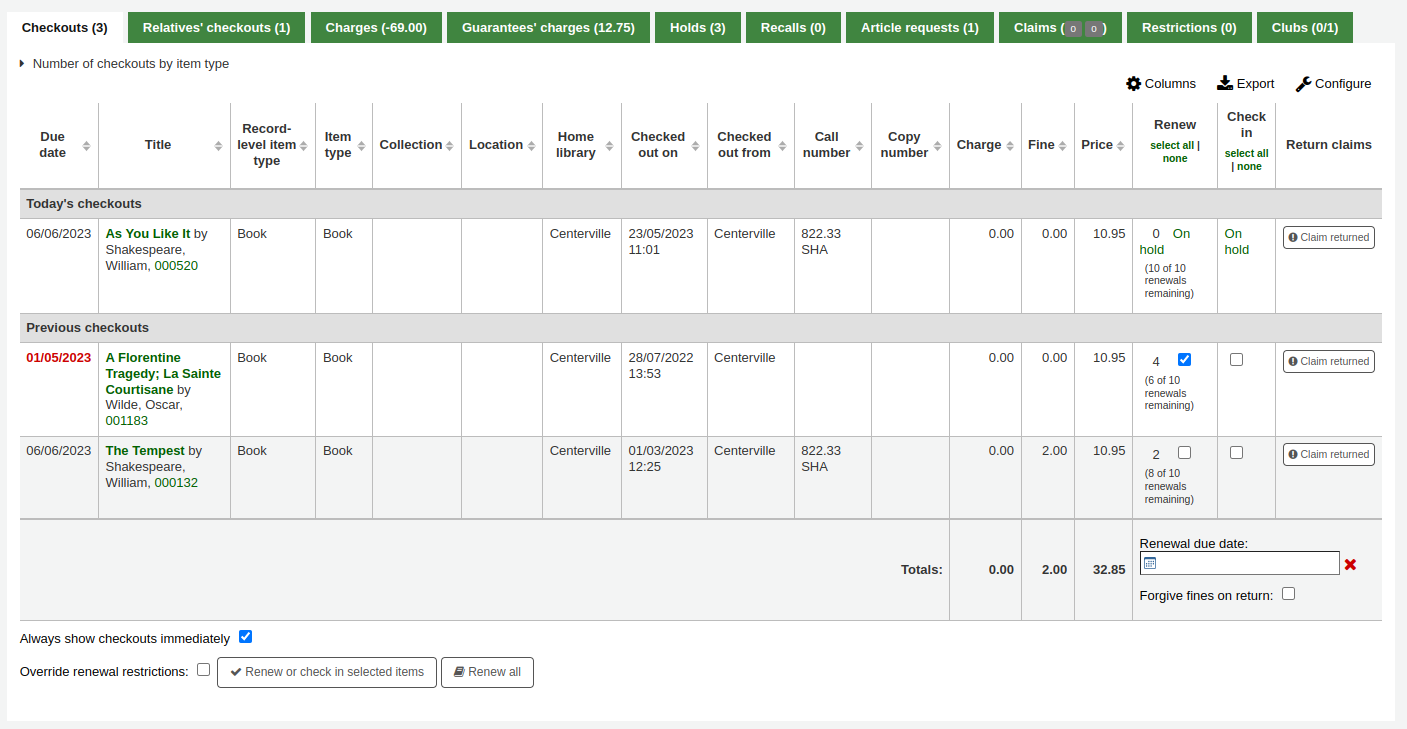
Below the patron’s information on the details screen is a tabbed display of the items they have checked out, overdue, and on hold, among other things.
CheckoutsThe first tab shows the items the patron currently has checked out. The number of current checkouts will be displayed in the tab title.
Note
You can customize the columns of this table in the ‘Table settings’ section of the Administration module (table id: issues-table, under Patrons).
Click ‘Configure’ at the top right of the table to access the administration module directly.
If the patron has family at the library, staff can see what the other family members have checked out. The total number of checkouts among all family members will be displayed in the tab title.

Note
You can customize the columns of this table in the ‘Table settings’ section of the Administration module (table id: relatives-issues-table, under Patrons).
Click ‘Configure’ at the top right of the table to access the administration module directly.
The Charges tab will only show in the patron accounts that have unpaid amounts or unused credits. The total amount of unpaid charges or unused credits will be displayed in the tab title.
The tab will show the total amount, without any details. To see the details, go to the accounting tab.

This tab will appear if the patron has guarantees and those guarantees have unpaid charges in their account. The total amount owed by guarantees will be displayed in the tab title.
The tab will show the guarantee’s name and the total unpaid amount, without any details. To see details, go to the guarantee’s accounting tab.

If the patron has holds, the number of holds will appear on this tab’s title and the details will appear in the tab.

Note
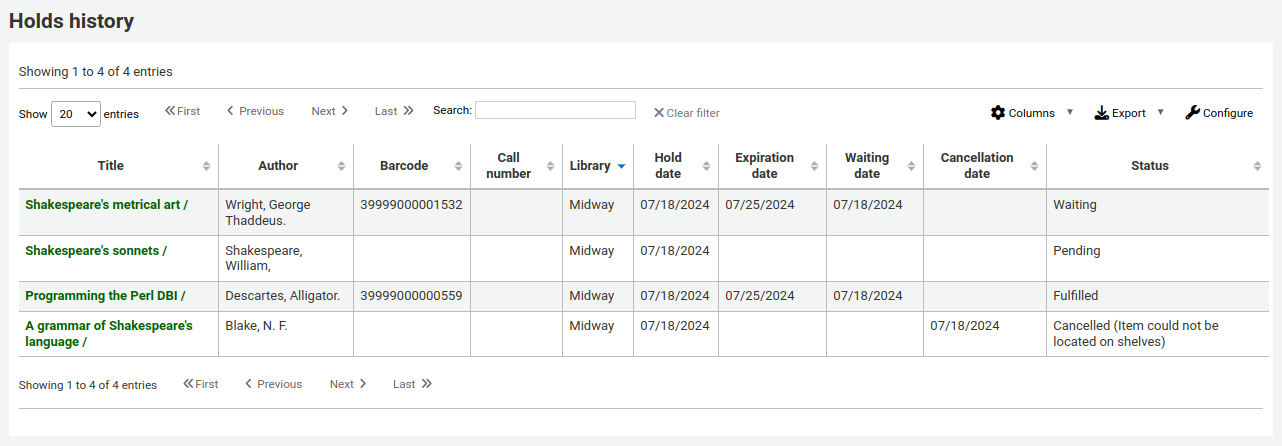
The barcode and call number will only appear on item-level holds or holds that have been confirmed. Record-level holds that are not waiting to be picked up will not have barcodes or call numbers.
From here you can manage the patron’s holds: change the pickup library, cancel or suspend holds.
Note
You will only be able to suspend holds if the SuspendHoldsIntranet system preference is set to “Allow”.
Note
If, when suspending a hold, you want to be able to set a date at which to automatically resume the hold, set the AutoResumeSuspendedHolds system preference to “Allow” and make sure the unsuspend_holds cron job is activated.
If recalls are enabled, currently active recalls requested by the patron will appear in this tab. The number of active recalls will be displayed in the tab title.

From here staff members can see the status of each recall and manage them.
Article requestsIf the ArticleRequests system preference is enabled, and the circulation rules allow it, the patrons will be able to request articles, either through the OPAC or in the staff interface. The number of active requests will be displayed in the tab title.
The details of the patron’s request, and its status, are visible in this tab.

If the patron has claimed they returned items, but those were not checked in, the claims will be shown in this tab. The number of resolved and unresolved claims will be displayed in the tab title. The first number, in green (or in gray if it’s 0), represents the number of resolved claims and the second number, in yellow (or in gray if it’s 0), represents the number of unresolved claims.

From this tab, staff can edit claim notes and resolve claims.
RestrictionsThe Restrictions tab will show for all patrons. If the patron has no restrictions you will see that on the tab.

If the patron has restrictions on their account the tab will show the number and the description.
There are at least four kinds of restrictions:Manual
Overdues
Suspension
Discharge
Using the ‘Add manual restriction’ link you can add a restriction to the patron record from here. This can be used for any type of restriction you need to put manually on a patron record.
Note
Only staff with the manage_restrictions permission (or superlibrarian) will be able to add manual restrictions or remove existing restrictions.

Type: if the PatronRestrictionTypes system preference is enabled, you will have a choice of restriction types. This list can be managed from the patron restriction types administration page
Comment: enter a comment to explain the restriction
Expiration: optionally enter an expiration date for this restriction. If there is no expiration date, the restriction will stay on the file until it is removed. If there is an expiration date, the restriction will automatically be expired and it will show in gray.
Version
Expired restrictions are marked as such as of Koha version 23.11. In prior versions, if a restriction was expired, it looked the same as an active restriction, but it stopped blocking circulation nonetheless.
Note
Expired restrictions will stay visible in the patron’s file, but will not block circulation.
You can use the cleanup_database.pl cronjob with the –restrictions flag to automatically remove expired restrictions.

The overdues restrictions are automatically set when overdue notices are sent if you specified you wanted the patron restricted in the overdue notice/status triggers tool.
This restriction will not be removed automatically when the overdue items are returned unless the AutoRemoveOverduesRestrictions system preference is set to ‘Do’.
In the circulation rules, you can choose to fine users by suspending them instead of (or in addition to) fining them money. In that case, returning an overdue document will trigger a suspension restriction.
Patrons may also be restricted if you have issued a discharge for them. Once the discharge is validated, the patron is automatically restricted.
Patrons can also be restricted by setting flags in their accounts.
Restrictions on a patron record will block checkouts. In fact, a message will appear in red when going to the checkout page.

Note
Only staff with the force_checkout permission (or superlibrarian) will be able to temporarily override a restriction in order to check out anyway.
Restrictions may also prevent renewing items if the RestrictionBlockRenewing system preference is set to ‘block’.
On the OPAC, patrons will get a message saying their account is frozen. They will not be able to place holds from the OPAC.

If you have patrons that have more than one restriction, you can choose to cumulate their restriction periods or not through the CumulativeRestrictionPeriods system preference.
Note
If you want to restrict patrons from doing various actions if their record is not pristine, check the following system preferences:
Set the OverduesBlockCirc system preference to ‘Block’ to prevent patrons who have overdue materials from checking out other materials.
Set the OverduesBlockRenewing system preference to ‘block renewing for all the patron’s items’ or ‘block renewing only for this item’ to prevent patrons who have overdue materials from renewing their loans.
Enter values in the noissuescharge and NoIssuesChargeGuarantees system preferences in order to block checking out to patrons who have more than a certain amount in fines or to patrons whose guarantees owe more than a certain amount.
Enter a value in the maxoutstanding system preference to prevent patron from placing holds on the OPAC if they owe more than a certain amount.
Enter a value in the OPACFineNoRenewals system preference to prevent patron who owe more than a certain amount to renew their loans from the OPAC.
Set the BlockExpiredPatronOpacActions system preference to ‘Block’ if you want to prevent patron whose membership has expired to place hold or renew their loans from the OPAC.
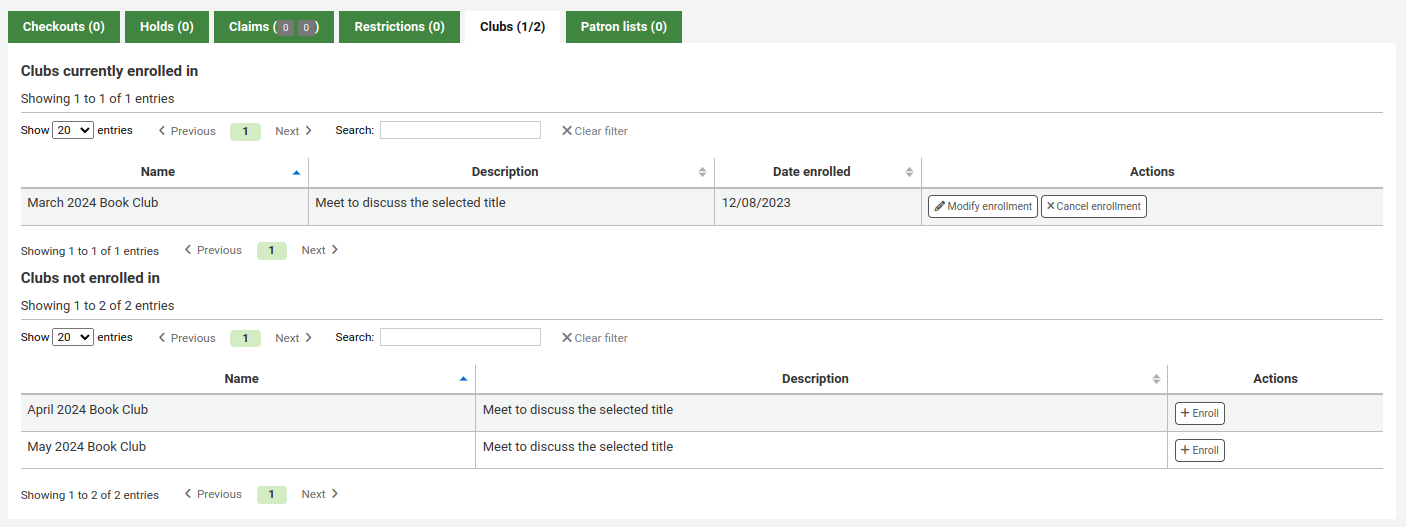
If you use patron clubs, patrons will have a tab in their record indicating which club they are enrolled in, if any. The first number in the tab title is the number of clubs in which the patron is enrolled, and the second number is the number of clubs the patron is not enrolled in.
Version
This tab was added to Koha in version 23.11.
If the patron is in one or more patron lists, the list or lists they are in will be shown in this tab.

At the bottom of the tab, there is a dropdown menu to add the patron to another list. Choose the list from the dropdown menu, and click the ‘+’ button to add them to the list.
Note that this dropdown menu only shows lists which don’t already have this patron. If the patron is in all the lists, this option is not visible.
Note
Only staff with the manage_patron_lists permission (or the superlibrarian permission) will be able to add the patron to a list.
Note
Staff members must have the updatecharges permission or at least have the remaining_permissions permission under updatecharges (or the superlibrarian permission) in order to have access to this tab.
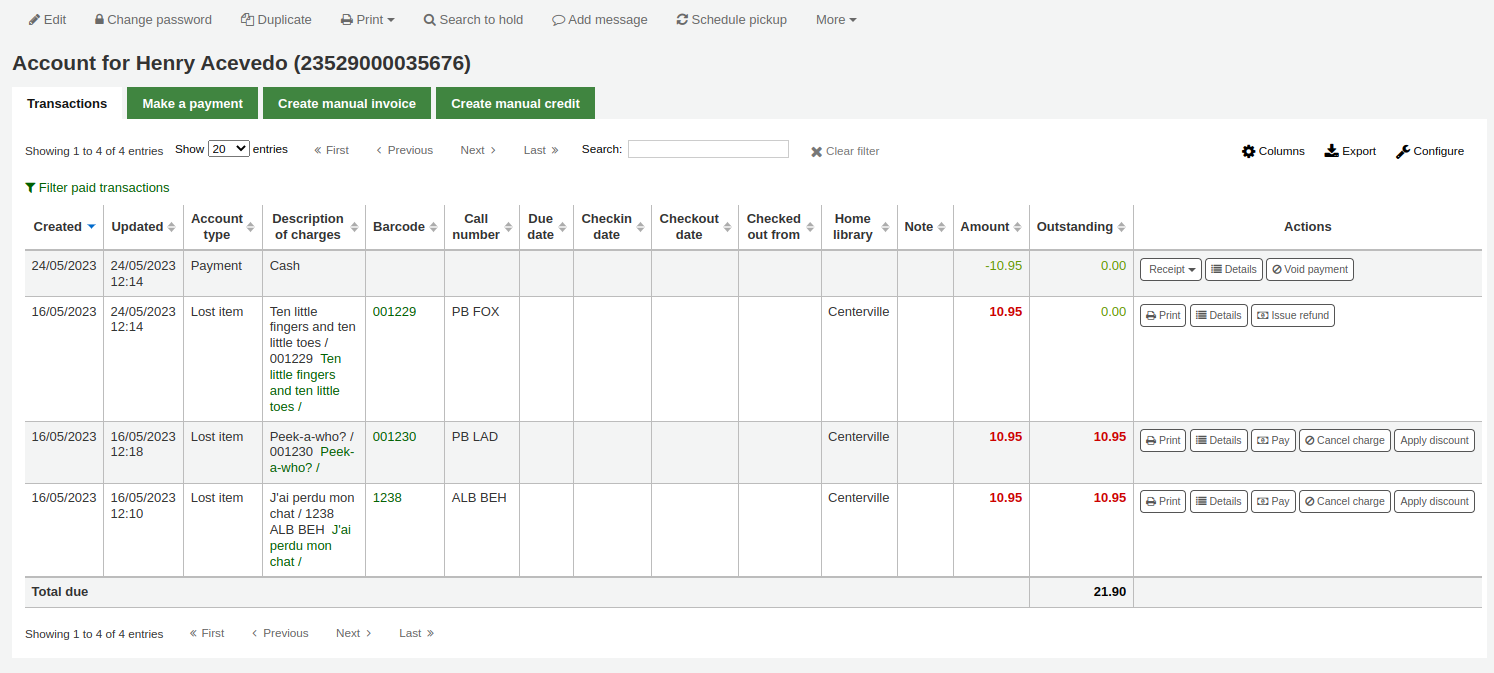
The patron’s complete accounting history will appear on the Accounting tab. The Accounting tab will show all types of charges and credits: overdue fines, membership fees, rental fees, hold fees and any other charge you may have for patrons.
Note
You can customize the columns of this table in the ‘Table settings’ section of the Administration module (table id: account-fines).
Note
It’s possible to print a summary of outstanding charges and unused credits in the patron’s account by clicking ‘Print’ at the top of the page and choosing the ‘Print account balance’.

‘Print summary’ will print a full summary of the patron’s account, including outstanding charges.
The Transactions tab will show you the following columns:
Date: the date the charge, payment or credit was posted
In the case of fines this will be the last day that the fine was accrued
Account type: what type of charge, payment or credit it is
In cases where an account type may have an accompanying status it will be displayed alongside the account type in brackets.
Description of charges: a description of the charges including the due date for overdue items and a link to the item record where one is available
Note
For overdue fines, the default is the title and the due date. You can customize this by editing the OVERDUE_FINE_DESC template in the Notices and slips tool.
Barcode: if the charge is linked to a particular item, the barcode is displayed
Call number: if the charge is linked to a particular item, the item’s call number is displayed
Due date: if the charge is an overdue fine, the due date is displayed
Checkin date: if the charge is an overdue fine, the checkin date is displayed
Checkout date: if the charge is an overdue fine, the check out date is displayed
Home library: if the charge is linked to a particular item the home library is displayed
Note: any notes about this charge/payment
If you’re allowing patrons to pay fines via the OPAC with PayPal (EnablePayPalOpacPayments) you will see a Note that says ‘PayPal’ for items paid this way
Amount: the total amount of the payment or charge
Outstanding: the amount still due on charge
Actions:
A selection of actions available to take upon the account line as detailed below
At the top of the table you can click the ‘Filter paid transaction’ to hide all completed transaction and above that you can use the search box to find a specific charge or payment.
ActionsAction buttons will be available for the different account lines depending on the user’s permissions and the account type and status.
A button to print or email a receipt or invoice for that line item
Note
If the line item is a credit (payment, writeoff or other credit), the receipt that will be printed will be the ACCOUNT_CREDIT notice. It can be customized in the Notices and slips tool.
If the line item is a debit (a charge), the invoice that will be printed will be the ACCOUNT_DEBIT notice. It can be customized in the Notices and slips tool.
A button to show further details about the charge and any payments that have been made
A button to void (reverse) a payment/credit
This button will only appear on a payment/credit line. Upon voiding the line it will reverse the payment process restoring the amountoutstanding for any debts/debits which the payment/credit may have previously been used to offset. This action is most commonly used to correct cases where a payment was recorded but never actually received. The credit line will be set to a zero amount and updated to VOID.
A button to cancel (remove) a charge/debit
This button will only appear on a charge/debit line that has not already had any payment/credits applied to it. Upon cancelling the line it will be marked as ‘Cancelled’ and a CANCELLATION line will be added and offset against it. This action is most commonly used to correct cases where a charge was made mistakenly.
A button to pay against charges/debits with outstanding amounts
This button will appear against any charge/debit with an outstanding amount. The subsequent page can be used to pay or writeoff the line partially or in full with a PAYMENT or WRITEOFF line will being added.
A button to issue a payout of credit
This button will appear against any credit line that has an amount outstanding and you have the payout permission. It allows the librarian to return outstanding credit to the patron and record the action with a PAYOUT line.
A button to issue a refund against a charge/debit
This button will appear against any charge/debit line that has been paid or partially paid and you have the refund permission. The subsequent modal dialogue will allow you to partially or fully refund the offset debt, either in CASH or by means of a credit added to the account.
A button to apply a discount to a charge/debit
This button will appear against any charge/debit which has not already been offset by a credit/payment and you have the discount permission. The subsequent modal dialogue will allow you to add a discount upon the charge.
Charging fines/feesMost fees and fines will be charged automatically if the fines cron job is running. Fines will also be charged when an overdue item is checked in if the CalculateFinesOnReturn system preference is enabled.
Fines will be charged based on your circulation and fines rules
Hold fees will be charged based on the rules you set in the Patron types and categories administration area
Rental fees will be charged based on the settings in your Item iypes administration area
Marking an item ‘Lost’ via the cataloging module will automatically charge the patron the replacement cost for that item
Creating a patron in a category with an enrollment fee.
Renewing a patron account in a category with an enrollment fee.
Article request fees will be charged based on the article request fees section of the circulation rules page.
Creating manual invoicesFor fees that are not automatically charged, staff can create a manual invoice.
Note
Staff members must have the manual_invoice permission (or the superlibrarian permission) in order to add manual invoices in a patron’s account.
Click on the ‘Create manual invoice’ tab
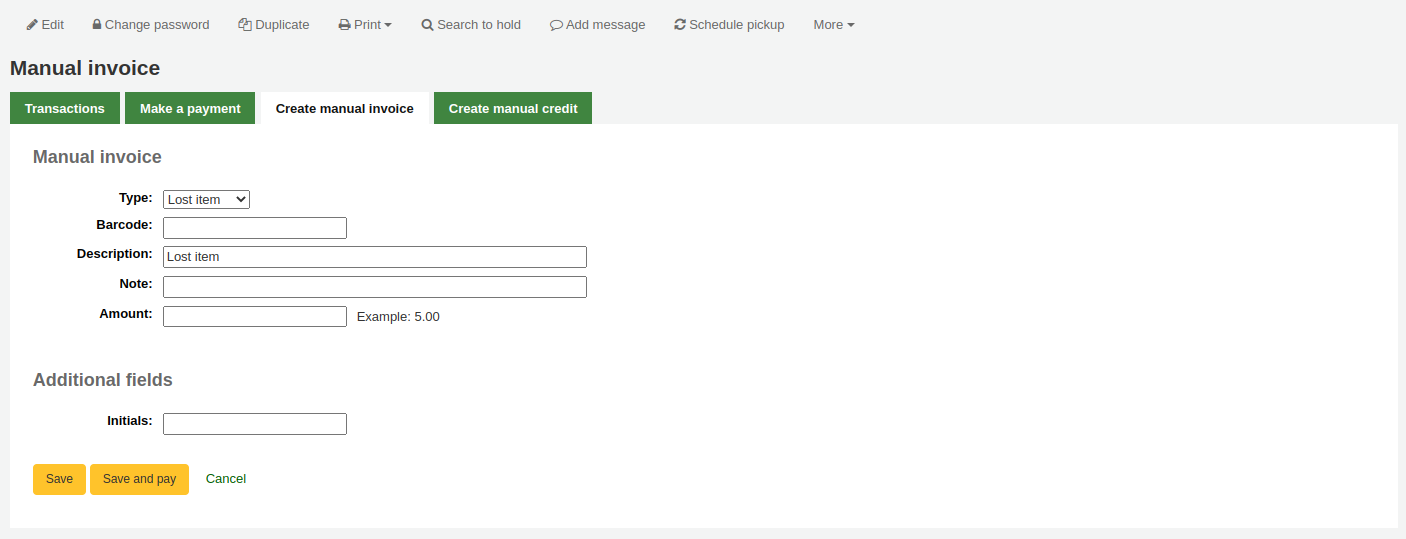
Type: choose the type of invoice to create.
Note
To add additional values to the manual invoice type pull down menu, add them to the debit types in the Administration module.
Barcode: if the fee is associated with an item you can enter its barcode so that the line item shows a link to that item.
Description: enter the description of the charge.
Note: if needed, add a note about this charge.
Cost: if the type is a custom debit type, there will be a ‘Cost’ field where you can enter the cost of the item. This is mainly for physical items being sold to the patron, such as used books or reusable bags, for example.
Version
This field was added to Koha in version 23.11.
Quantity: if the type is a custom debit type, there will be a ‘Quantity’ field where you can enter quantity of items being charged. This is mainly for physical items being sold to the patron, such as used books or reusable bags, for example.
Version
This field was added to Koha in version 23.11.
Amount: enter the amount of the charge, do not enter currency symbols, only numbers and decimals.
Note
If the type is a custom debit type, and you entered a cost and quantity, the amount will be automatically calculated.
If any additional fields were set up for account line debits, they will appear here.
Click ‘Save’ to charge the amount to the patron’s account, or
Click ‘Save and pay’ to charge the amount to the patron’s account and go directly to the payment page.
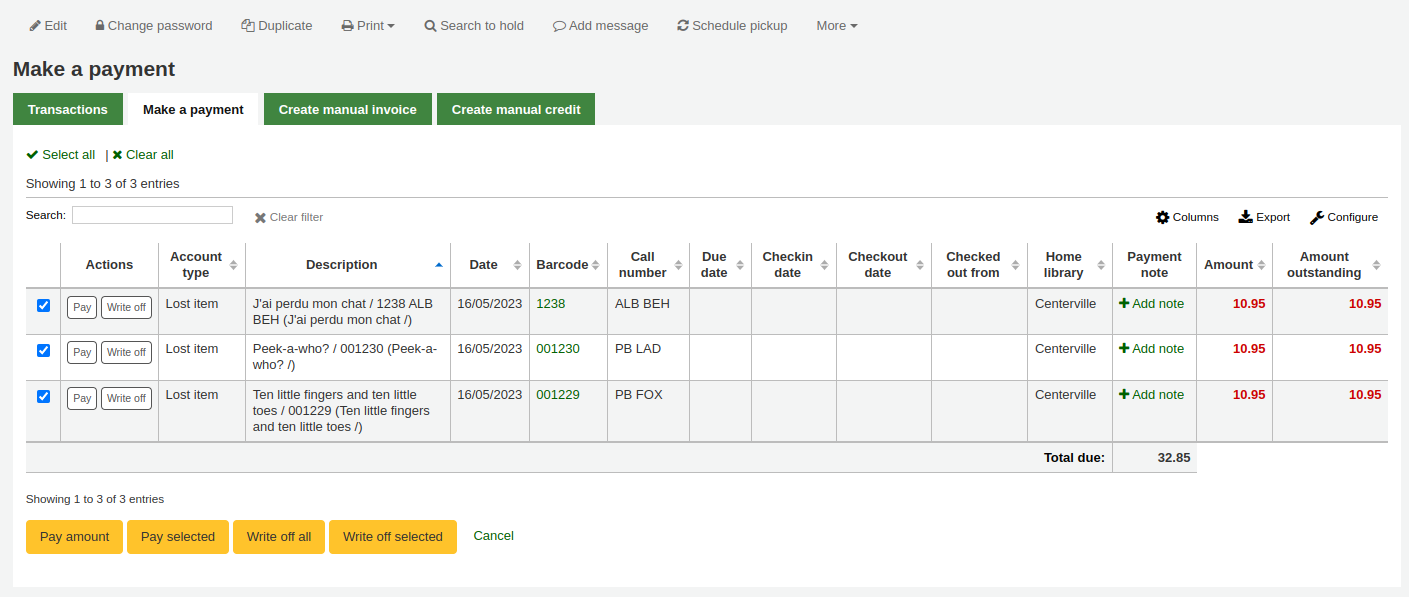
Paying and writing off chargesEach account line can be paid in full or written off using the ‘Make a payment’ tab.
Note
You can customize the columns of this table in the ‘Table settings’ section of the Administration module (table id: pay-fines-table).
Each account line can be paid in full, partially paid, or written off.
Paying an individual charge in fullTo pay an individual charge in full:
If you need to add a note about the payment, click ‘Add note’ and type in the note before proceeding.
Click the ‘Pay’ button next to the charge to be paid in full.

A table will show the details of the charge being paid, the full amount of the charge will be populated for you in the ‘Amount being paid’ and the ‘Amount tendered’ fields.
Note
If you made a mistake and this charge should be written off instead, you can switch between ‘Pay’ and ‘Write off’ mode using the buttons located at the top of this tab. See Writing off an individual charge below.
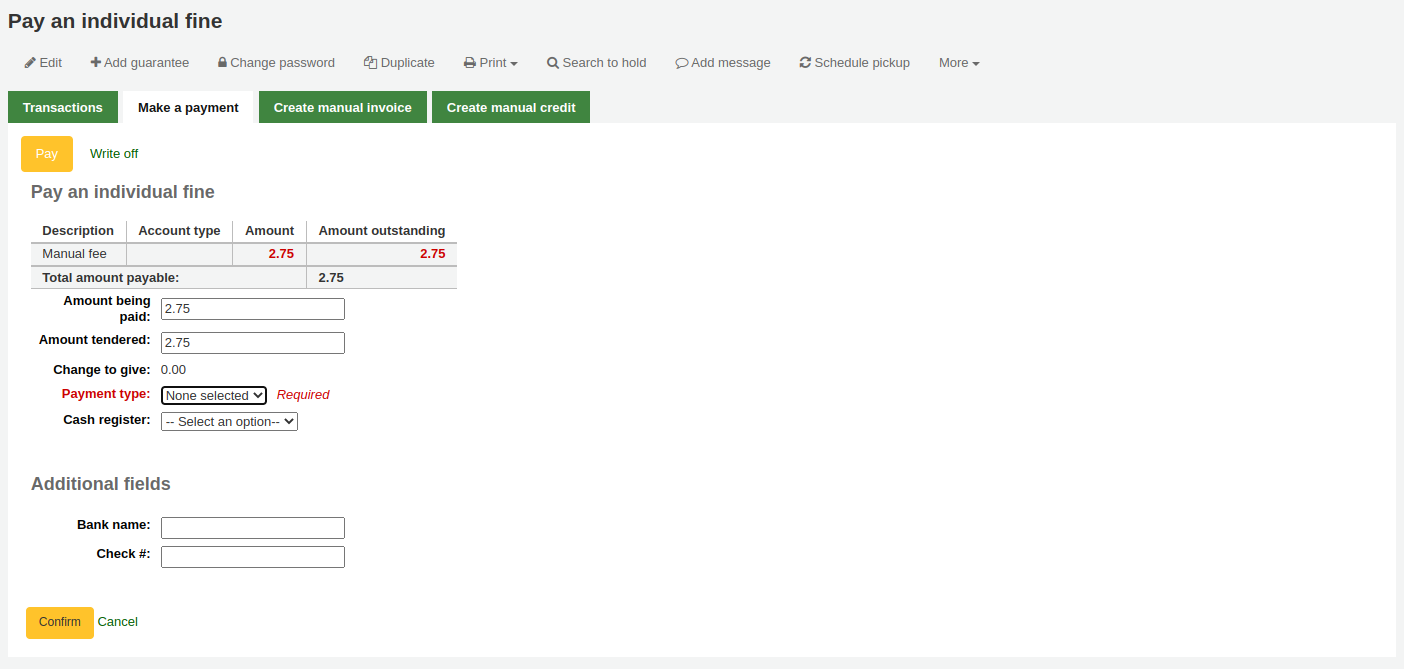
Amount being paid: this is the amount that will be debited from the charge. When paying a charge in full, this should be the full amount.
Amount tendered: this is the actual amount handed to you by the patron, it will be used to calculate the change. For example, if a patron has a 2.75$ fine to pay, and they pay with a 5$ bill, enter 5 in ‘Amount tendered’.
Change to give: if the amount being paid and the amount tendered are different (i.e. more money was collected) the amount of change to be given will be displayed.
Payment type: choose the type of payment.
Note
This field will only appear if one or more values are defined in the PAYMENT_TYPE authorized value category.
Note
This field will be required if either the UseCashRegisters system preference or the RequirePaymentType system preference is enabled.
Cash register: if the UseCashRegisters system preference is enabled, you will have a choice of cash register in which to enter the transaction.
Note
If the UseCashRegisters system preference is enabled, and the CASH payment type is chosen above, you will be required to choose a cash register for the payment.
Whether or not this field is required when another payment type is chosen is determined by the RequireCashRegister system preference.
If any additional fields were set up for account line credits, they will appear here.
Click ‘Confirm’.
If change was to be given back to the patron, a pop-up window will appear to remind you, click ‘Yes’ to confirm that you gave back the correct amount and confirm the payment.
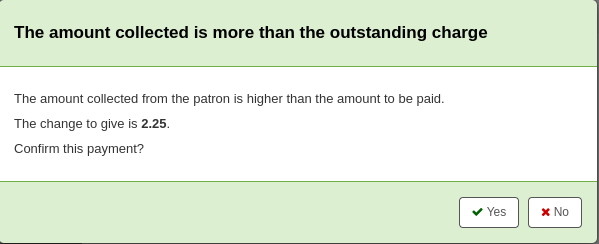
The charge’s outstanding amount will be set to zero (fully paid), and a payment line will be added in the patron’s transactions.
Note
If the FinePaymentAutoPopup system preference is enabled, a print dialogue window will display. The receipt printed uses the letter ACCOUNT_CREDIT, which can be modified in the Notices and slips tool. If change was given for this transaction the details will be included when using this system preference.
In addition to printing receipts you can enable email receipts for payment and writeoff transactions with the UseEmailReceipts system preference. The email sent uses the ACCOUNT_PAYMENT letter, which can be modified in the Notices and slips tool.
To partially pay an individual charge:
Click the ‘Pay’ button next to the charge to be partially paid.

A table will show the details of the charge being paid, the full amount of the charge will be populated for you in the ‘Amount being paid’ and the ‘Amount tendered’ fields.
Note
If you made a mistake and this charge should be written off instead, you can switch between ‘Pay’ and ‘Write off’ mode using the buttons located at the top of this tab. See Partially writing off an individual charge below.

Amount being paid: this is the amount that will be debited from the charge. When partially paying a charge, enter the amount that should be paid.
Amount tendered: this is the actual amount handed to you by the patron, it will be used to calculate the change. For example, if a patron has a 2.75$ fine to pay, and they pay with a 5$ bill, enter 5 in ‘Amount tendered’.
Change to give: if the amount being paid and the amount tendered are different (i.e. more money was collected) the amount of change to be given will be displayed.
Payment type: choose the type of payment.
Note
This field will only appear if one or more values are defined in the PAYMENT_TYPE authorized value category.
Note
This field will be required if either the UseCashRegisters system preference or the RequirePaymentType system preference is enabled.
Cash register: if the UseCashRegisters system preference is enabled, you will have a choice of cash register in which to enter the transaction.
Note
If the UseCashRegisters system preference is enabled, and the CASH payment type is chosen above, you will be required to choose a cash register for the payment.
Whether or not this field is required when another payment type is chosen is determined by the RequireCashRegister system preference.
If any additional fields were set up for account line credits, they will appear here.
Click ‘Confirm’.
If change was to be given back to the patron, a pop-up window will appear to remind you, click ‘Yes’ to confirm that you gave back the correct amount and confirm the payment.

The charge will be updated to show the original amount and the current amount outstanding, and a payment line will be added in the patron’s transactions.
Note
If the FinePaymentAutoPopup system preference is enabled, a print dialogue window will display. The receipt printed uses the letter ACCOUNT_CREDIT, which can be modified in the Notices and slips tool. If change was given for this transaction the details will be included when using this system preference.
In addition to printing receipts you can enable email receipts for payment and writeoff transactions with the UseEmailReceipts system preference. The email sent uses the ACCOUNT_PAYMENT letter, which can be modified in the Notices and slips tool.
To pay an amount towards all charges:
Click the ‘Pay amount’ button.

The total amount outstanding in the patron’s account will be displayed, and populated for you in the ‘Amount being paid’ and the ‘Amount tendered’ fields.
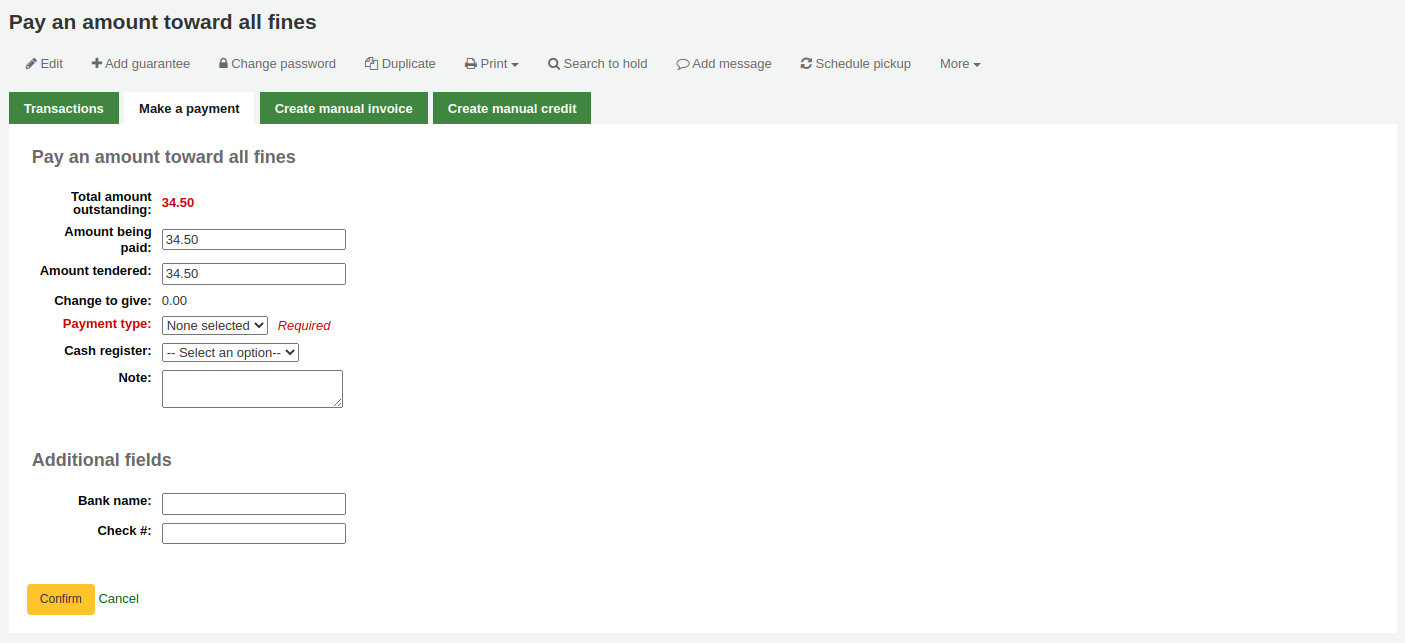
Total amount outstanding: this is the total unpaid charges in the patron’s account.
Amount being paid: this is the amount that will be debited from the outstanding amount. Enter the amount that will be paid.
Amount tendered: this is the actual amount handed to you by the patron, it will be used to calculate the change. For example, if a patron has a 2.75$ fine to pay, and they pay with a 5$ bill, enter 5 in ‘Amount tendered’.
Change to give: if the amount being paid and the amount tendered are different (i.e. more money was collected) the amount of change to be given will be displayed.
Payment type: choose the type of payment.
Note
This field will only appear if one or more values are defined in the PAYMENT_TYPE authorized value category.
Note
This field will be required if either the UseCashRegisters system preference or the RequirePaymentType system preference is enabled.
Cash register: if the UseCashRegisters system preference is enabled, you will have a choice of cash register in which to enter the transaction.
Note
If the UseCashRegisters system preference is enabled, and the CASH payment type is chosen above, you will be required to choose a cash register for the payment.
Whether or not this field is required when another payment type is chosen is determined by the RequireCashRegister system preference.
Note: if needed, add a note about this payment.
If any additional fields were set up for account line credits, they will appear here.
Click ‘Confirm’.
If change was to be given back to the patron, a pop-up window will appear to remind you, click ‘Yes’ to confirm that you gave back the correct amount and confirm the payment.

The charges’ outstanding amounts will be updated, with the payment applied to oldest charges first, and a payment line will be added in the patron’s transactions.
Note
If the FinePaymentAutoPopup system preference is enabled, a print dialogue window will display. The receipt printed uses the letter ACCOUNT_CREDIT, which can be modified in the Notices and slips tool. If change was given for this transaction the details will be included when using this system preference.
In addition to printing receipts you can enable email receipts for payment and writeoff transactions with the UseEmailReceipts system preference. The email sent uses the ACCOUNT_PAYMENT letter, which can be modified in the Notices and slips tool.
To pay only some charges:
Check the selection boxes next to the charges to be paid.
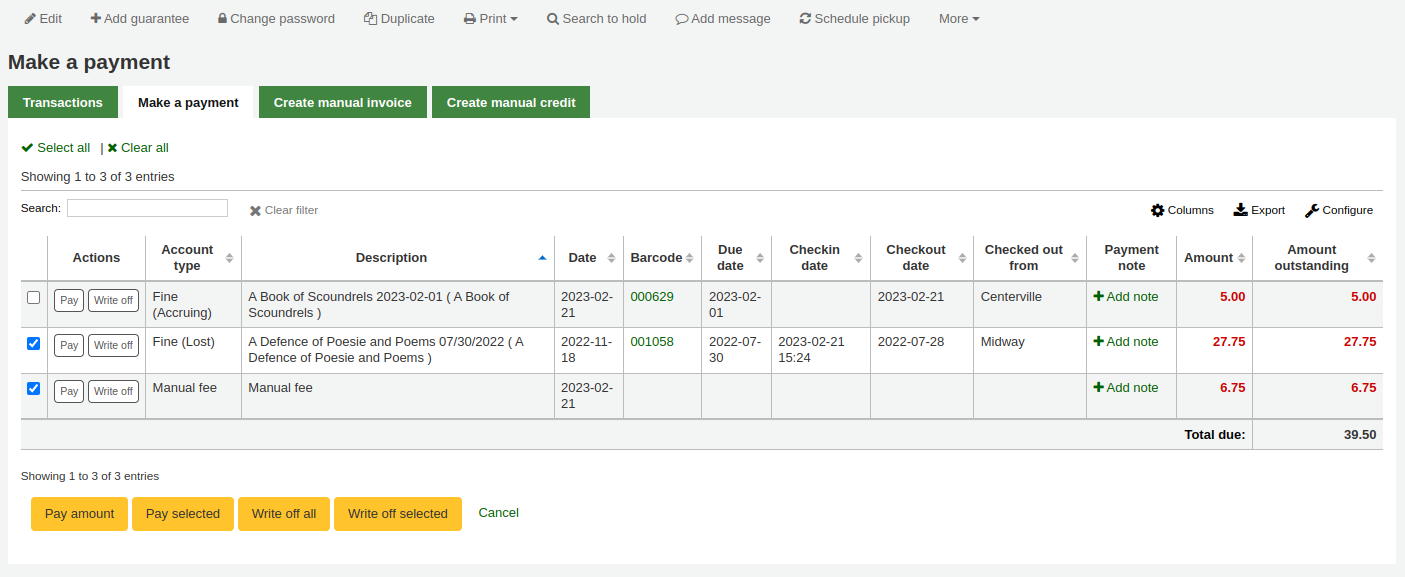
Click the ‘Pay selected’ button.
The total outstanding amount for the selected charges will be displayed, and populated for you in the ‘Amount being paid’ and the ‘Amount tendered’ fields.
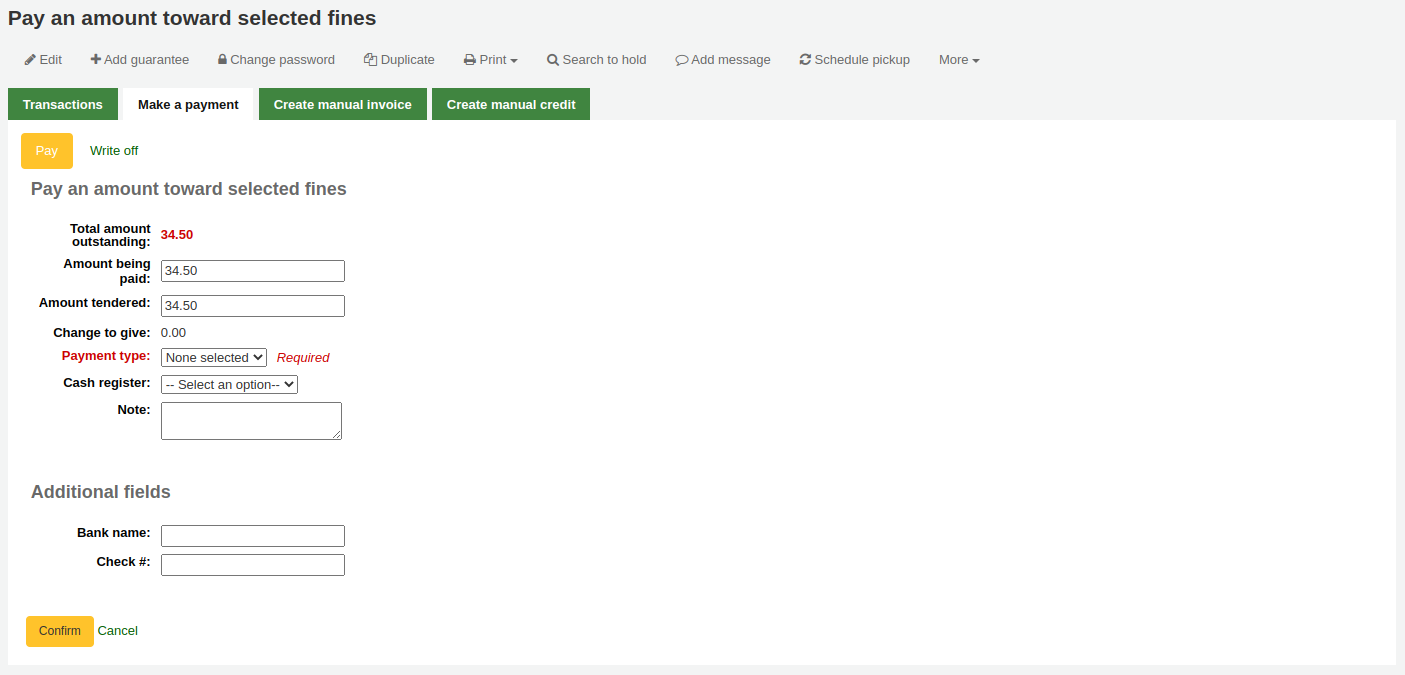
Total amount outstanding: this is the total unpaid amount for the selected charges.
Amount being paid: this is the amount that will be debited from the total outstanding amount of the selected charges. Enter the amount that will be paid.
Amount tendered: this is the actual amount handed to you by the patron, it will be used to calculate the change. For example, if a patron has a 2.75$ fine to pay, and they pay with a 5$ bill, enter 5 in ‘Amount tendered’.
Change to give: if the amount being paid and the amount tendered are different (i.e. more money was collected) the amount of change to be given will be displayed.
Payment type: choose the type of payment.
Note
This field will only appear if one or more values are defined in the PAYMENT_TYPE authorized value category.
Note
This field will be required if either the UseCashRegisters system preference or the RequirePaymentType system preference is enabled.
Cash register: if the UseCashRegisters system preference is enabled, you will have a choice of cash register in which to enter the transaction.
Note
If the UseCashRegisters system preference is enabled, and the CASH payment type is chosen above, you will be required to choose a cash register for the payment.
Whether or not this field is required when another payment type is chosen is determined by the RequireCashRegister system preference.
Note: if needed, add a note about this payment.
If any additional fields were set up for account line credits, they will appear here.
Click ‘Confirm’.
If change was to be given back to the patron, a pop-up window will appear to remind you, click ‘Yes’ to confirm that you gave back the correct amount and confirm the payment.

The selected charges’ outstanding amounts will be updated, with the payment applied to oldest charges first, and a payment line will be added in the patron’s transactions.
Note
If the FinePaymentAutoPopup system preference is enabled, a print dialogue window will display. The receipt printed uses the letter ACCOUNT_CREDIT, which can be modified in the Notices and slips tool. If change was given for this transaction the details will be included when using this system preference.
In addition to printing receipts you can enable email receipts for payment and writeoff transactions with the UseEmailReceipts system preference. The email sent uses the ACCOUNT_PAYMENT letter, which can be modified in the Notices and slips tool.
Note
Staff members must have the writeoff permission (or the superlibrarian permission) in order to be able to write off charges.
To write off all charges in a patron’s account:
Click the ‘Write off all’ button

Confirm the writeoff
All charges’ outstanding amounts will be set to zero (fully paid/written off), and a writeoff line will be added in the patron’s transactions.
Writing off an individual chargeNote
Staff members must have the writeoff permission (or the superlibrarian permission) in order to be able to write off charges.
To write off a single charge:
If you need to add a note about the writeoff, click ‘Add note’ and type in the note before proceeding
Click the ‘Write off’ button next to the charge to be written off

A table will show the details of the charge being written off, the full amount of the charge will be populated for you in the ‘Writeoff amount’ field.
Note
If you made a mistake and this charge should be paid instead, you can switch between ‘Pay’ and ‘Write off’ mode using the buttons located at the top of this tab. See Paying an individual charge in full above.
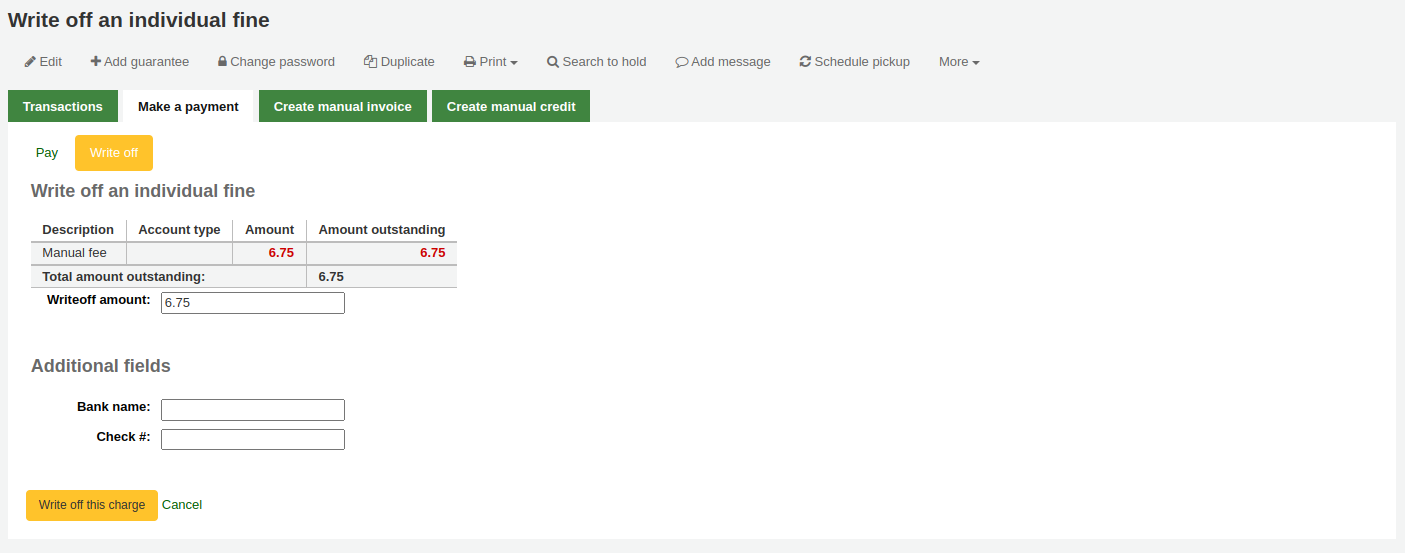
Writeoff amount: this is the amount that will be debited from the charge. When writing off a charge completely, this should be the full amount.
If any additional fields were set up for account line credits, they will appear here.
Click ‘Write off this charge’
The charge’s outstanding amount will be set to zero (fully paid/written off), and a writeoff line will be added in the patron’s transactions.
Note
If the FinePaymentAutoPopup system preference is enabled, a print dialogue window will display. The receipt printed uses the letter ACCOUNT_CREDIT, which can be modified in the Notices and slips tool. If change was given for this transaction the details will be included when using this system preference.
In addition to printing receipts you can enable email receipts for payment and writeoff transactions with the UseEmailReceipts system preference. The email sent uses the ACCOUNT_WRITEOFF letter, which can be modified in the Notices and slips tool.
Note
Staff members must have the writeoff permission (or the superlibrarian permission) in order to be able to write off charges.
To partially write off a single charge:
If you need to add a note about the writeoff, click ‘Add note’ and type in the note before proceeding
Click the ‘Write off’ button next to the charge to be written off

A table will show the details of the charge being written off, the full amount of the charge will be populated for you in the ‘Writeoff amount’ field.
Note
If you made a mistake and this charge should be paid instead, you can switch between ‘Pay’ and ‘Write off’ mode using the buttons located at the top of this tab. See Partially paying an individual charge above.

Writeoff amount: this is the amount that will be debited from the charge. When partially writing off a charge, enter the amount to be written off.
If any additional fields were set up for account line credits, they will appear here.
Click ‘Write off this charge’
The charge will be updated to show the original amount and the current amount outstanding, and a writeoff line will be added in the patron’s transactions.
Note
If the FinePaymentAutoPopup system preference is enabled, a print dialogue window will display. The receipt printed uses the letter ACCOUNT_CREDIT, which can be modified in the Notices and slips tool. If change was given for this transaction the details will be included when using this system preference.
In addition to printing receipts you can enable email receipts for payment and writeoff transactions with the UseEmailReceipts system preference. The email sent uses the ACCOUNT_WRITEOFF letter, which can be modified in the Notices and slips tool.
Note
Staff members must have the writeoff permission (or the superlibrarian permission) in order to be able to write off charges.
To write off only some charges:
If you need to add a note about the writeoff, click ‘Add note’ and type in the note before proceeding
Check the selection boxes next to the fines to be written off

Click the ‘Writeoff selected’ button
The total outstanding amount for the selected charges will be displayed, and populated for you in the ‘Writeoff amount’ field.
Note
If you made a mistake and this charge should be paid instead, you can switch between ‘Pay’ and ‘Write off’ mode using the buttons located at the top of this tab. See Paying selected charges above.
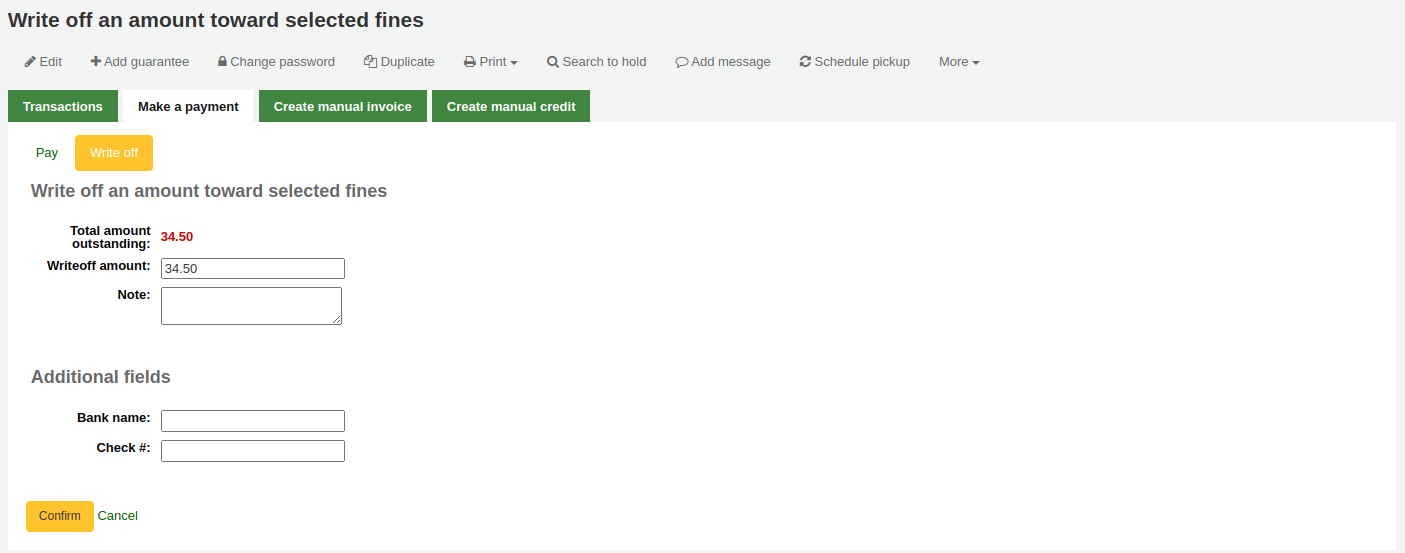
Writeoff amount: this is the amount that will be debited from the charge. When writing off the charges completely, this should be the full amount.
Note: if needed, enter a note about this writeoff.
If any additional fields were set up for account line credits, they will appear here.
Click ‘Confirm’
The selected charges’ outstanding amounts will be updated, with the writeoff applied to oldest charges first, and a writeoff line will be added in the patron’s transactions.
Note
If the FinePaymentAutoPopup system preference is enabled, a print dialogue window will display. The receipt printed uses the letter ACCOUNT_CREDIT, which can be modified in the Notices and slips tool. If change was given for this transaction the details will be included when using this system preference.
In addition to printing receipts you can enable email receipts for payment and writeoff transactions with the UseEmailReceipts system preference. The email sent uses the ACCOUNT_WRITEOFF letter, which can be modified in the Notices and slips tool.
If a user was charged for something and it’s an error, you can cancel the fee by clicking the ‘Cancel charge’ button in the Actions column.

Once clicked a new line will be added to the account for a ‘Cancelled charge’ of the same amount as the cancelled charge. The charge that was cancelled will now have the ‘Cancelled’ status and the amount outstanding will be 0.

If you cancelled a charge by mistake, you can void the cancellation (see Void payments below).
Void paymentsIf you accidentally mark and item as paid, you can reverse that line item by clicking ‘Void’ to the right of the line

Once clicked a new line item will be added to the account showing the payment as ‘Voided’. The payment line is added back to the Pay fines tab as an outstanding charge.

Manual credits can be used to pay off parts of fines, or to forgive a fine amount.
Note
Staff members must have the manual_credit permission (or the superlibrarian permission) in order to add manual credits to a patron’s account.
Click ‘Create manual credit’.
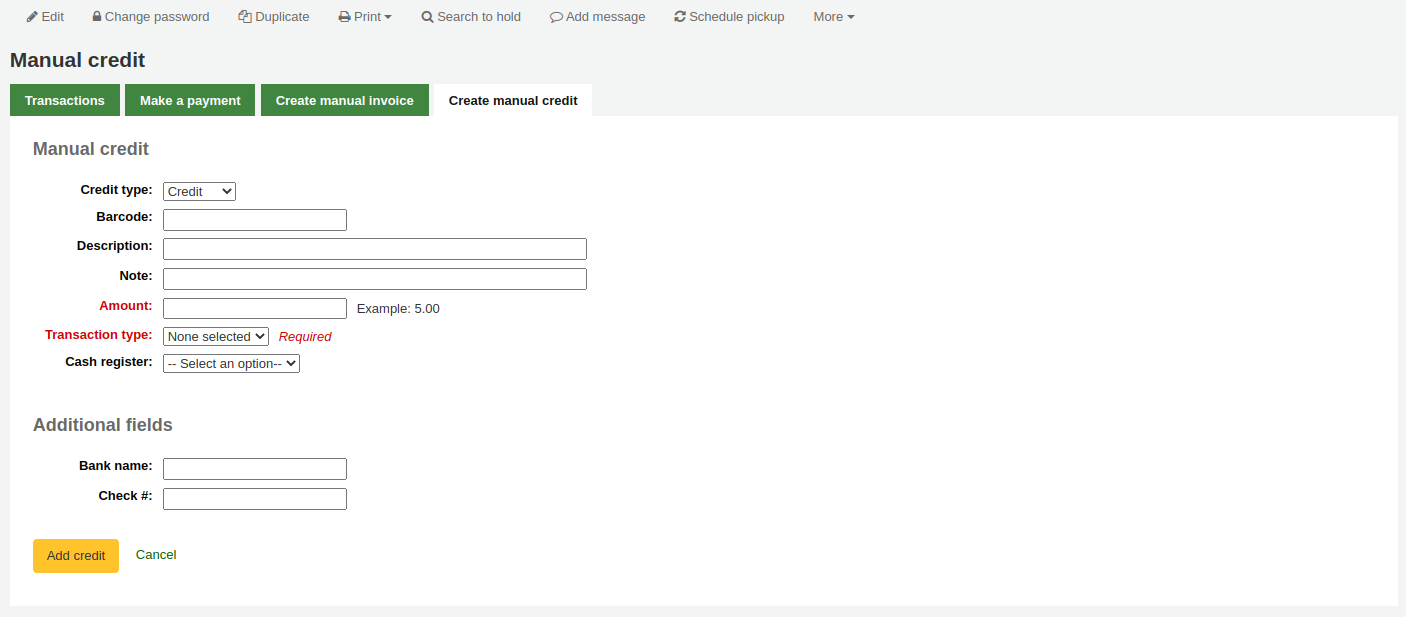
Type: choose the type of credit to apply.
Note
To add additional values to the manual credit type drop-down menu, add them to the credit types in the Administration module.
Barcode: if this credit is associated with an item you can enter that item’s barcode so that the line item links to the right item.
Description: enter the description of the credit.
Note: if needed, add a note about this credit.
Amount: enter the credit’s amount, do not enter currency symbols, only numbers and decimals.
Transaction type: choose the type of credit.
Note
This field will only appear if one or more values are defined in the PAYMENT_TYPE authorized value category.
Note
This field will be required if either the UseCashRegisters system preference or the RequirePaymentType system preference is enabled.
Cash register: if the UseCashRegisters system preference is enabled, you will have a choice of cash register in which to enter the transaction.
Note
If the UseCashRegisters system preference is enabled, and the CASH transaction type is chosen above, you will be required to choose a cash register for the payment.
Whether or not this field is required when another transaction type is chosen is determined by the RequireCashRegister system preference.
If any additional fields were set up for account line credits, they will appear here.
Click ‘Add credit’.
This will add a credit line to the patron’s account.
Note
If the AccountAutoReconcile system preference is set to ‘Do’, the credit will automatically be used to reduce the outstanding amounts in the patron’s account, starting with the oldest charges.
Note
If the AutoCreditNumber system preference is enabled, credits will be numbered.
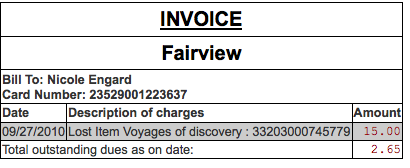
To the right of each account line there is a print link. Clicking that link will print an invoice for the line item that includes the date and description of the line item along with the total outstanding on the account.
A list of all of the serial routing lists the patron belongs to will be accessible via the ‘Routing lists’ tab on the patron record.
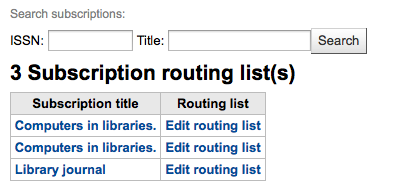
On this tab you will be able to see and edit all of the routing lists that this patron is on.
The circulation history tab will appear if you have set the intranetreadinghistory preference to allow it to appear. If you have the OPACPrivacy system preference set to ‘Allow’ and the patron has decided that the library cannot keep this information this tab will only show currently checked out items.

Note
You can customize the columns of this table in the ‘Table settings’ section of the Administration module (table id: checkouthistory-table).
To see when an item was renewed and by whom, click ‘View’ in the Number of renewals column.

If you would like to export a list of barcodes for the items checked in today you can find that option under the More menu on the top right of the page.

This will generate a text file with one barcode per line.
Note
If the RecordStaffUserOnCheckout system preference is enabled, the account of the staff member who checked out the item to the patron will also be displayed here.
The holds history tab will appear if the IntranetReadingHistoryHolds system preference is set to ‘Allow’. It shows all the holds the patron has made, with their status.
Note
You can customize the columns of this table in the ‘Table settings’ section of the Administration module (table id: holdshistory-table).
Note
If the OPACPrivacy system preference is set to ‘Allow’ and the patron has decided to never keep their history, this tab will only show current holds.
Note
Only staff with the view_system_logs permission (or the superlibrarian permission) will have access to this tool.
If you have set your BorrowersLog to track changes to patron records, then this tab will appear. The Modification log will show when changes were made to the patron record. If you also have turned on the IssueLog and ReturnLog you will see checkins and outs on this screen as well.

The Librarian field shows the patron number for the librarian who made the changes
The module lists ‘MEMBERS’ for the patron module
The action will tell you what action was being logged
The Object field lists the borrowernumber that is being modified (in the example above, it was my changing my own record)
NoticesThe patron’s messaging preferences are set when adding or editing the patron. This tab will show the messages that have been sent and those that are queued to be sent:
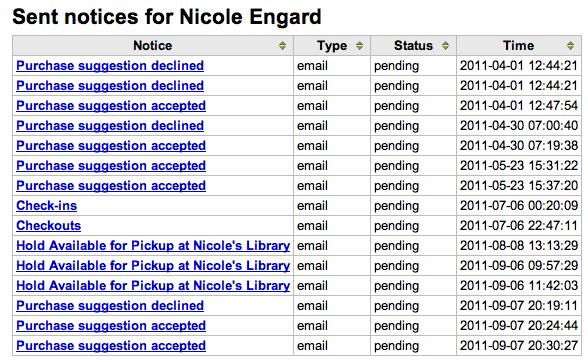
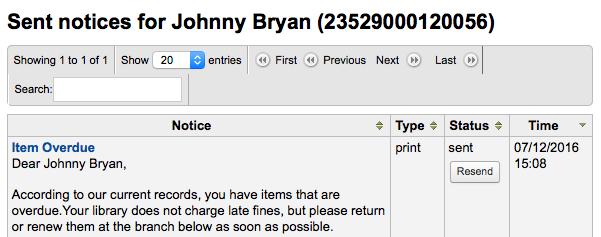
Clicking on the message title will expand the view to show you the full text of the message that was sent.

If the message has a status of sent or failed you will have the option to ‘resend’ the message to the patron by clicking the ‘resend’ button found under the status.
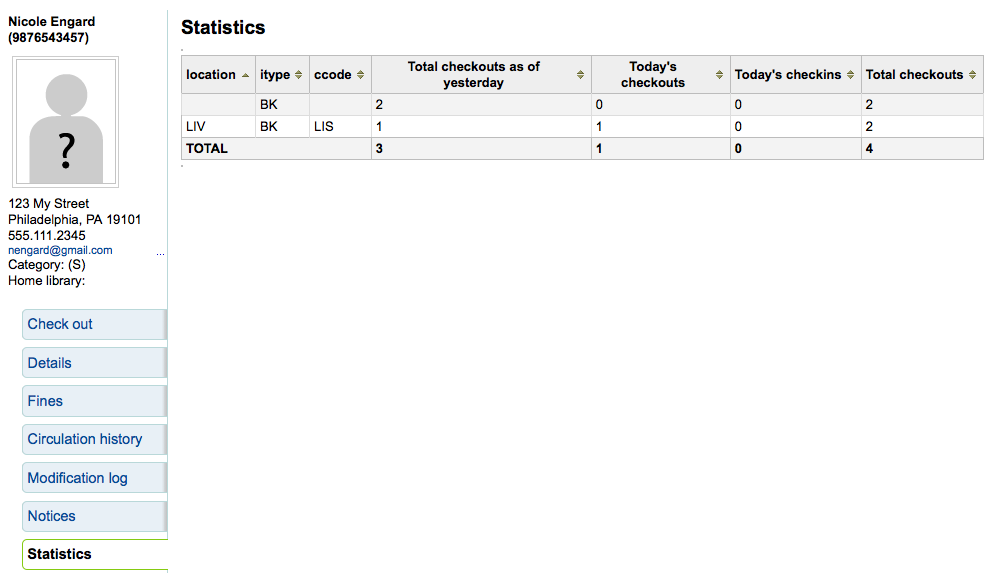
Depending on what you set for the values of your StatisticsFields system preference, you can see statistics for one patron’s circulation actions.
If you set the EnableBorrowerFiles preference to ‘Do’ the Files tab will be visible on the patron information page.
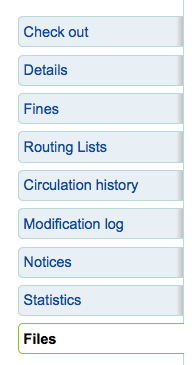
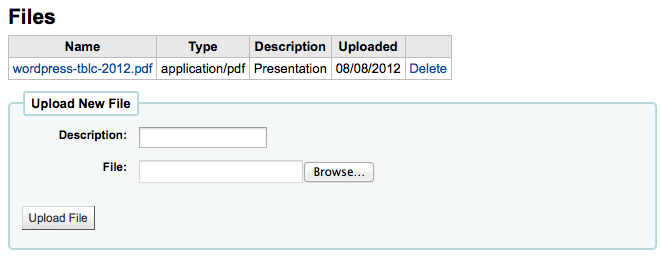
From here you can upload files to attach to the patron record.
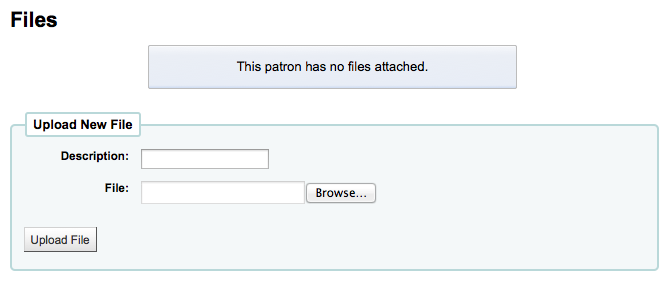
All files that are uploaded will appear above a form where additional files can be uploaded from.
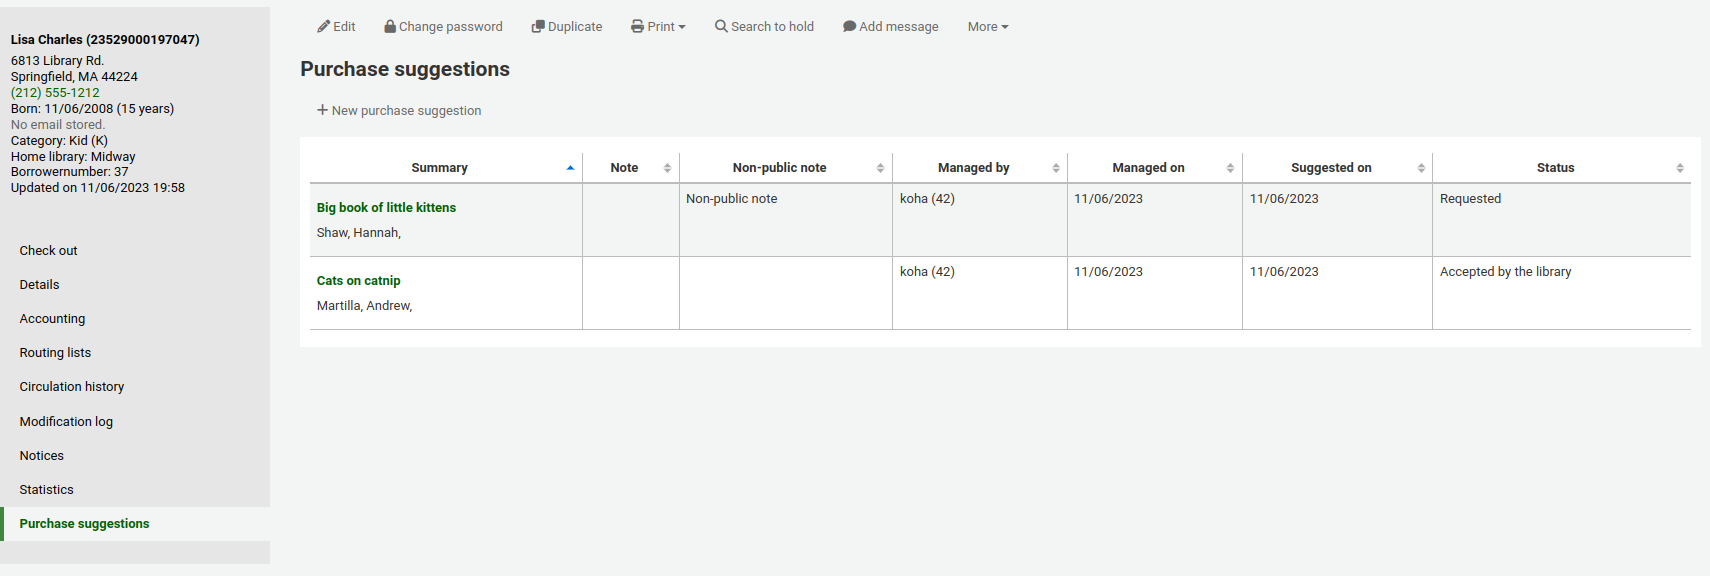
If the patron has made any purchase suggestions you will see a purchase suggestions tab on the patron record.
Note
Staff members must have the suggestions_manage permission (or the superlibrarian permission) in order to create purchase suggestions for patrons and view existing purchase suggestions.
From here you can see all suggestions made by the patron and their status, you can also create a purchase suggestion on the patron’s behalf by clicking the ‘New purchase suggestion’ button at the top.
Learn more about managing purchase suggestions in the Acquisitions chapter of this manual.
Patron dischargesA discharge is a certificate that says the patron has no current checkouts and no holds. To enable this option on the patron record, set the useDischarge system preference to ‘Allow’.
Note
In France, a “quitus” (“discharge”) is needed if you want to register for an account in a library or a university.
Note
Academic libraries often require that you have a clear record at the library before you can graduate.
To generate a discharge for a specific patron, click the ‘Discharges’ tab on the left of the patron record.
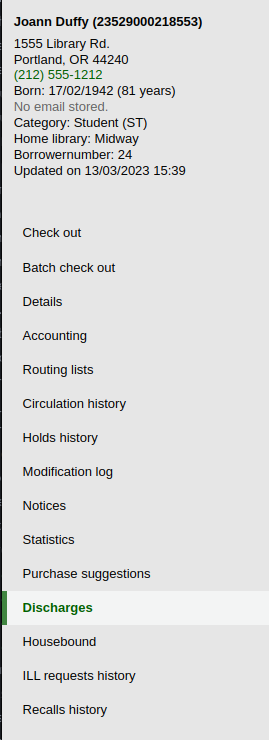
Or click on the ‘More’ button and choose ‘Discharge’.

If the patron can have a discharge generated, it will have a button that says ‘Generate discharge’

If the patron has checkouts or holds, you’ll see a message explaining why the patron cannot be discharged.

Once the letter is generated you will have a PDF to download.
Note
You can customize this message in the Notices and slips tool. The letter code is DISCHARGE.
Note
You can style the PDF using the NoticeCSS preference, or add inline CSS in the DISCHARGE letter in the Notices and slips tool.
The patron will have a restriction added to their account.

A history of discharges will be added to the ‘Discharges’ tab.

Patrons can request discharges via the OPAC. Any pending discharges will be listed below the menu buttons on the main staff interface page, with other pending requests.

Clicking the pending discharge request link will open a screen where you can approve those discharges by clicking ‘Allow’.

There are three roles a patron can have in regard to housebound circulation:
Important
In order to use the housebound module, the HouseboundModule and ExtendedPatronAttributes system preferences must be enabled.
The chooser is in charge of choosing the materials for the housebound patron.
If you have enabled the housebound module, with the HouseboundModule system preference, you will see that patrons now have a new section in their record called ‘Housebound roles’.
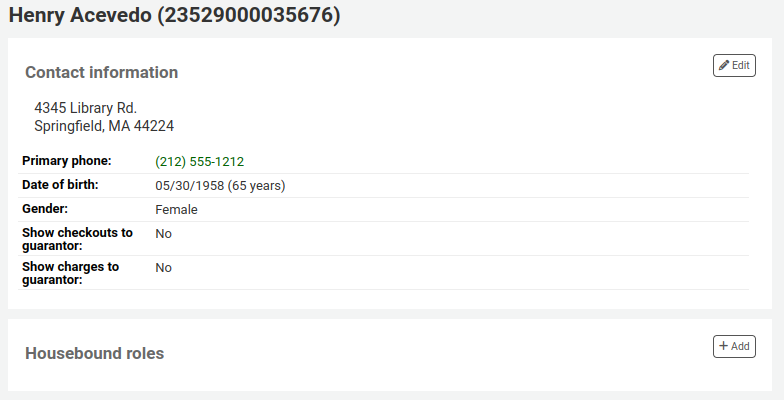
Click the ‘Add’ button to mark this patron as a ‘Chooser’.

The deliverer is in charge of delivering the chosen materials to the housebound patron on a specific day at a specific time.
In the ‘Housebound roles’, click the ‘Add’ button to mark this patron as a ‘Deliverer’.

To create a housebound profile for a housebound patron, click on the ‘Housebound’ tab in their record.
From there, you can edit their housebound profile information.
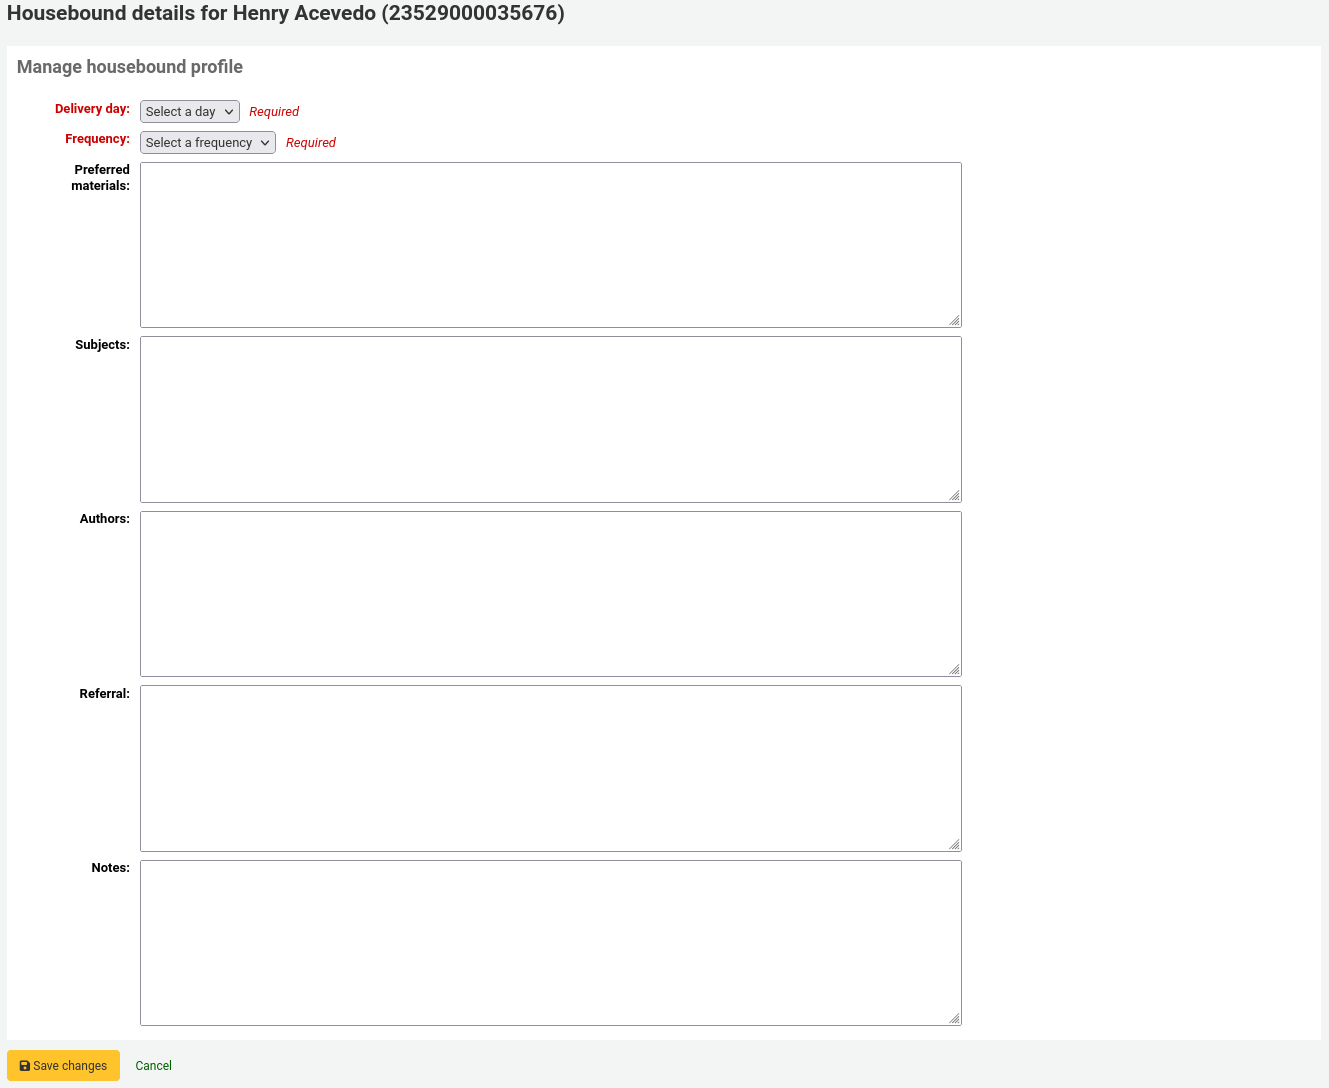
Delivery day: choose which day (or ‘Any’) the patron prefers to receive their delivery.
Frequency: choose the frequency at which they want to receive their deliveries.
Note
The frequencies are managed in the HSBND_FREQ authorized value category.
Preferred materials: enter notes that will help the chooser choose appropriate documents for the housebound patron.
For example: books, dvds, magazines, etc.
Subjects: if the housebound patron has a preference for particular subjects, enter them here. This will help the chooser select interesting documents for the patron.
For example: romance, cookbooks, thrillers, etc.
Authors: if the housebound patron has favorite authors, enter them here.
For example: Danielle Steel, James Patterson, etc.
Referral: if the housebound patron has a referral, enter it here.
Notes: enter any other notes that may help the chooser or the deliverer.
Click the ‘Save changes’ button to save the housebound profile.
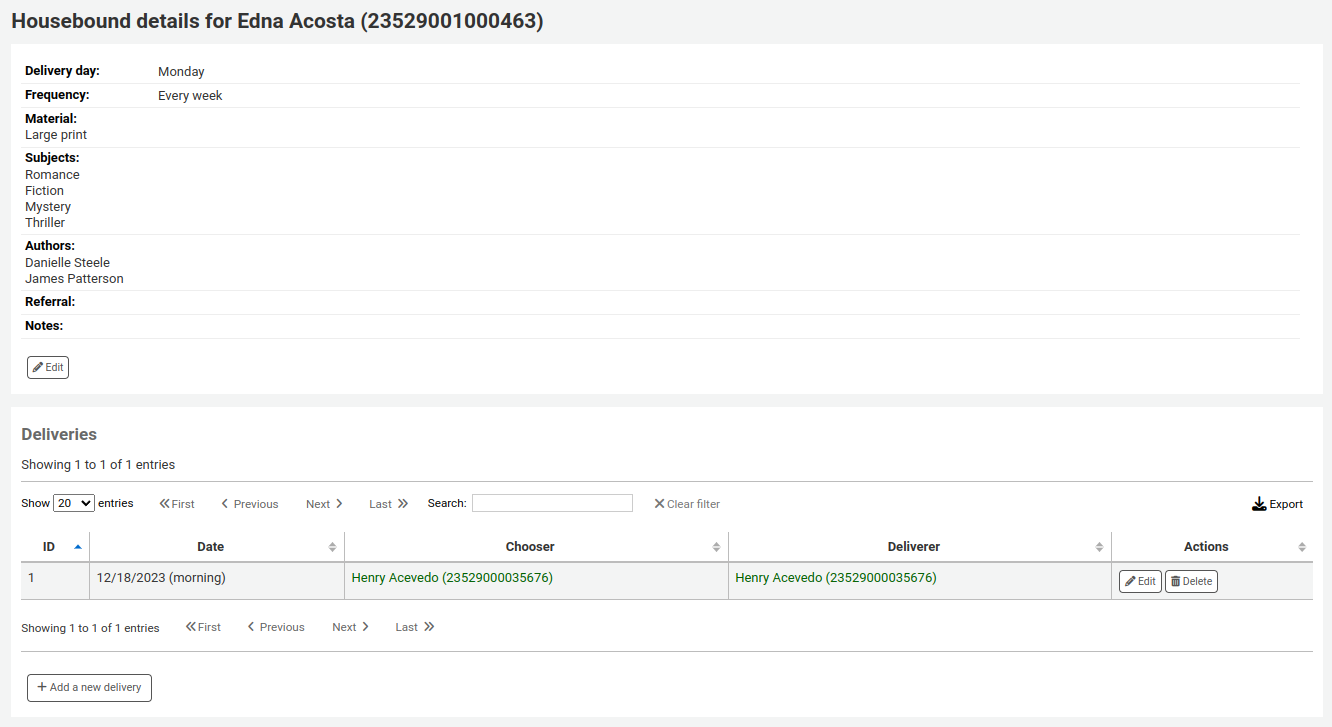
Coordinating deliveriesTo plan visits, go to the housebound patron’s record.
In their housebound tab, you will be able to create deliveries.

Click on ‘Add a new delivery’.

Fill out the information :
Date: enter the date of the delivery.
Time: select a time of day for the delivery. The choices are morning, afternoon, or evening.
Chooser: select a chooser who will be in charge of selecting the materials for this housebound patron.
Note
This list is populated by the patrons having the chooser role.
Deliverer: select a deliverer who will be in charge of picking up the materials and bringing them over to the housebound patron.
Note
This list is populated by the patrons having the deliverer role.
Note
Choosers and Deliverers can be notified of planned deliveries via reports.
Example reports can be found in the SQL Reports Library at https://wiki.koha-community.org/wiki/SQL_Reports_Patrons#Patron_Characteristics.
If recalls are enabled, active and past recalls requested by the patron will appear in this tab.

From here staff members can see the status of each recall and manage them.
Alert subscriptionsVersion
This section was added to Koha in version 23.11.
Note
Only staff with any one of the serial permissions (or the superlibrarian permission) will be able to see the patron’s email alert subscriptions.
If the RoutingSerials system preference is enabled, patrons who have opted in to email alerts for new serial issues via the ‘Subscriptions’ tab in the bibliographic record will have an ‘Alert subscriptions’ tab in their account.

This tab lists all the serial email alerts the patron has subscribed to. Staff can cancel alerts for the patron by clicking the ‘Unsubscribe from email alerts’ link. Note that patrons can unsubscribe themselves from the ‘Alert subscriptions’ tab in their online account.
