Communicating with patronsï
Koha offers several options for communicating with patrons, some of which have already been covered in this chapter.
OPAC notesï
OPAC notes are added to the patronâs file through the add patron form or the edit patron form, in the âLibrary set-upâ section.
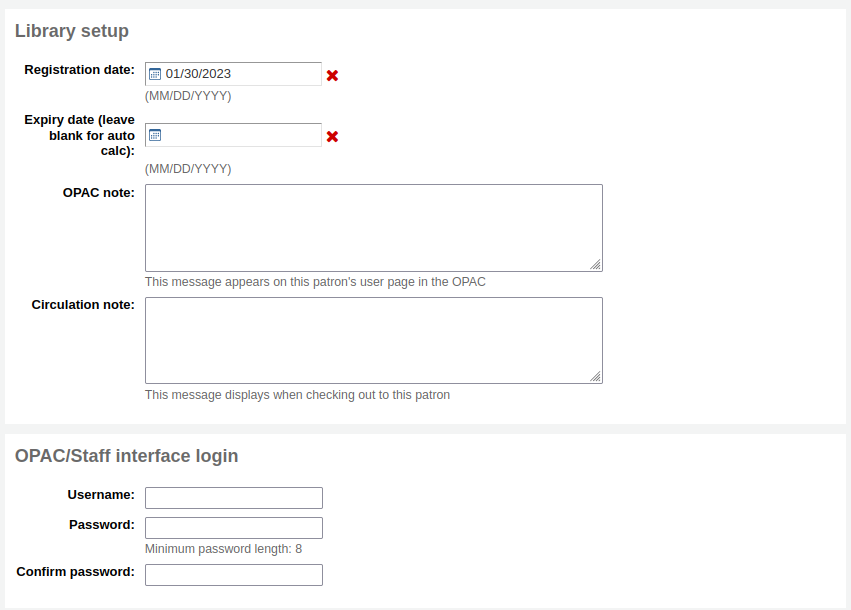
They show up in the âYour summaryâ section of the patronâs online account in the OPAC.

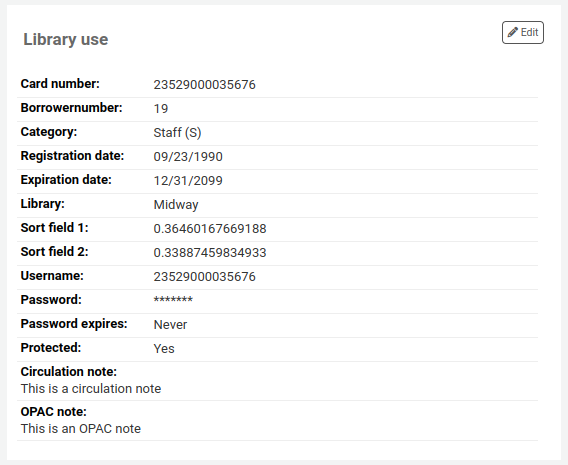
In the staff interface, OPAC notes will be in the âLibrary useâ section of the patronâs file.
OPAC messagesï
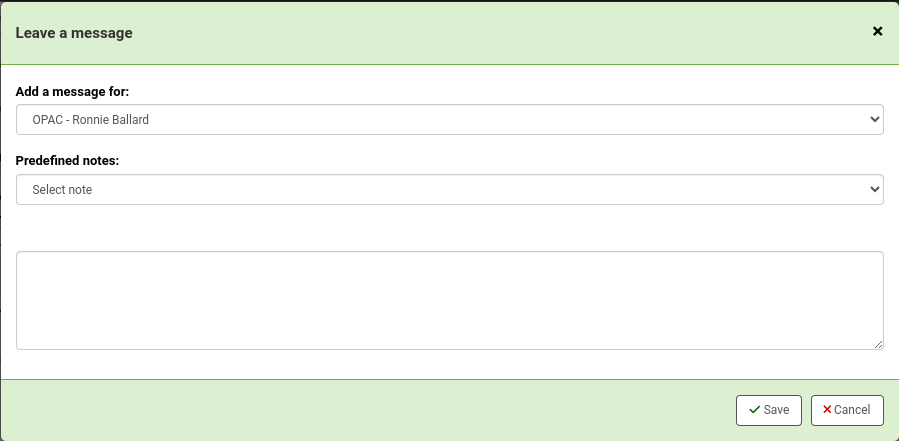
OPAC messages are added to the patronâs file using the âAdd messageâ button.

To leave a message that the patron will be able to see in the OPAC, choose âOPAC - Patronâs nameâ in the âAdd a message forâ field. Enter your message in the box, or choose a predefined message in the drop-down menu.
Note
Predefined messages are added in the BOR_NOTES authorized value category.
Once saved, the patron will be able to see the message in the âYour summaryâ section of their online account. The patron will also be able to see the date on which the message was added as well as the name of the branch. They will have the option to dismiss the message. This will hide the message from their OPAC account and mark it as read, but it will not delete the message.

In the staff interface, OPAC messages are shown on the patronâs detail page, at the top of the page just under the row of action buttons.

It will also appear on the checkout page, to the right of the checkout box.

If you need to edit the message, click the âEditâ button next to the message, edit the text and click âSaveâ.
Warning
If you edit a message that has been dismissed by the patron, it will stay as âReadâ and the patron will not see your edit.
If the patron dismisses the message, a âReadâ mention with the date will appear next to the message in the staff interface to inform staff members that this message was read by the patron.

Advance notices and hold noticesï
If you have enabled the EnhancedMessagingPreferences system preference, you can set advance notices as well as hold notices when adding a new patron or editing a patron.
If the EnhancedMessagingPreferencesOPAC system preference is set to âshowâ, patrons will be able to modify their messaging preferences in their online account.
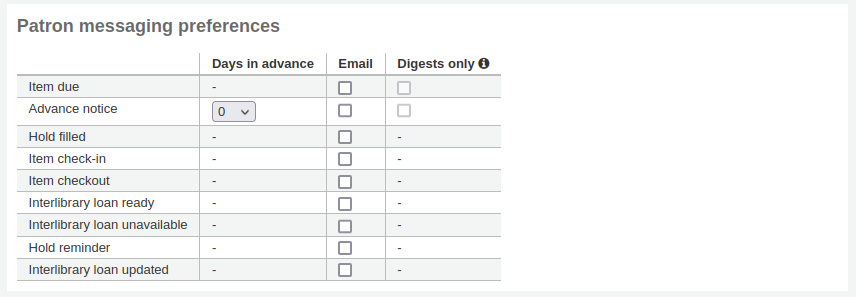
Item due: A notice on the day and item is due back at the library
Customize this notice by editing the DUE or DUEDGST notices in the Notices and slips tool
Advance notice: A notice in advance of the patronâs items being due (the patron can choose the number of days in advance)
Customize this notice by editing the PREDUE or PREDUEDGST notices in the Notices and slips tool
Hold filled: A notice when you have confirmed the hold is waiting for the patron, and when a curbside pickup is scheduled.
Customize the hold filled notice by editing the HOLD or HOLDDGST templates in the Notices and slips tool.
Customize the curbside pickup scheduled notice by editing the NEW_CURBSIDE_PICKUP template in the Notices and slips tool.
Item check-in: A notice that lists all the of the items the patron has just checked in
Customize this notice by editing the CHECKIN notice in the Notices & slips tool
Item checkout: A notice that lists all the of the items the patron has just checked out and/or renewed, this is an electronic form of the checkout receipt
Customize this notice by editing the CHECKOUT notice in the Notices and slips tool
Note
If the RenewalSendNotice system preference is set to âSendâ, this notice will be called âItem checkout and renewalâ.
For renewals, the notice sent is RENEWAL.
Interlibrary loan ready: A notice that is sent when an inter-library loan the patron requested has been fulfilled and is now ready for pickup.
Customize this notice by editing the ILL_PICKUP_READY notice in the Notices and slips tool
This option will only appear if the ILLModule system preference is enabled.
Interlibrary loan unavailable: A notice that is sent when an inter-library loan the patron requested has been cancelled because it was unavailable.
Customize this notice by editing the ILL_REQUEST_UNAVAIL notice in the Notices and slips tool
This option will only appear if the ILLModule system preference is enabled.
Auto renewal: A notice that notifies the patron that their checkouts have been automatically renewed, or if there was a problem with their automatic renewal.
Customize this notice by editing the AUTO_RENEWAL or AUTO_RENEWAL_DGST notice in the Notices & slips tool
This option will only appear if the AutoRenewalNotices is set to âaccording to patrons messaging preferencesâ
Hold reminder: A notice that is sent a certain number of days after the hold has been filled, in order to remind the patron that they have to pick it up.
Customize this notice by editing the HOLD_REMINDER notice in the Notices and slips tool.
This notice requires the holds_reminder.pl cron job.
Interlibrary loan updated: A notice that is sent when an inter-library loan the patron requested has been updated.
Customize this notice by editing the ILL_REQUEST_UPDATE notice in the Notices and slips tool
This option will only appear if the ILLModule system preference is enabled.
Patrons can choose to receive their notices as a digest by checking the âDigest onlyâ box along with the delivery method. A digest is a combination of all the messages of that type (so all items due in 3 days in one email) in to one email instead of multiple emails for each alert.
The delivery methods currently supported are:
SMS (text messages)
Automated phone call system
To generate the advance notices (advance notice and item due), you need to run the advance_notices.pl cronjob. Then, the process_message_queue.pl cronjob will send the notices or the gather_print_notices.pl cronjob will gather them in a nice file you can print out and send out via regular mail.
Overdue noticesï
Overdue notices are managed in Notices & slips and when they are sent is managed in Overdue notice/status triggers.
Patrons cannot opt out of receiving overdue notices like they can other notices (such as advance notices or hold notices)
To generate the overdue notices , you need to run the overdue_notices.pl cronjob. Then, the process_message_queue.pl cronjob will send the notices or the gather_print_notices.pl cronjob will gather them in a nice file you can print out and send out via regular mail.
Custom emailsï
Note
Only staff with the edit_borrowers permission and the send_messages_to_patrons permission (or the superlibrarian permission) will be able to send custom emails to patrons.
Custom emails can be sent to an individual patron.
Version
This feature was added to Koha in version 24.05.
To send a custom email to a patron, click the âAdd messageâ button.

Choose âEmail - email addresses of patronâ in the âAdd a message forâ field. If needed, choose a predefined notice in âPatron noticeâ.
Note
Custom patron notices can be created in the notices and slips tool with the module âPatrons (custom message)â.
Otherwise, manually enter the emailâs subject in the âSubjectâ field and the message in the âBodyâ field.
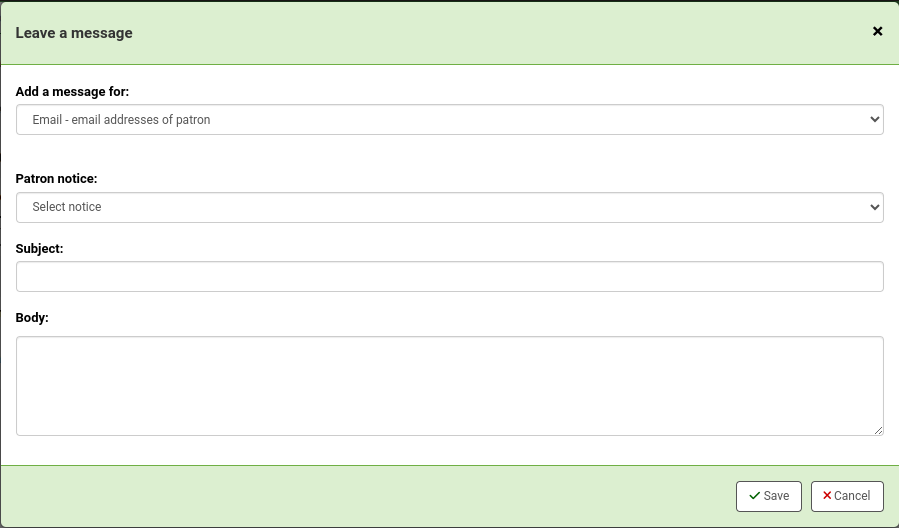
When you click âSaveâ, the message will be queued to be sent by the process_message_queue.pl cronjob. It will also be visible in the Notices tab of the patronâs file.
Built with Sphinx using a theme provided by Read the Docs.
