
Circulation reports
Most reports can be found via the Reports module, but some of the more common circulation reports are available right from the Circulation module.
Get there: Circulation > Circulation reports
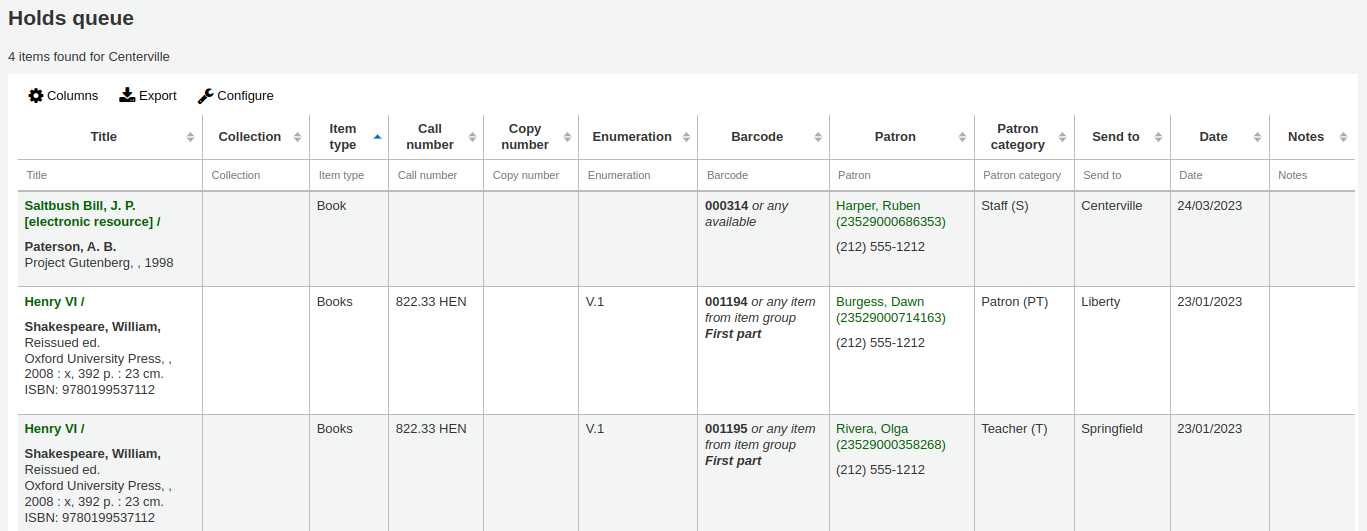
Holds queueThis report will show you all holds waiting to be pulled off the shelf at your library.
First, choose some filters for the report.

Then, the report will be displayed.
Note
You can customize the columns of this table in the ‘Table settings’ section of the Administration module (table id: holds-table).
To generate this report, you must either have the Build holds queue cron job running, or the RealTimeHoldsQueue system preference must be set to ‘Enable’. Either of these will run a script that decides which library should be responsible for fulfilling a given hold request. This should be enabled if your library system allows borrowers to place on-shelf holds.
The holds queue behavior is controlled by the system preferences StaticHoldsQueueWeight, RandomizeHoldsQueueWeight and UseTransportCostMatrix.
If you do not want all of your libraries to participate in the on-shelf holds fulfillment process, you should list the libraries that *do* participate in the process here by inputting all the participating library’s branchcodes, separated by commas (e.g. “MPL,CPL,SPL,BML” etc.).
By default, the holds queue will be generated such that the system will first attempt to hold fulfillment using items already at the pickup library if possible. If there are no items available at the pickup library to fill a hold, the system will then use the list of libraries defined in StaticHoldsQueueWeight. If RandomizeHoldsQueueWeight is disabled (which it is by default), the script will assign fulfillment requests in the order the libraries are placed in the StaticHoldsQueueWeight system preference.
For example, if your system has three libraries, of varying sizes (small, medium and large) and you want the burden of holds fulfillment to be on larger libraries before smaller libraries, you would want StaticHoldsQueueWeight to look something like “LRG,MED,SML”.
If you want the burden of holds fulfillment to be spread out equally throughout your library system, simply enable RandomizeHoldsQueueWeight. When this system preference is enabled, the order in which libraries will be requested to fulfill an on-shelf hold will be randomized each time the list is regenerated.
An alternative to static and randomized is using the Transport cost matrix. It takes precedence in controlling where holds are filled from and allows you to define the ‘cost’ of transport between any two libraries. To use the Transport cost matrix simply set your UseTransportCostMatrix preference to ‘Use’.
Note
Other system preferences will have an impact on prioritization in the holds queue, namely: LocalHoldsPriority, LocalHoldsPriorityPatronControl, LocalHoldsPriorityItemControl and HoldsQueuePrioritizeBranch.
This report will show you all of the items that have holds on them that are available at the library for pulling. If the items are available at multiple libraries then all libraries with that item available will see the hold to pull until one library triggers the hold.

Note
You can customize the columns of this table in the ‘Table settings’ section of the Administration module (table id: holds-to-pull).
Depending on the value of the CanMarkHoldsToPullAsLost system preference, clicking the “Mark item as lost” button or “Mark item as lost and notify patron” button will mark item as lost and notify the requesting patron.
You can choose which LOST value to set the item to with the UpdateItemWhenLostFromHoldList system preference.
Warning
These buttons will only appear on item-level holds.
Note
The notification sent to the patron will use the CANCEL_HOLD_ON_LOST template. It can be customized in the Notices and slips tool.
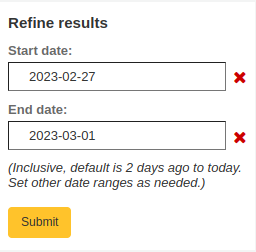
You can limit the results you see by using the Refine box on the left side of the page.
Note
The default dates in the filters are determined by the HoldsToPullStartDate and ConfirmFutureHolds system preferences.
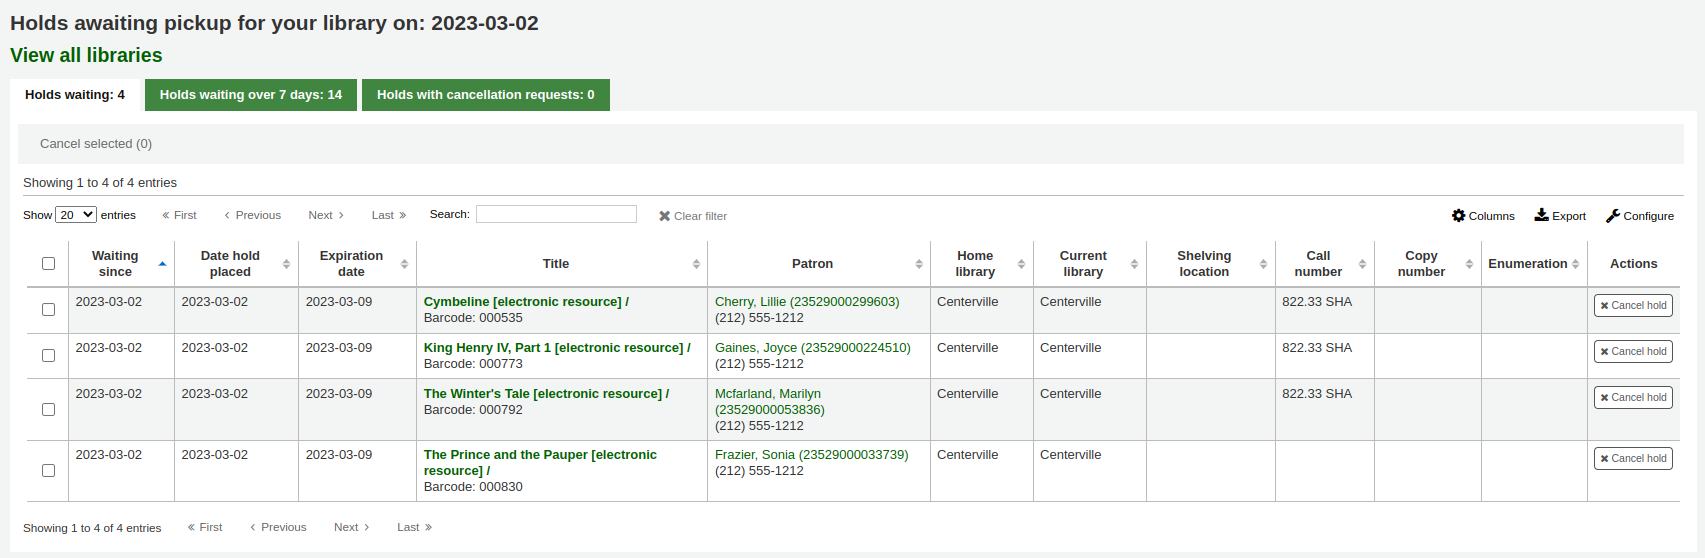
This report will show all of the holds that are waiting for patrons to pick them up.
Note
You can customize the columns of this table in the ‘Table settings’ section of the Administration module (table id: holdst).
You can cancel individual holds manually by clicking the ‘Cancel hold’ button to the right of each hold, or you can cancel selected holds using the button at the top of the list.
Items that have been on the hold shelf longer than you normally allow (based on the ReservesMaxPickUpDelay system preference value or the ‘Holds pickup delay’ rule in the circulation and fine rules) will appear on the ‘Holds waiting past their expiration date’ tab.

Note
You can customize the columns of this table in the ‘Table settings’ section of the Administration module (table id: holdso).
These holds will not automatically be canceled unless the ExpireReservesMaxPickUpDelay system preference is set to ‘Allow’ and the cancel_expired_holds.pl cron job is scheduled to run regularly.
You can cancel individual holds manually by clicking the ‘Cancel hold’ button to the right of each hold, or you can cancel selected holds using the button at the top of the list, or even cancel all holds.
The ‘Holds with cancellation requests’ tab contains waiting holds that have been canceled by patrons through their account on the OPAC, if that is allowed by the waiting hold cancellation policy.
From this tab, staff can cancel the holds, and transfer them back to their home library, if that is the case.
Note
Checking in the items will also cancel the holds with cancellation requests.
Hold ratios help with collection development. Using this report you will be able to see how many of your patrons have holds on items and whether you should buy more. By default it will be set to the library needing 3 items per hold that has been placed. The report will tell you how many additional items need to be purchased to meet this quota.
Note
You can change the default ratio with the HoldRatioDefault system preference.

Note
You can customize the columns of this table in the ‘Table settings’ section of the Administration module (table id: holds-ratios).
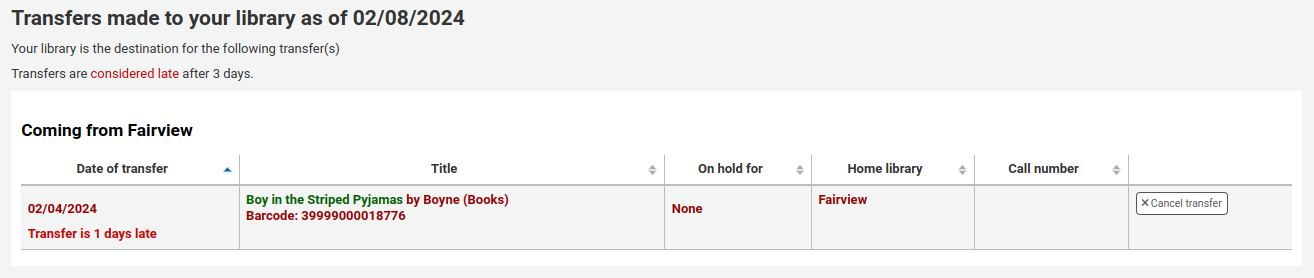
This report lists all the items that are in transit to your library.

If your transfers are late in arriving, you will see a message stating how late your items are.
Note
A transfer is considered late based on the number of days entered in the TransfersMaxDaysWarning system preference.
This report lists all the items that are requested from your library by the stock rotation tool.
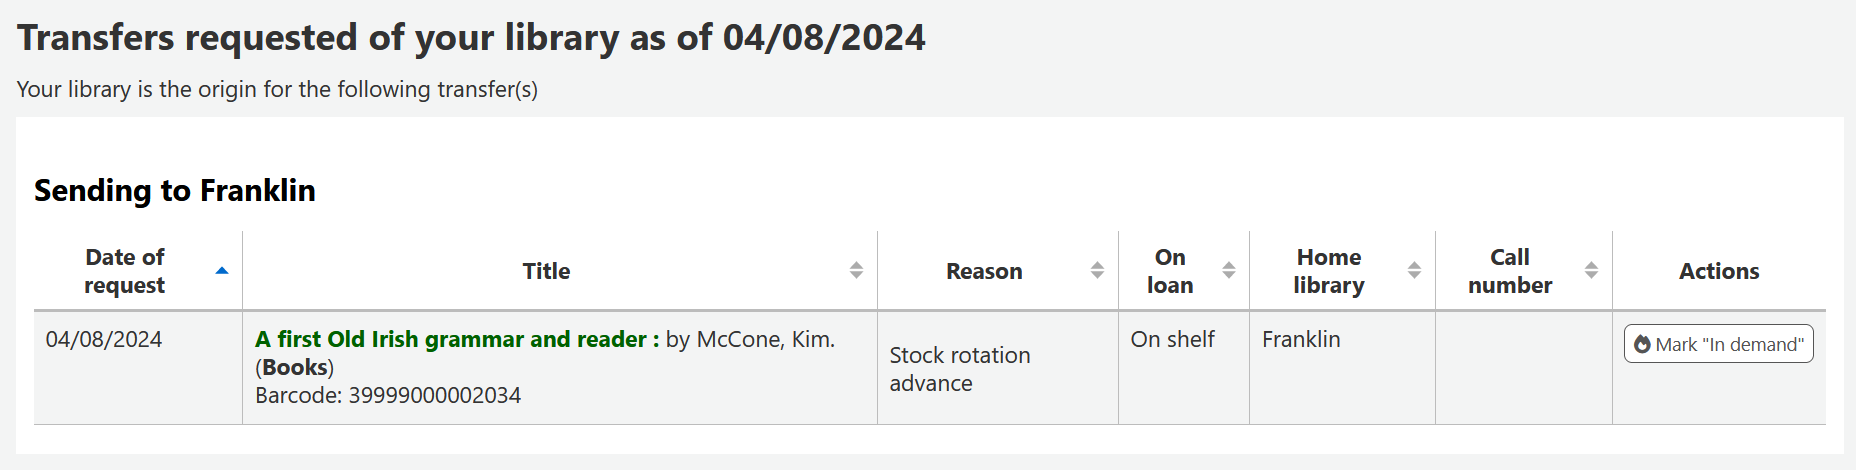
Note
This report will only be shown and filled if you are using the stock rotation automation tool.
Article requests are somewhat similar to holds, but are not requests for an item to check out. Instead, article requests are requests for a photocopy of a particular section of a book or an article from a serial issue. This is very common in academic libraries where researchers may request a copy of a single article found in a journal.
Setting up article requestsFirst, enable your system preference for ArticleRequests.
Set to ‘Enable’ patrons to place article requests.
Next you will need to decide how your patrons will make requests, either record only, item only, or both record and item level.
You can set 3 different system preferences for mandatory fields to be filled in depending on how your records are requested.
ArticleRequestsMandatoryFields: make the following fields mandatory for records that are record level or item level requestable
ArticleRequestsMandatoryFieldsItemsOnly make the following fields mandatory for records that are only item level requestable
ArticleRequestsMandatoryFieldsRecordOnly make the following fields mandatory for records that are only record level requestable
The ArticleRequestsOpacHostRedirection system preference is used if you create analytical records. If enabled, it will redirect the patron from the child record to the host record in the OPAC.
The ArticleRequestsSupportedFormats system preference determines the various formats patrons can request their articles in (either photocopy or scan).
Next you will want to go into your circulation and fines rules matrix and select each rule for which you want to allow requests.
You can allow requests to be made at the record level, item level, yes (which means both) and no (which means no article requests may be placed).
You can also limit the number of open article requests a patron can have at one time by patron category in the Default open article requests limit section of the circulation rules page.
You can set up a fee for each article request in the Default article request fees section of the circulation rules page.
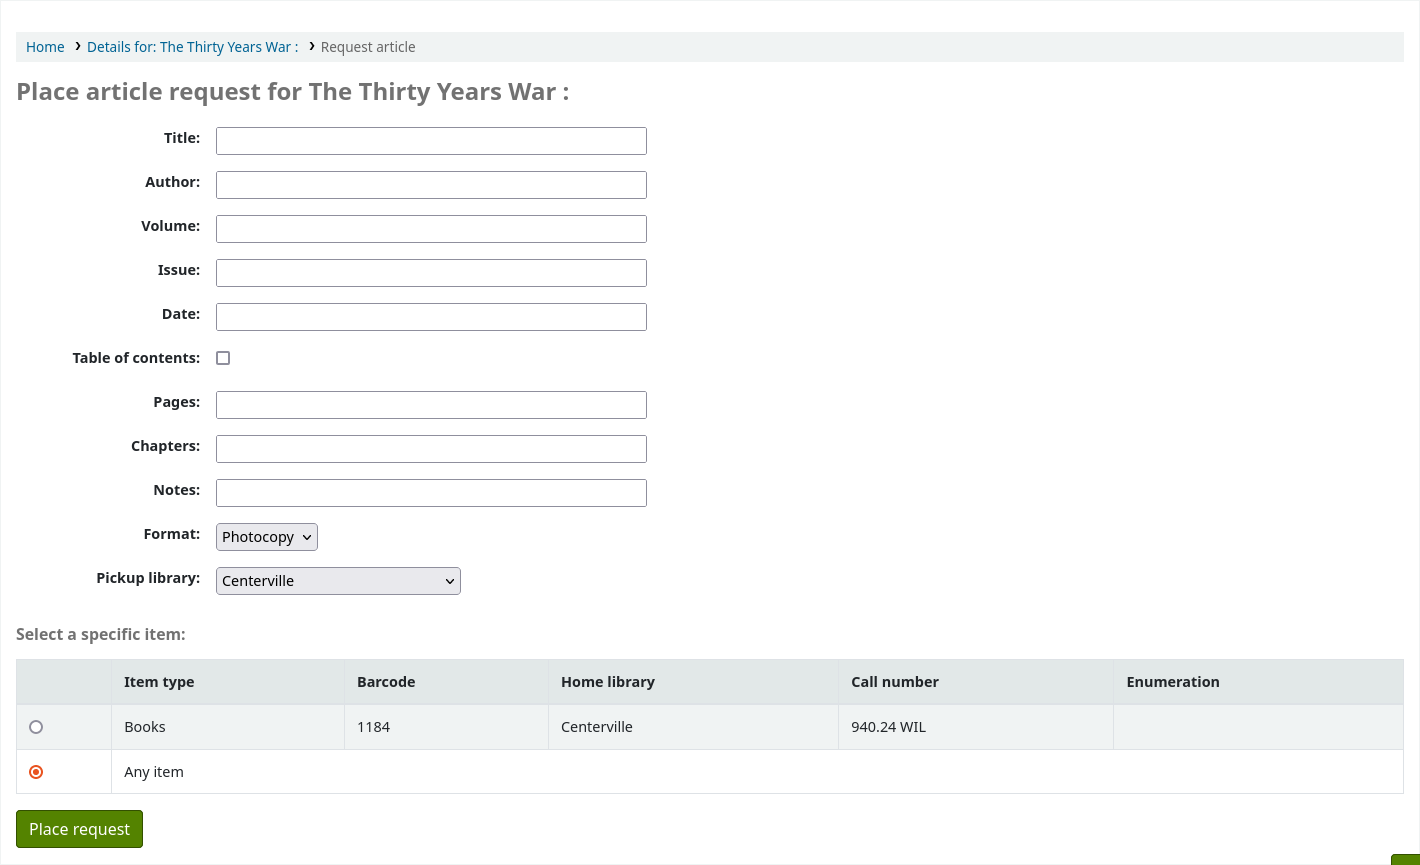
Placing article requestsNow you can place requests on both the staff client and OPAC.
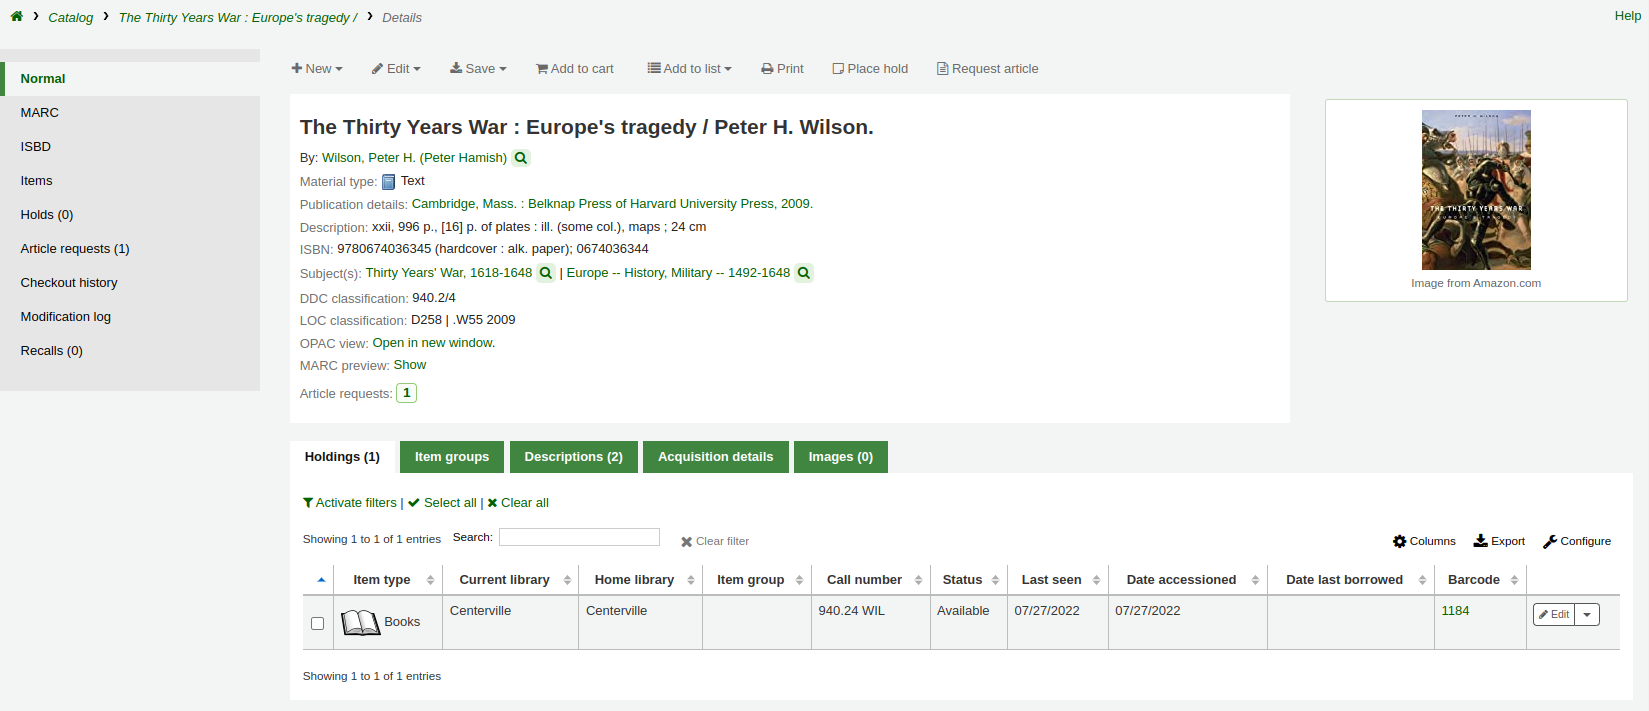
In the staff client, on the record details page, you will see a ‘Request article’ button at the top and an ‘Article requests’ tab to the left. The two options lead to the same page.
Just like a hold, you will be prompted to enter the patron’s card number or name.

If there is a fee, a message will appear to inform the staff member.

Fill in the form.

Note
The mandatory fields are set through the three system preferences ArticleRequestsMandatoryFields, ArticleRequestsMandatoryFieldsItemsOnly, and ArticleRequestsMandatoryFieldsRecordOnly.
Title: enter the title of the requested article or chapter
Author: enter the author of the requested article or chapter
Volume: enter the volume in which this article or chapter is found
Issue: enter the issue in which this article is found
Date: enter the date of the issue in which this article is found
Table of contents: check to indicate the patron wants a copy of the table of contents
Pages: enter the pages to photocopy or scan
Chapters: enter the chapters to photocopy or scan
Patron notes: enter any relevant notes
Format: choose the format in which the patron wishes to receive this article or chapter
Note
The possible formats are defined in the ArticleRequestsSupportedFormats system preference.
Pickup library: choose the library at which the patron wishes to pick up their photocopy
If allowed, choose the specific item to request.
Then, click on ‘Place request’.
From the OPAC, patrons can place requests themselves either from the results list

or by going to the detailed record.

As with a hold, if the patron is not logged in, they will be asked to do so.
The form is the same as the one in the staff interface.
If there is a fee, a message will appear to inform the patron.

If allowed, the patron can choose the specific item to request.
From their account, the patron will be able to follow the progress of their request from ‘new’

to ‘pending’, if necessary,

to ‘processing’.

The patron will receive an email notification after placing the request to confirm it as well as when the status of the request changes.
Note
When placing an article request, the patron will receive a notification. The notice sent is based on the AR_REQUESTED template.
Each status is also linked to a notification. See below, under Managing article requests for the letter code for each status.
The content of any notification can be customized in the Notices and slips tool.
Once the request is completed the patron will receive an email notification and the article request will no longer appear in their account.
Note
When staff marks the article request as ‘Completed’, the patron will receive a notification. The notice sent is based on the AR_COMPLETED template. The content of this notification can be customized in the Notices and slips tool.
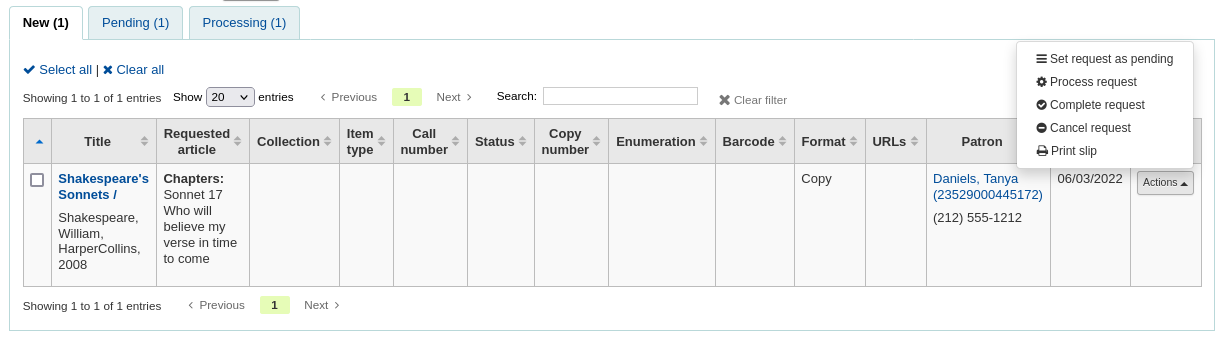
Once the article request has been placed, staff will see new requests at the bottom of the home page on the staff client. (In the same location as tags, comments and modifications).
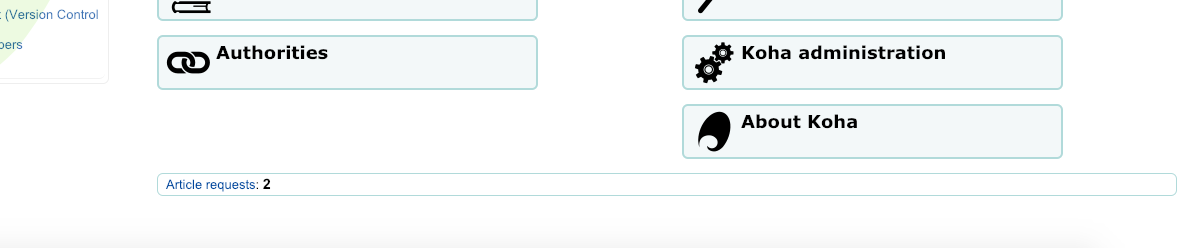
From there staff will be able to select requests to process.

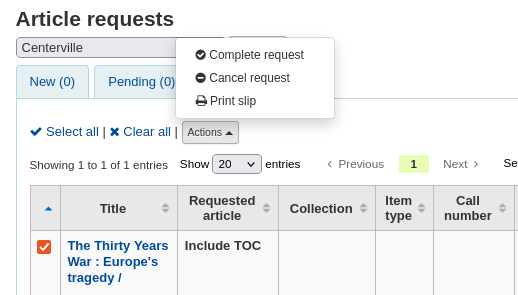
New requests are in the ‘New’ tab.
The first step would be for a staff member to process the request, that moves the request to the processing tab and alerts other staff members that the request is in process. In the actions column, click on the dropdown menu and select ‘Process request’. This will move the request to the processing tab.
Note
Setting an article request to ‘Processing’ will send a notification to the patron. The notice sent is based on the AR_PROCESSING template. The content of this notification can be customized in the Notices and slips tool.
If for any reason, a request cannot be processed right away (for example, if the title is currently checked out), the status can be changed to ‘Pending’. This will send a notice to the patron indicating the request has been received and seen, but has yet to be processed.
Note
Setting an article request to ‘Pending’ will send a notification to the patron. The notice sent is based on the AR_PENDING template. The content of this notification can be customized in the Notices and slips tool.
Next staff will go to the shelf and make a copy of the requested article.
Once that is complete, staff can print the article request slip and staple or paper clip it to the article. In the actions column, you can select the dropdown and select print slip.
Note
The slip used is based on the AR_SLIP template. The content of this slip can be customized in the Notices and slips tool.
Finally, staff will select the complete article request from the actions dropdown menu which will send a notice to the patron who made the request letting them know the request is ready for pickup.
This removes the article request from the processing tab.
Note
Completing an article request will send a notification to the patron. The notice sent is based on the AR_COMPLETED template. The content of this notification can be customized in the Notices and slips tool.
If, for any reason, an article request must be cancelled, staff can choose the ‘Cancel request’ option from the ‘Actions’ button.
Note
Cancelling an article request will send a notification to the patron. The notice sent is based on the AR_CANCELED template. The content of this notification can be customized in the Notices and slips tool.
Note
Actions can also be made in bulk by checking the boxes next to the requests to process or by clicking ‘Select all’, and choosing the new status from the actions menu on top of the table.
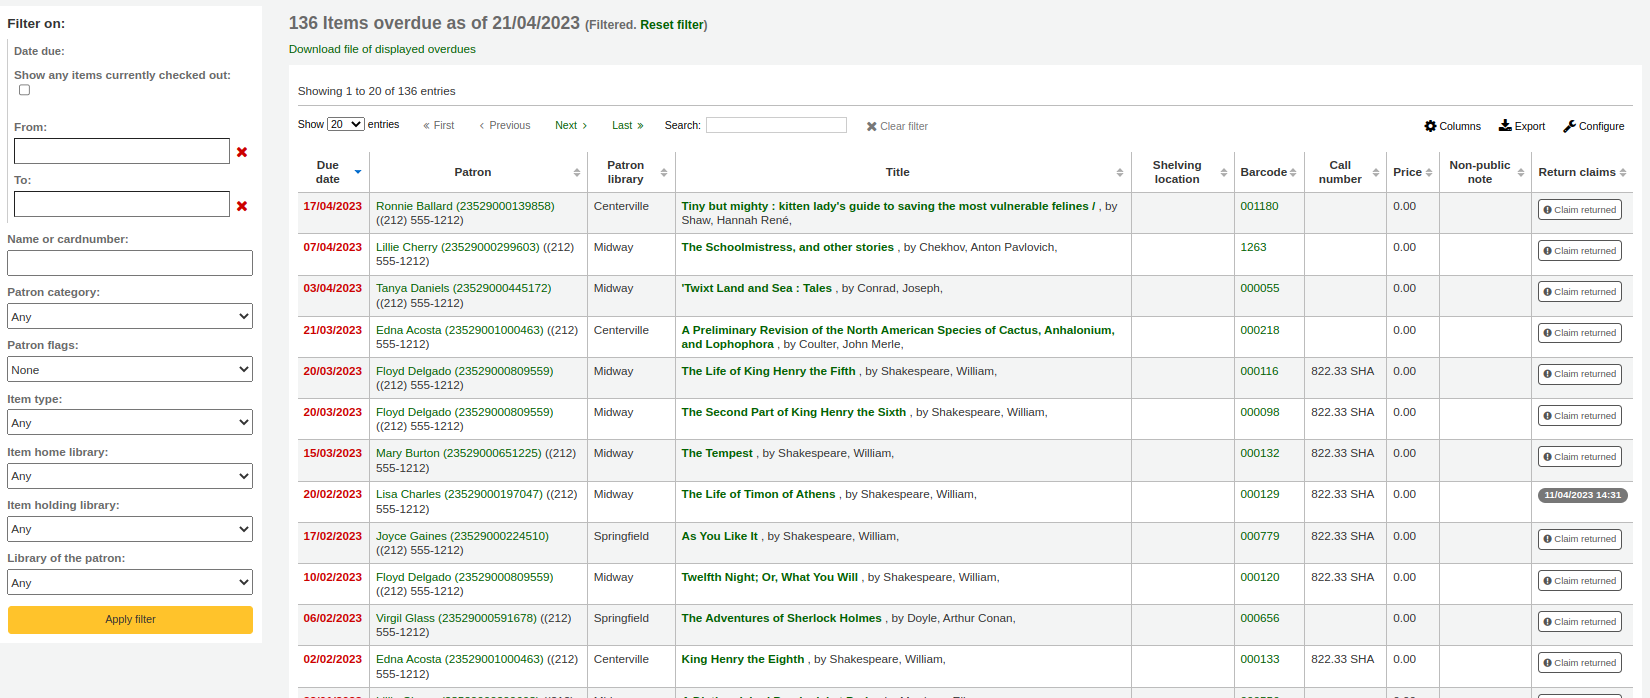
This report will list all items that are overdue at your library.
Note
Only staff with the overdues_report permission (or the superlibrarian permission) will be able to run this report.
Warning
For libraries with a large patron base, this report may take a significant amount of time to run.
Large libraries can choose to filter the report before it runs by setting the FilterBeforeOverdueReport system preference to ‘Require’.
Note
You can customize the columns of this table in the ‘Table settings’ section of the Administration module (table id: circ-overdues).
The report can be filtered using the menu options found on the left of the report.
Note
The ‘Show any items currently checked out’ checkbox basically switches this from a report of overdues to a report of checkouts. It will show all titles checked out regardless of due date.
The report result can be downloaded via the ‘Download file of displayed overdues’ link or the ‘Export’ button at the top of the table.
Overdues with finesThis report will show you any overdues at your library that have accrued fines on them.
Note
Only staff with the overdues_report permission (or the superlibrarian permission) will be able to run this report.
If you would like to limit the report you can use the pull down menu at the top to limit to a specific shelving location at your branch. To see overdues with fines at other branches you will have to change your branch or log in at that branch.
Important
If you do not charge fines and/or don’t have the fines cron job running you will see no data on this report.
If you are using the on site checkouts functionality (OnSiteCheckouts) then you’ll have a report to view all items that are currently checked out on site.
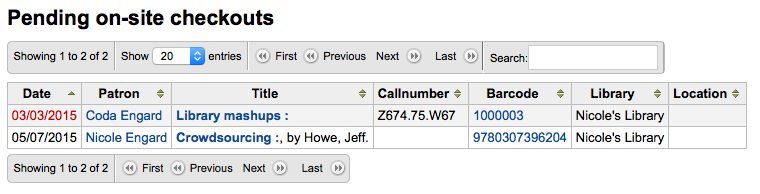
This will list the due date (overdues in red), who has the item, item information and what library the item is at.