
Accounting
Get there: More > Administration > Accounting
This section deals with the parameters used in managing the patron accounts.
Debit typesGet there: More > Administration > Accounting > Debit types
Note
Only staff with the manage_accounts permission (or the superlibrarian permission) will have access to this section.
This is where you define the manual fees you can charge patrons.
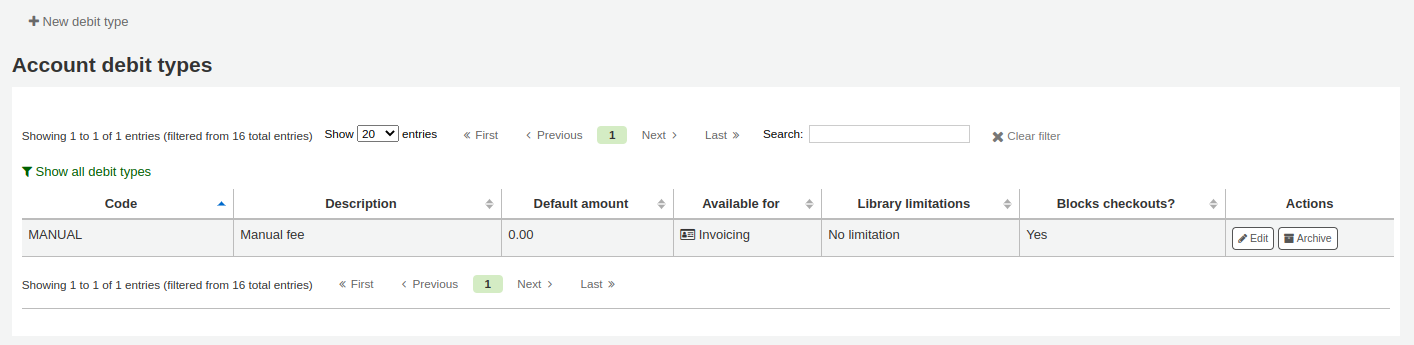
When you first get to the page, you will only see the manual fees that are already defined in your system.
You can see the default system fees by clicking “Show all debit types”.
You can go back to seeing only the manual fees by clicking “Filter system debit types”.
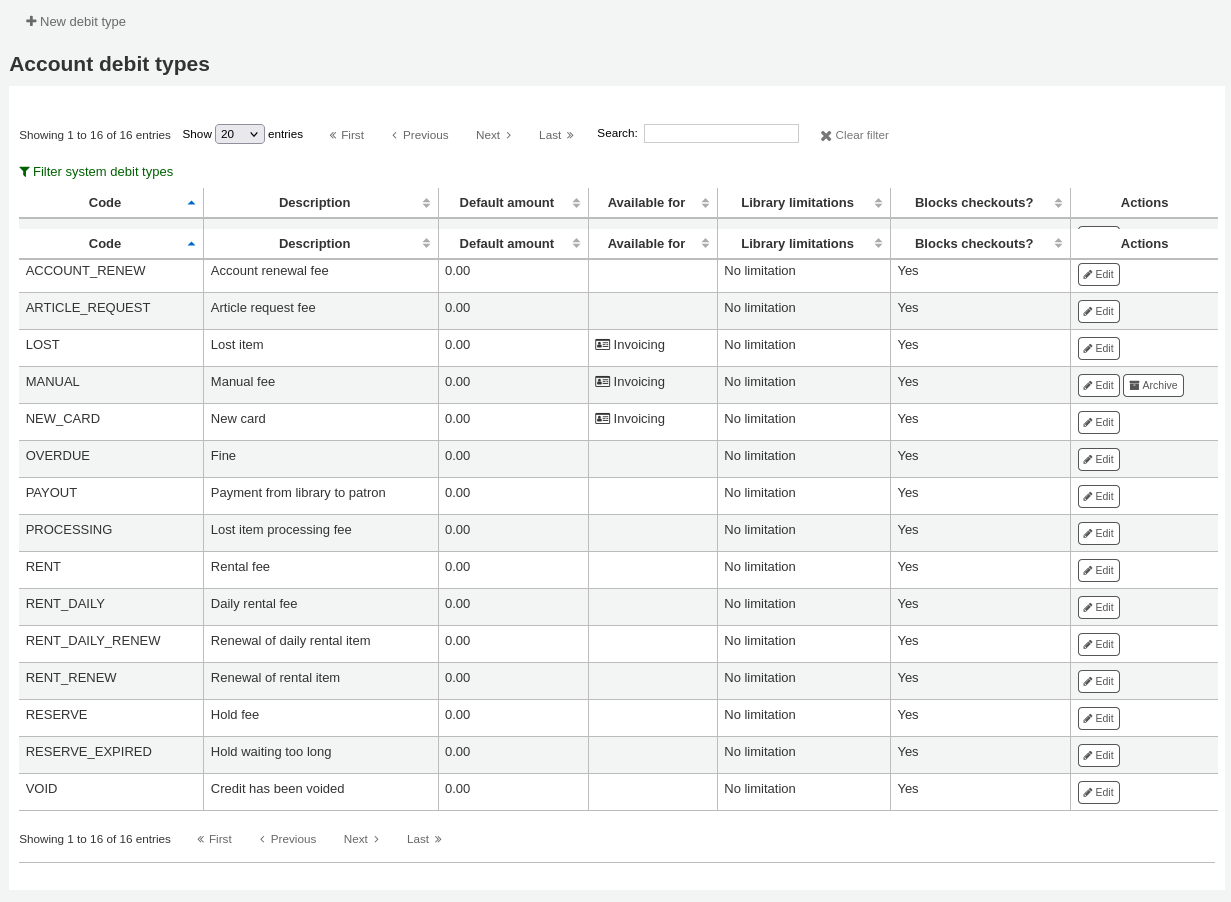
System debit typesSeveral debit types come installed with Koha. Most of them are automatic fees that are added according to the policies you set up elsewhere in Koha.
ACCOUNT (Account creation fee): this is charged to the patron’s account upon registration. The fee can be changed in the patron category settings under ‘Enrollment fee’.
ACCOUNT_RENEW (Account renewal fee): this is charged to the patron’s account when their account is renewed. Like the ACCOUNT debit type above, this can be changed in the patron category settings under ‘Enrollment fee’.
LOST (Lost item): this is charged to the patron’s account when an item in their file is declared lost. The amount depends on the item’s ‘replacement cost’ field or on the item type’s default replacement cost. It can also be added manually in the manual invoices tab.
MANUAL (Manual fee): this is the default manual fee installed with Koha. This is not charged automatically by Koha, but can be added to a patron’s account manually in the manual invoices tab.
NEW_CARD (New card fee): this is another default manual fee installed with Koha. This will not be charged automatically by Koha, but can be added to a patron’s account manually in the manual invoices tab.
OVERDUE (Overdue fine): this is charged automatically to the patron’s account when they have overdue items. The amount for overdue fines are set in the circulation and fines rules.
PAYOUT (Payment from library to patron): this is used when the library reimburses the patron (for an over payment for example).
PROCESSING (Lost item processing fee): this is charged automatically to the patron’s account when an item in their file is declared lost. The amount is set by item type under ‘Processing fee (when lost)’.
RENT (Rental fee): this is charged automatically to the patron’s account upon checkout if the item type has a rental charge.
RENT_DAILY (Daily rental fee): this is charged automatically to the patron’s account upon checkout if the item type has a daily rental charge.
RENT_DAILY_RENEW (Renewal of daily rental item): this is charged automatically to the patron’s account upon renewal if the item type has a daily rental charge.
RENT_RENEW (Renewal of rental item): this is charged automatically to the patron’s account upon renewal if the item type has a rental charge.
RESERVE (Hold fee): this is charged automatically to the patron’s account upon placing a hold. The amount depends on the ‘Hold fee’ amount in the patron’s category settings.
RESERVE_EXPIRED (Hold waiting too long): this is charged automatically to the patron’s account if they haven’t picked up their hold after the number of days defined in the ExpireReservesMaxPickUpDelay system preference. The amount is set in the ExpireReservesMaxPickUpDelayCharge system preference.
Adding a new debit typeTo add a new debit type:
Click ‘New debit type’
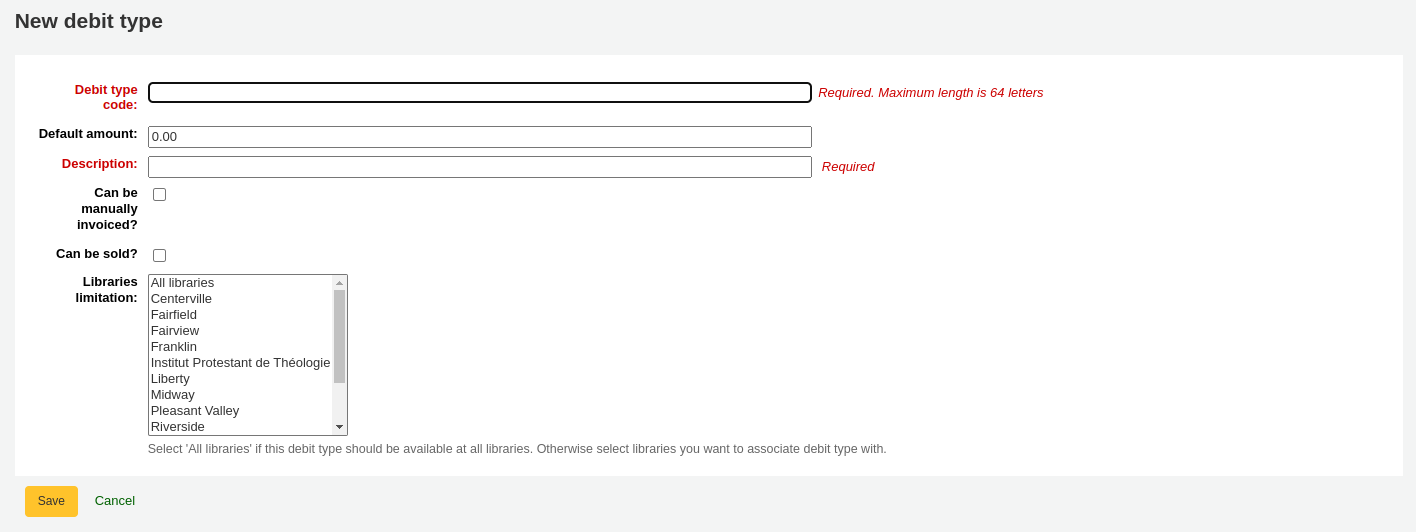
Debit type code: enter a code (limited to 64 letters).
Warning
Codes should be limited to letters, numbers, and underscores (_).
Avoid spaces, diacritics, and special characters.
Default amount: enter the default amount.
Note
Staff will be able to change this amount when adding the charge to the patron’s account, if necessary.
Important
Do not enter currency symbols. Only write the amount with a decimal point (for example, 5 or 5.00 instead of $5).
Description: write a description, this description will be used in the drop-down menu when adding a new charge to a patron’s account or when making a sale in the point of sale as well as in their transaction history.
Can be manually invoiced: check this box if this debit type can be added manually by staff to a patron’s account via the manual invoices.
Can be sold: check this box if this debit type can be used in the point of sale.
Included in noissuescharge: check this box if this debit type should be included when calculating the amount owed by the patron for the noissuescharge system preference. This system preference is used to block checkouts when a patron owes over a certain amount of money to the library.
Libraries limitation: if necessary, select the libraries where this debit type can be used. Choosing ‘All libraries’ will make the debit type available everywhere.
Note
You can select more than one library by pressing the ‘Ctrl’ key while selecting.
Click ‘Save’
Editing an existing debit typeYou can only modify the debit types you have added, as well as the ‘Manual fee’.
To edit a debit type:
Click the ‘Edit’ button to the right of the debit type
Modify any field
Click ‘Save’
Archiving a debit typeIf there is a debit type you don’t need anymore, you can archive it.
Note
There is no way to delete a debit type since they are used in the patron’s accounting section.
To archive a debit type, simply click the ‘Archive’ button to the right of the debit type.
Restoring an archived debit typeIf you need to use an archived debit type again, simply click on the ‘Restore’ button to the right of the debit type.
This will make it available again.
Credit typesGet there: More > Administration > Accounting > Credit types
Note
Only staff with the manage_accounts permission (or the superlibrarian permission) will have access to this section.
This is where you define the manual credits you can give patrons.
When you first get to the page, you will only see the credits that are already defined in your system.
You can see the default system credit types by clicking “Show all credit types”.
You can go back to seeing only the manual credit types by clicking “Filter system credit types”.
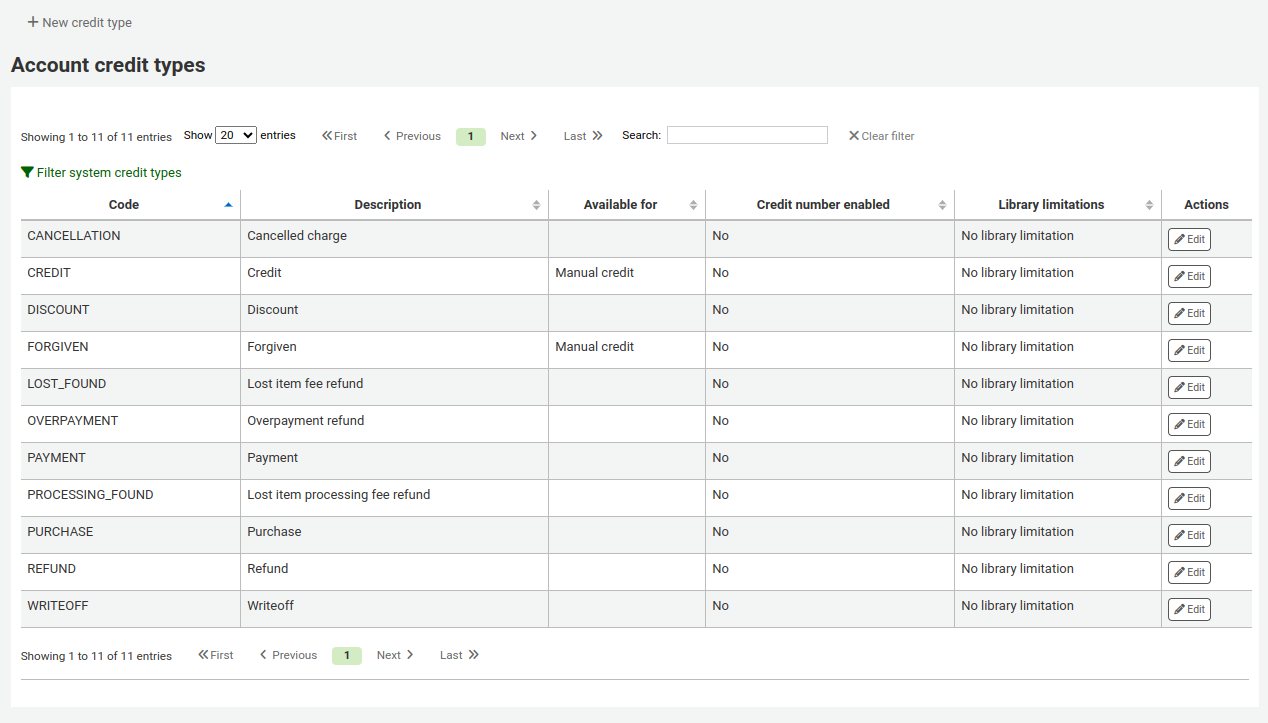
System credit typesSeveral credit types come installed with Koha. Most of them are automatic credits that are added according to the policies you set up elsewhere in Koha. They can not be deleted.
CANCELLATION (Canceled charge): this is used when cancelling a charge in a patron’s account
CREDIT (Credit): this is used for manual credits to give to your patrons.
DISCOUNT (A discount applied to a patrons fine): this is used to discount fines and charges.
FORGIVEN (Forgiven): this is used for manual credits to give to your patrons.
LOST_FOUND (Lost item fee refund): this is used when a previously lost item is returned. If you refund the lost fees (see Default lost item fee refund on return policy), this credit will be applied to refund the fee.
OVERPAYMENT (Over payment refund): this is automatically applied to a patron’s account when they paid too much for a fee. This is mostly used when backdating check-ins where the patron has already paid the full fine.
PAYMENT (Payment): as the name states, this is used to indicate fee payments.
PURCHASE (Purchase): this is used when a payment is made through the point of sale module.
REFUND (A refund applied to a patrons fine): this is used when refunding the payment of a fine or charge.
WRITEOFF (Writeoff): this is used when writing off a fine or charge.
Adding a new credit typeTo add a new credit type:
Click ‘New credit type’
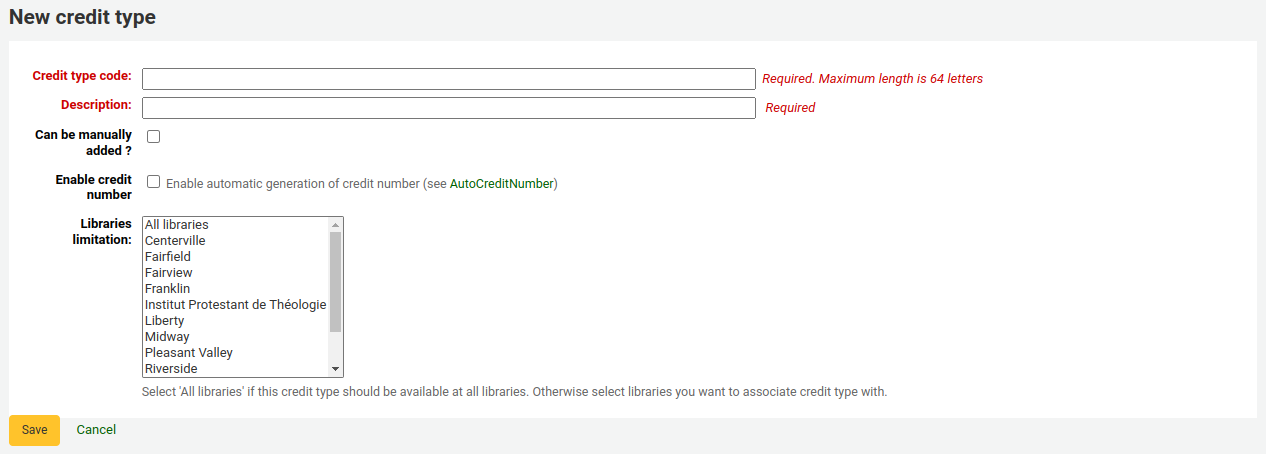
Enter a code (limited to 64 letters)
Warning
Codes should be limited to letters, numbers, and underscores (_).
Avoid spaces, diacritics, and special characters.
Write a description
This description will be used in the drop-down menu when adding a new credit to a patron’s account as well as in their transaction history
If this credit type can be added manually by staff to a patron’s account via the manual credit, check the ‘Can be added manually?’ check box
If you need this credit type to be sequentially numbered, check the ‘Enable credit number’. The format of the number is defined in the AutoCreditNumber system preference.
If this credit type is only to be used in specific branches, you can select the libraries in ‘Libraries limitation’
Note
You can select more than one library by pressing the ‘Ctrl’ key while selecting.
Click ‘Save’
Editing an existing credit typeYou can only modify the credit types you have added.
To edit a credit type:
Click the ‘Edit’ button to the right of the credit type
Modify any field
Click ‘Save’
Archiving a credit typeIf there is a credit type you don’t need anymore, you can archive it.
Note
There is no way to delete a credit type since they are used in the patron’s accounting section.
To archive a credit type, simply click the ‘Archive’ button to the right of the credit type.
Restoring an archived credit typeIf you need to use an archived credit type again, simply click on the ‘Restore’ button to the right of the credit type.
This will make it available again.
Cash registersGet there: More > Administration > Accounting > Cash registers
This feature is enabled through the UseCashRegisters system preference.
Note
Only staff with the manage_cash_registers permission (or the superlibrarian permission) will have access to this section.
If you have no cash registers already defined, you will be invited to create one.
Otherwise, you will see the list of all your cash registers.
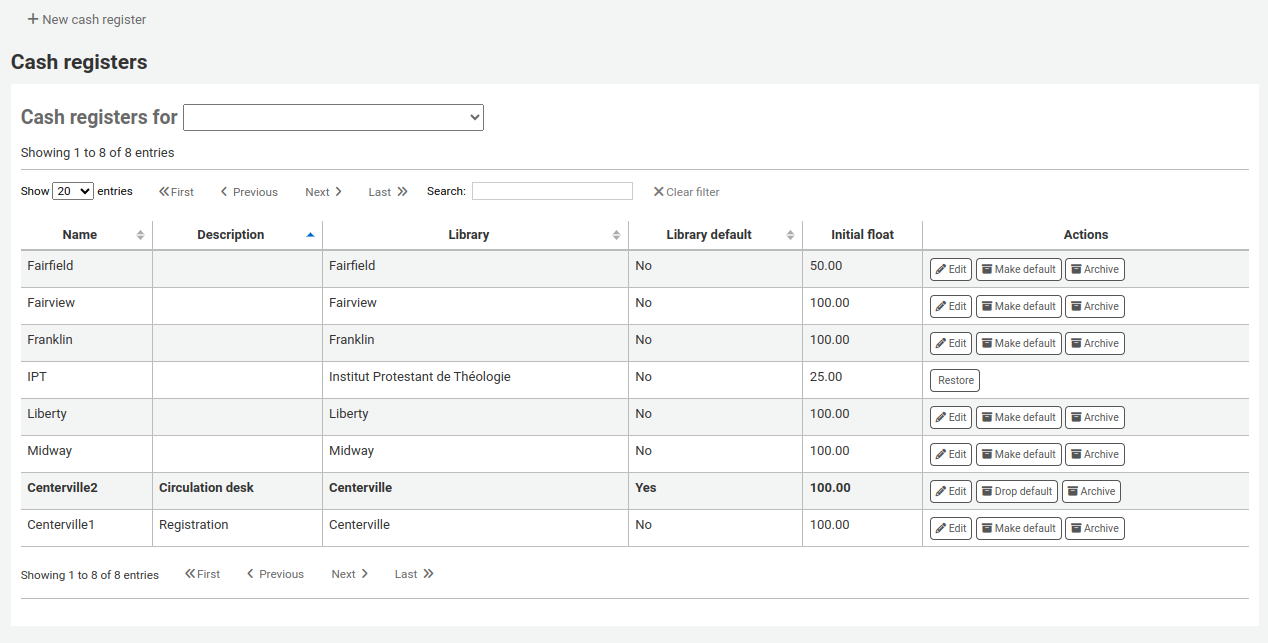
In the ‘Actions’ columns, you can choose to edit your cash registers, make one of them default or remove the default status, and archive or restore an archived register.
The default status is only useful in libraries that have more than one register per branch. The default register will be pre-selected when entering a payment. If there is only one cash register per branch, the branch’s cash register will be selected when paying.
Adding a new cash registerClick on ‘New cash register’

Give your cash register a name
Optionally you can also add a description
Choose in which library this cash register is located
And finally, enter the initial float, i.e. the amount in the cash register
Click ‘Add’