
Catalog administration
Set these controls before you start cataloging on your Koha system.
Get there: More > Administration > Catalog
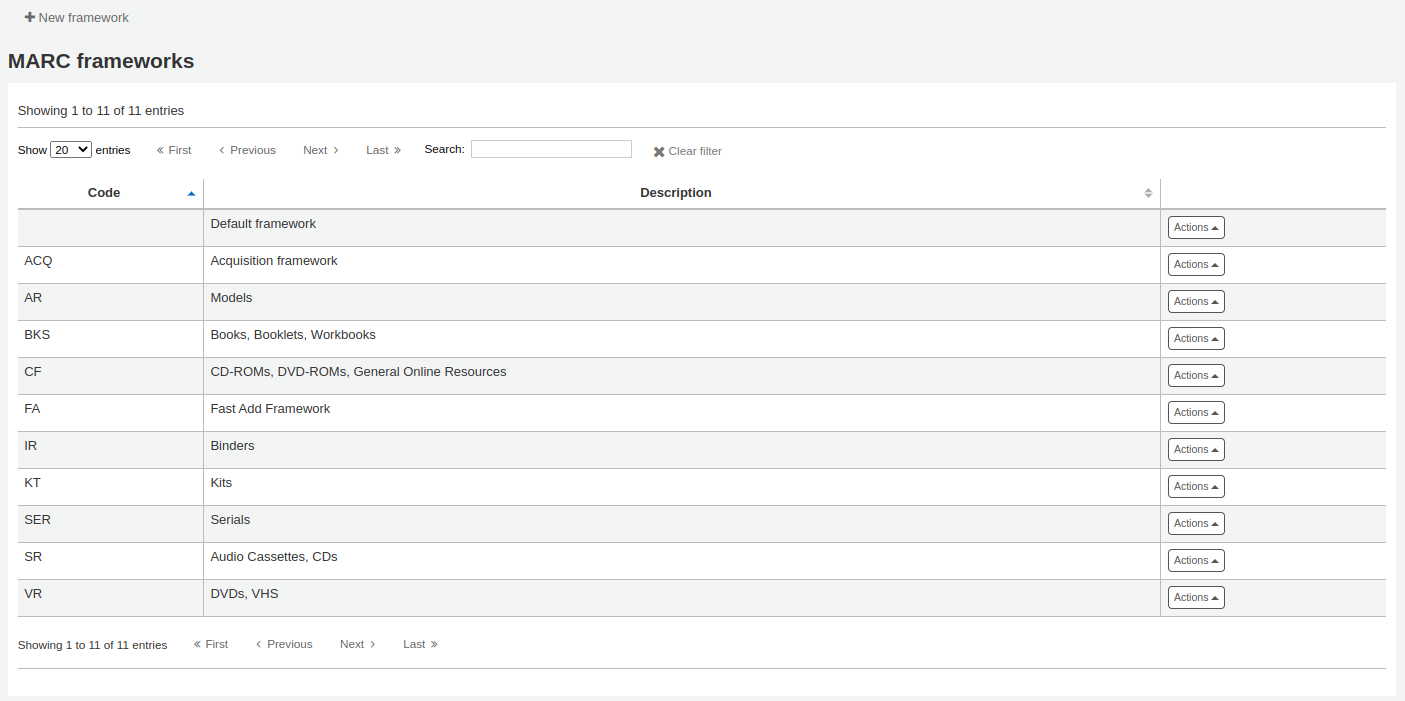
MARC bibliographic frameworksThink of frameworks as templates for creating new bibliographic records. Koha comes with some predefined frameworks that can be edited or deleted, and librarians can create their own frameworks for content specific to their libraries.
Get there: More > Administration > Catalog > MARC bibliographic frameworks
Note
Only staff with the manage_marc_frameworks permission (or the superlibrarian permission) will have access to this section.
Important
Do not delete or edit the Default framework since this will cause problems with your cataloging records - always create a new template based on the Default framework, or alter the other frameworks.
To add a new framework
Click ‘New framework’

Code: enter a code of 4 or fewer characters, avoiding spaces, diacritics, or other special characters.
Description: enter a more detailed definition of your framework, this is what will be displayed in Koha.
Click ‘Submit’
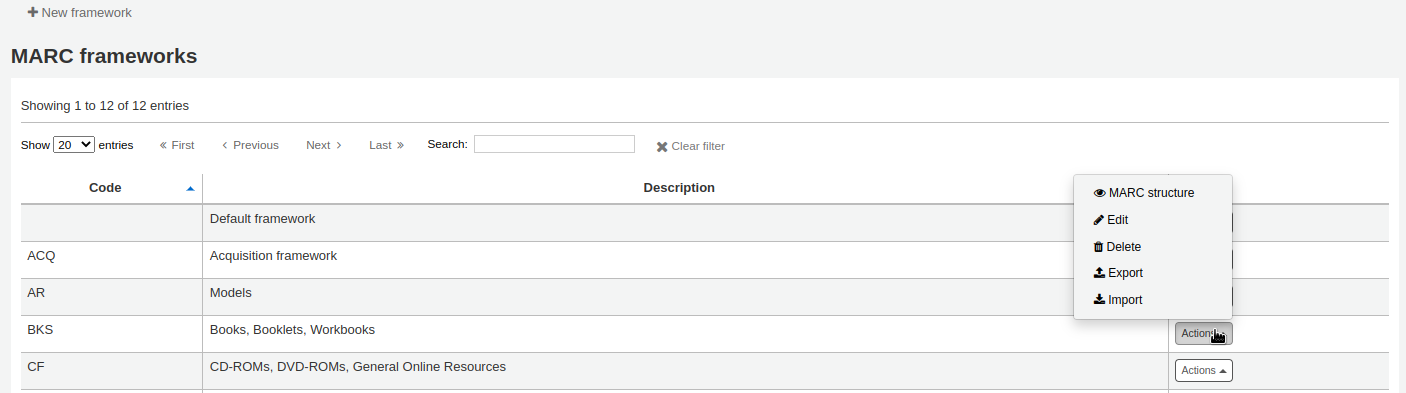
Once your framework is added click ‘Actions’ to the right of it on the list of frameworks and choose ‘MARC structure’
You will be asked to choose a framework to base your new framework on, this will make it easier than starting from scratch

Once your framework appears on the screen you can edit or delete each field by following the instructions for editing fields and subfields
Editing existing frameworksClicking ‘Actions’ and then ‘Edit’ to the right of a framework will only allow you to edit the description for the framework.

Frameworks are made up of MARC fields (tags) and subfields. To make edits to the fields and subfields associated with the framework you must click on ‘Actions’ and then ‘MARC structure’.
Important
Whenever you make changes to the framework fields and subfields, make sure to run the MARC bibliographic framework test.
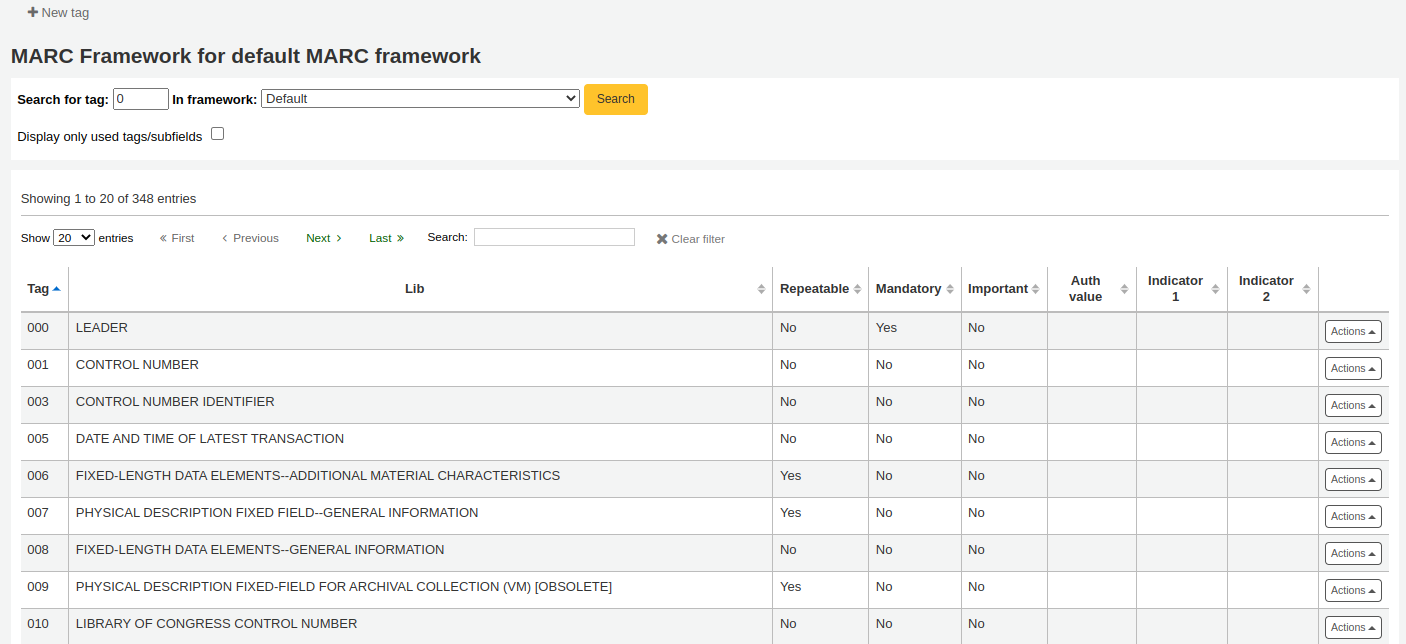
After clicking on ‘MARC structure’ you will be taken to a screen listing all the available tags for that framework and you can search for the tag you need. To make edits to a MARC field click on ‘Actions’ on the right of the field and choose ‘Edit tag’.
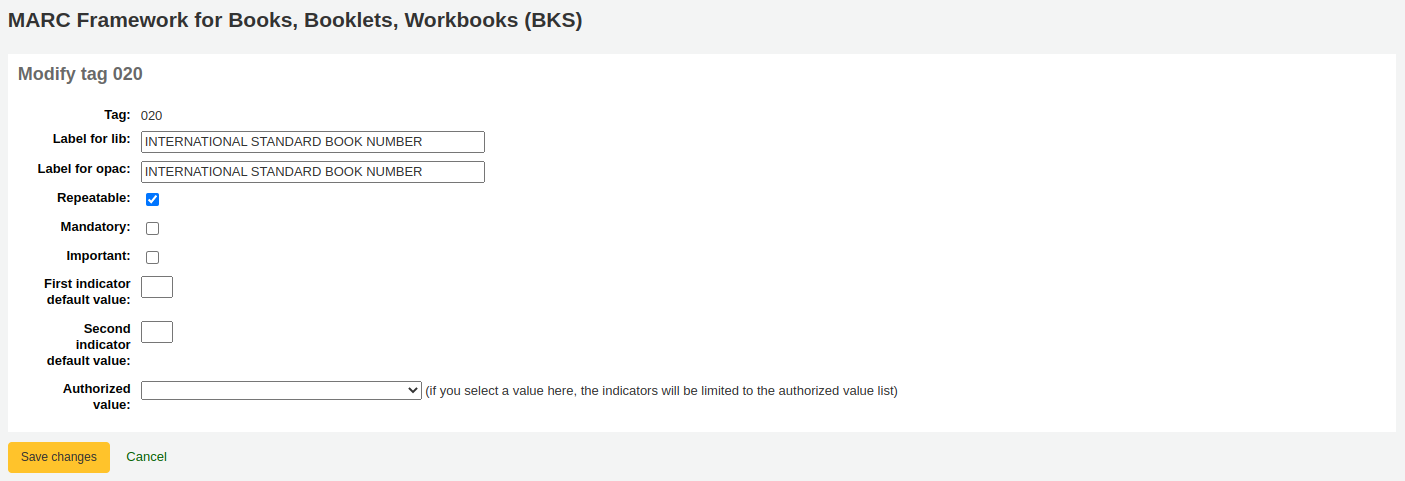
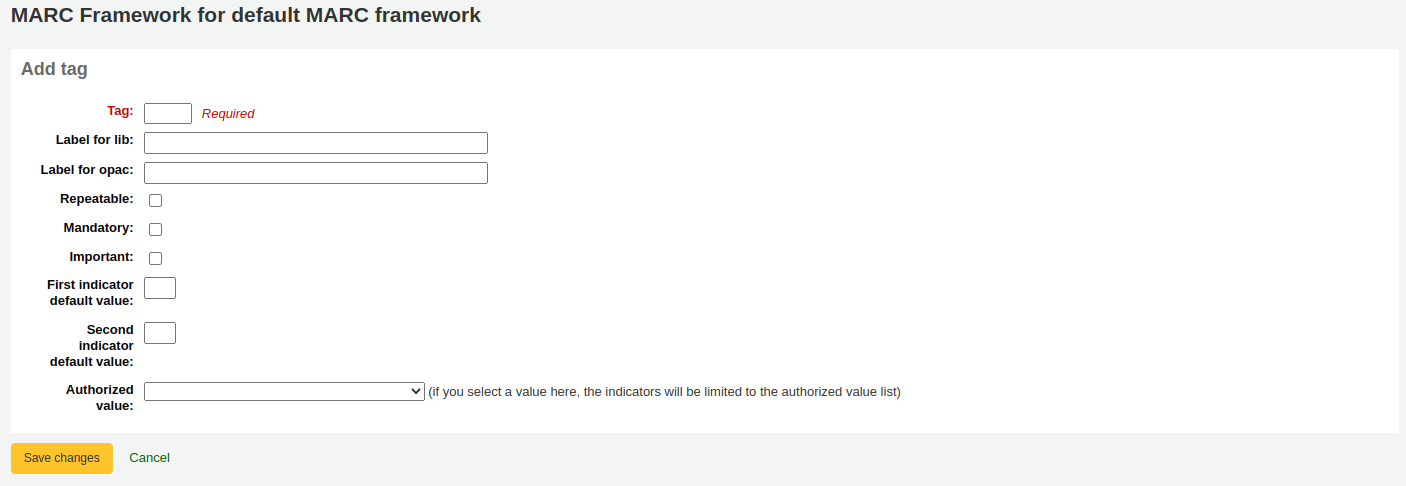
The next screen shows details of the tag.
Tag: the MARC tag, or field number, is uneditable.
Label for lib: text that will show in the staff interface MARC view, and in the basic editor if the advancedMARCeditor system preference is set to display labels.
Note
If you use XSLT (see the XSLTDetailsDisplay system preference), the labels for the ‘Normal’ view are defined in the XSLT stylesheet.
This will not affect the ‘Normal’ view unless you don’t use XSLT.
Label for OPAC: text that will show on the MARC view in the OPAC.
Note
If you use XSLT (see the OPACXSLTDetailsDisplay system preference), the labels for the ‘Normal’ view are defined in the XSLT stylesheet.
This will not affect the ‘Normal’ view unless you don’t use XSLT.
Repeatable: when checked, the field will have an icon next to it in the basic editor, allowing you to add multiples of that tag.
Mandatory: when checked, the record cannot be saved unless the field has a value. In the basic editor, a ‘Required’ flag will display as a prompt.
Important: when checked, the field will generate a warning if it is not filled, but unlike ‘Mandatory’, you will still be able to save your record nonetheless. In the basic editor, an ‘Important’ flag will display as a prompt.
Indicator default values: add default values for indicators here so that they will be pre-filled to save time when cataloging, but can still be edited if required.
Authorized value: define an authorized value pull down list for the catalogers
Warning
The authorized value option at field level does not work.
Click ‘Save changes’ to save any modification.
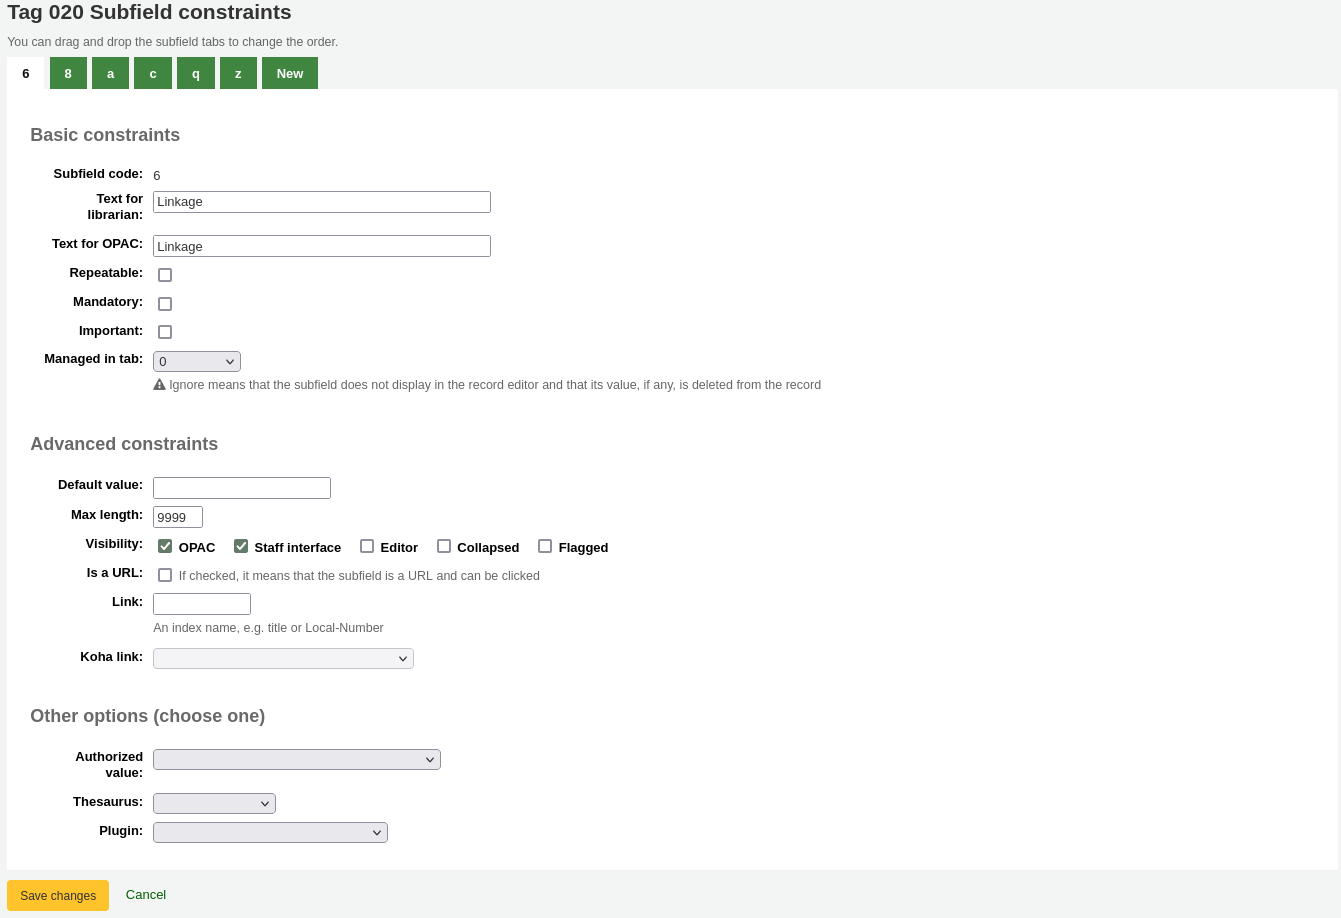
Editing a MARC subfieldTo edit the subfields associated with the tag, click ‘Actions’ then ‘Edit subfields’ to the right of the tag on the framework field list. Each subfield has its own tab which contains three sections - Basic constraints, Advanced constraints and Other options.
For each subfield you can set the following basic constraint options
Subfield code: this is the MARC subfield code, this wouldn’t normally be changed.
Text for librarian: text that will show in the staff interface MARC view, and in the basic editor if the advancedMARCeditor system preference is set to display labels.
Note
If you use XSLT (see the XSLTDetailsDisplay system preference), the labels for the ‘Normal’ view are defined in the XSLT stylesheet.
This will not affect the ‘Normal’ view unless you don’t use XSLT.
Text for OPAC: text that will show on the MARC view in the OPAC.
Note
If left empty, the ‘Text for librarian’ is used instead
Note
If you use XSLT (see the OPACXSLTDetailsDisplay system preference), the labels for the ‘Normal’ view are defined in the XSLT stylesheet.
This will not affect the ‘Normal’ view unless you don’t use XSLT.
Repeatable: when checked, the field will have an icon next to it in the basic editor, allowing you to add multiples of this subfield.
Mandatory: when checked, the record cannot be saved unless the subfield has a value. In the basic editor, a ‘Required’ flag will display as a prompt.
Important: when checked, the field will generate a warning if it is not filled, but unlike ‘Mandatory’, you will still be able to save your record nonetheless. In the basic editor, an ‘Important’ flag will display as a prompt.
Managed in tab: defines the tab where the subfield is shown.
Important
All subfields of a given field must be in the same tab or ignored. Ignore means that the subfield is not managed.
Warning
When importing records, or editing existing records, subfields that are managed in tab ‘ignore’ will be deleted. If you still wish to keep the subfields, but hide them, use the ‘Visibility’ options below.
For each subfield you can set the following advanced constraint options
Default value: defines what you want to appear in the field by default, this will be editable, but it saves time if you use the same text over and over or the same value in a field often.
Note
There are several values that you can use here that will be replaced automatically when a new record is created:
<<MM>> - the current month, 2 digits
<<DD>> - the current day of month, 2 digits
<<YY>> - the current year, 2 digits
<<YYYY>> - the current year, 4 digits
<<USER>> - the username of the currently logged in user
For example: a default of “<<MM>>/<<DD>>/<<YYYY>>” (without quotes) will print the current date in the form of “01/21/2021”
Note
When those default values are filled depends on the ApplyFrameworkDefaults system preference.
Max length: enter a value here to limit the number of characters that can be entered in the subfield.
Visibility: allows you to select from where this subfield is visible or hidden. Check the boxes where you would like the field to show, and uncheck the boxes where you would like it hidden.
OPAC: when checked, this will make the subfield available for display in the OPAC. For non-XSLT views, the field will be displayed. For XSLT views, it will depend on the stylesheet.
Staff interface: when checked, this will make the subfield available for display in the staff interface. For non-XSLT views, the field will be displayed. For XSLT views, it will depend on the stylesheet.
Editor: when checked, this will make the subfield available for modification in the basic editor.
Collapsed: when checked, the subfield will be hidden in the basic editor, but will display when the field label is clicked to expand all subfields.
Flagged: when checked, the subfield will be unavailable and hidden from all views (equivalent to all boxes being unchecked).
Is a URL: if checked, it means that the subfield is a URL and can be clicked.
Link: if you enter an index name here, a link appears after the subfield in the MARC detail view in the staff interface. If the librarian clicks on the link, a catalog search is done using the index and the content of the subfield.
Koha link: this field is used to create a link between the MARC subfield and a column in the items, biblioitems, and biblio database tables. The mappings can be changed from the Koha to MARC mapping page.
For each subfield you can set the following Other option values
Authorized value: means the value must be chosen from a drop-down menu generated from the authorized value list.
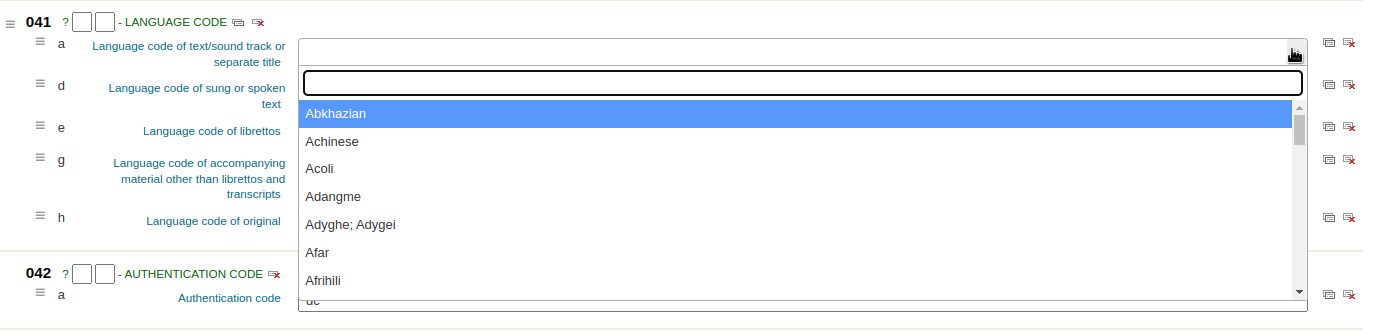
In the example below, the LANG authorized value category has been set to 041$a.

This creates a drop-down menu in the basic editor.
Thesaurus: means that the value is linked to the authority catalog of the selected category. Authority categories are managed in the Authority types section.
Plugin: means the value is calculated or managed by a cataloguing plugin. Cataloguing plugins, or value builders, can do almost anything.
Examples:
For call numbers there is an option to add a call number browser next to the call number subfield so that you can identify which call numbers are in use and which are not. Simply choose the cn_browser.pl plugin. Learn more in the cataloging section of this manual.
If you’d like to let file uploads via cataloging you can choose the upload.pl plugin and this will allow you to upload files to Koha to link to your records.
In UNIMARC there are plugins for every 1xx fields that are coded fields. The plugin is a huge help for cataloger! There are also two plugins (unimarc_plugin_210c and unimarc_plugin_225a that can “magically” find the editor from an ISBN, and the collection list for the editor)
If you would like to enable an autocomplete search for publishers in 260b and 264b you can set the plugin to marc21_field_260b.pl. When you start typing in a publisher name you will be given search results based on publisher names already in the catalog.
To save your changes, click ‘Save changes’.
Tip
You can drag and drop the subfield tabs to change the order in which they appear when cataloging with the basic editor.
By default, they will appear in alphanumeric order (0-9, then a-z).
If a framework doesn’t contain a field that you require, you may need to add it. To add a field to a framework click the ‘New tag’ button at the top of the framework definition.
This will open up a blank form for entering MARC field data
Enter the field number for your new tag. The process for entering the remainder of the settings for the new tag is the same as those found in the editing fields and subfields in frameworks section of this manual.
When you’re finished, click ‘Save changes’ and your new tag will be displayed in the framework field list.
You will need to add at least one subfield to your new tag before it will appear in your framework when you are cataloging.
Click on the ‘Actions’ button for your new tag and then ‘Edit subfields’. Click on the ‘New’ tab and enter your subfield code. The process for entering the remainder of the settings for the new subfield is the same as those found in the editing fields and subfields in frameworks section of this manual.
Importing and exporting frameworksNext to each framework is a link to either import or export the framework.
Export frameworkTo export a framework, click the ‘Export’ option in the ‘Actions’ button to the right of the framework title.
When you click ‘Export’ you will be prompted to choose what format to export the file in.

A framework exported this way can be imported into any other Koha installation using the import framework option.
Import frameworkAn easy way to create a new framework is to import one created for your or another Koha installation. This framework would need to be exported from the other system using the instructions above to be available for import here.
To import a framework you first need to create a new framework. Once you have that framework, click ‘Actions’ then ‘Import’ to the right of the new framework.
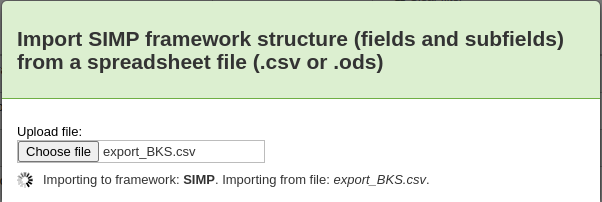
You will be prompted to find a file on your computer to import into the framework.
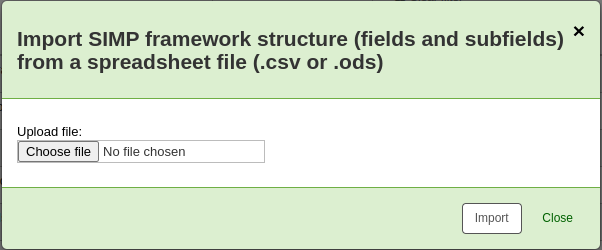
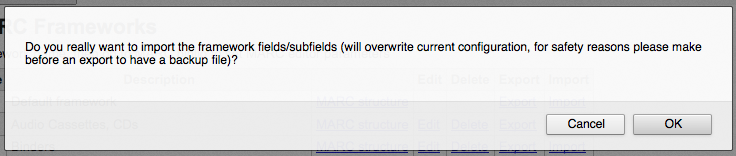
You will be asked to confirm your actions before the file is imported.
As your file is uploaded, you will see a spinning icon to indicate that the system is working.
Once your import is complete you will be brought to the framework edit tool where you can make any changes you need to the framework you imported.
Koha to MARC mappingWhile Koha stores the entire MARC record, it also stores common fields for easy access in various tables in the database (mainly the items, biblioitems, and biblio tables). Koha to MARC mapping is used to tell Koha where to find these values in the MARC record. Whenever a record is added or changed, this mapping will be used to update the linked database column. The information from the database columns is used as a way to quickly look up important information without having to parse the full MARC record. It is used for displaying information in a lot of pages and can also be used in reports.
In many cases, you will not have to change the default values set at the time of the installation, but it is important to know that the tool is here and can be used at any time.
Warning
If you change mappings after data has been added to your catalog, ask your system administrator to run misc/batchRebuildBiblioTables.pl. This will update the values in the database columns for all your records.
Get there: More > Administration > Catalog > Koha to MARC mapping
Note
Only staff with the manage_marc_frameworks permission (or the superlibrarian permission) will have access to this section.
The table shows all the database fields that can be mapped to MARC fields.
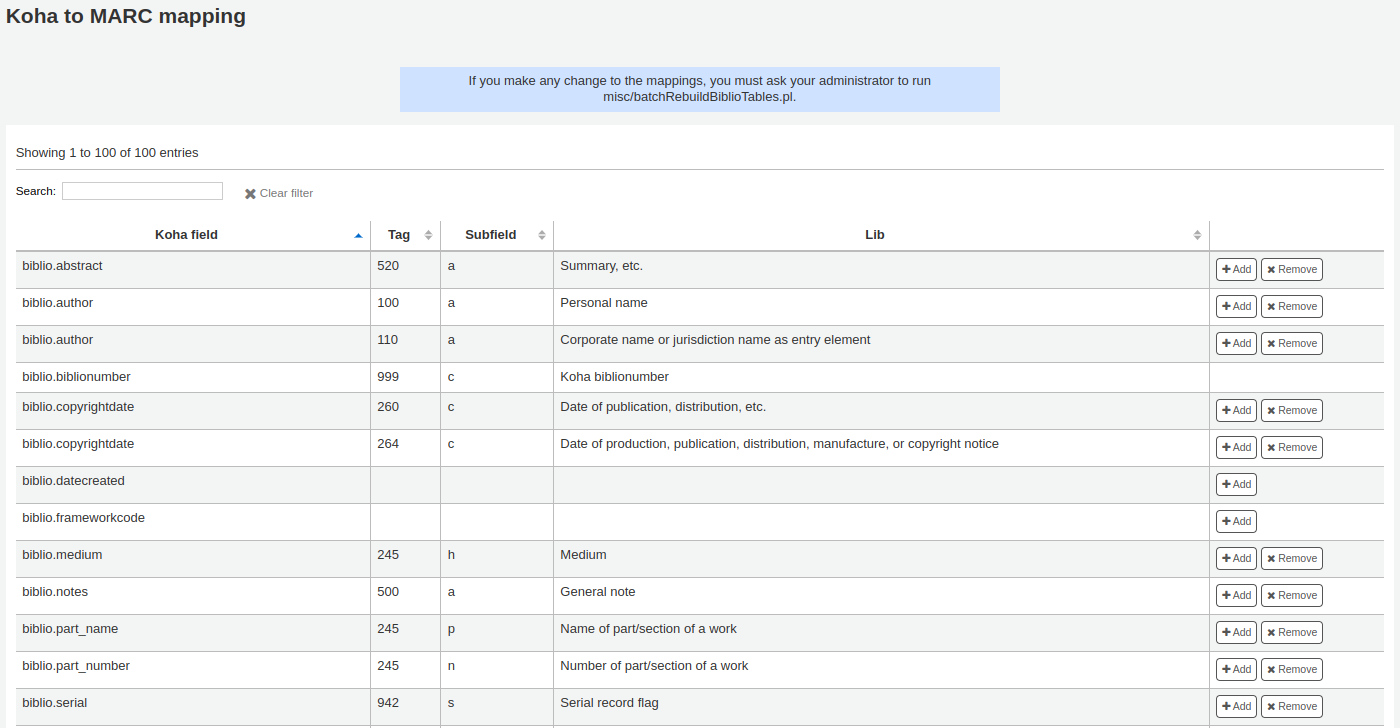
To add a new mapping, click on the ‘Add’ button to the right of the appropriate field.
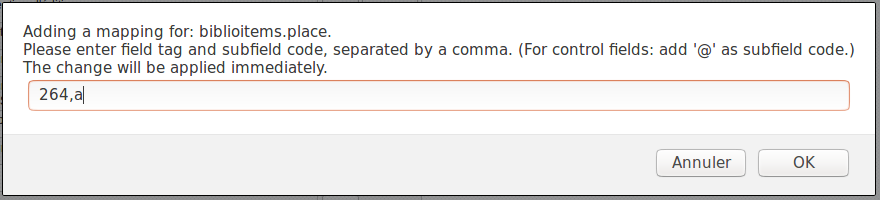
Write in the MARC field and subfield you would like to map, separated by a comma, to this Koha field (for example, “264,a”) and click the ‘OK’ button.
Note
It is possible to link more than one MARC field to a database field. For example, you could link both 260$a and 264$a to the biblioitems.place field.
If you would like to clear the mapping for a database field, click the ‘Remove’ button.
Note
All changes are immediate. Records created or edited after the change will immediately have the new mappings. However, if you want to update the mappings for records already in the catalog, ask your system administrator to run misc/batchRebuildBiblioTables.pl. This will update the values in the database columns for all your records.
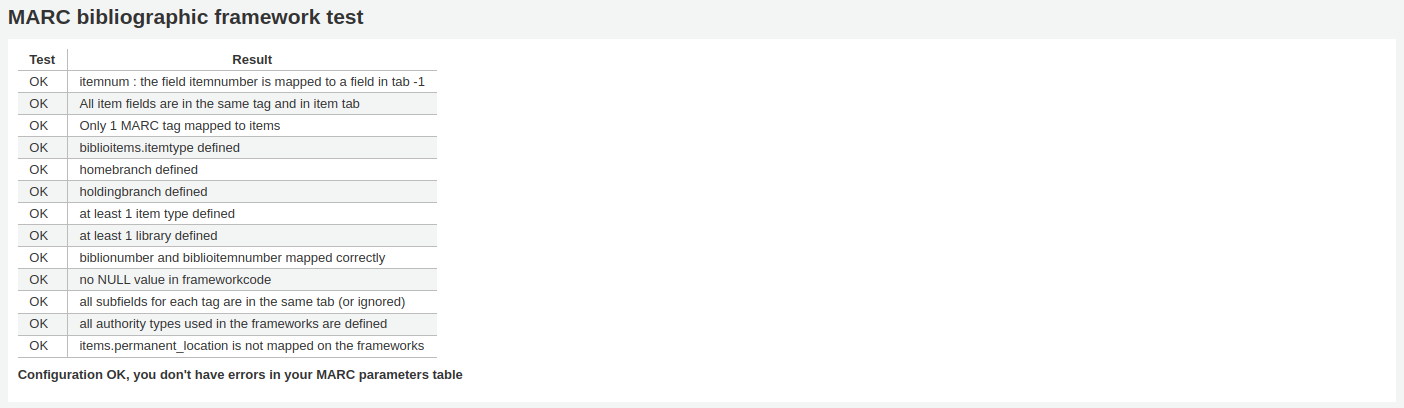
The tool checks the MARC structure of bibliographic frameworks.
Get there: More > Administration > Catalog > MARC bibliographic framework test
Note
Only staff with the manage_marc_frameworks permission (or the superlibrarian permission) will have access to this section.
If you change your MARC bibliographic framework, it’s recommended that you run this tool to test for errors in your definition.
Authority types are basically MARC frameworks for authority records and because of that they follow the same editing rules found in the MARC bibliographic frameworks section of this manual. Koha comes with many of the necessary authority frameworks already installed. To learn how to add and edit authority types, simply review the MARC bibliographic frameworks section of this manual.
Get there: More > Administration > Catalog > Authority types
Note
Only staff with the manage_marc_frameworks permission (or the superlibrarian permission) will have access to this section.
Source of classification or shelving scheme are mapped to field 952$2 and 942$2 in Koha’s MARC bibliographic frameworks and stored in the items.cn_source and biblioitems.cn_source fields in the database.
Get there: More > Administration > Catalog > Classification sources
Note
Only staff with the manage_classifications permission (or the superlibrarian permission) will have access to this section.
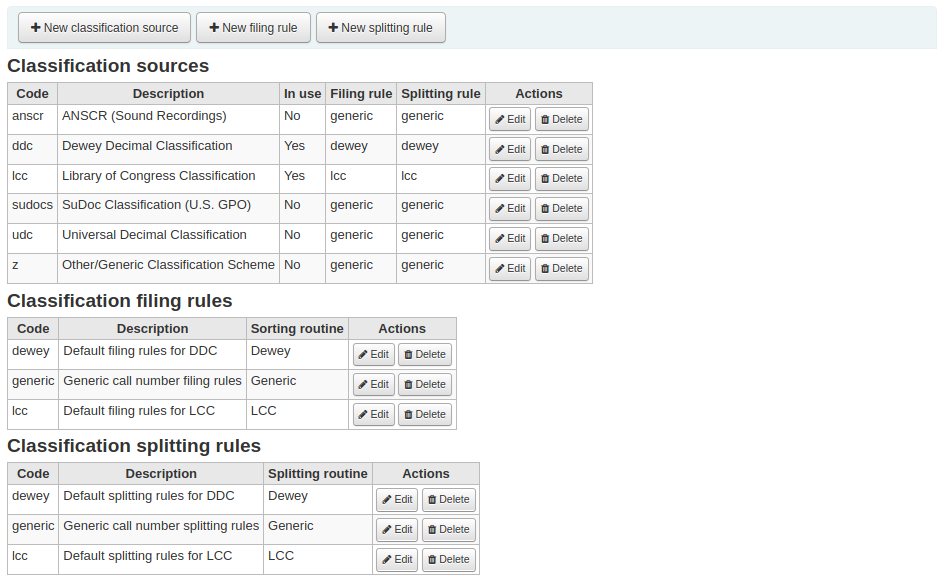
Commonly used classification sources are:
ddc - Dewey Decimal Classification
lcc - Library of Congress Classification
If you chose to install classification sources during Koha’s installation, you would see other values too:
ANSCR (sound recordings)
SuDOC classification
Universal Decimal Classification
Other/Generic Classification
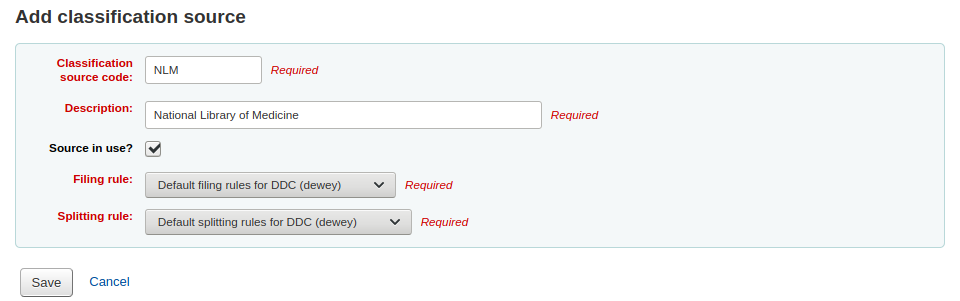
Adding/editing classification sourcesYou can add your own source of classification by using the ‘New classification source’ button. To edit use the ‘Edit’ button.
When creating or editing:
Enter a code. The code is limited to 10 characters and must be unique.
Note
The code is not editable once it has been created.
Enter a description. The description is used in the drop-down lists in the cataloging module.
Check the ‘Source in use?’ checkbox if you want the value to appear in the drop-down list for this category.
Select the appropriate filing rule from the drop-down list.
Select the appropriate splitting rule from the drop-down list.
Classification filing rulesFiling rules determine the order in which items are placed on shelves. Filing rules normalize call numbers in order for Koha to be able to compare them and sort them in the right order.
For example, a Dewey call number such as ‘636.8/07 SHAW’ will become ‘636_800000000000000_07_SHAW’ in order to be sorted.
The sorted call number is saved in the items.cn_sort or biblioitems.cn_sort fields in the database
Values that are pre-configured in Koha are:
Dewey
LCC
Generic
Filing rules are mapped to Classification sources. You can setup new filing rules by using the ‘New filing rule’ button. To edit, use the ‘Edit’ button.
When creating or editing:
Enter a code. The code is limited to 10 characters and must be unique.
Note
The code is not editable once it has been created.
Enter a description. The description is used in the drop-down list when creating or editing a classification source.
Choose an appropriate filing routine - dewey, generic or lcc
The Dewey filing routine generates a sorted call number by following these rules:
Concatenates classification and item parts.
Converts to uppercase.
Removes any leading or trailing white spaces, and forward slashes (/)
Separates alphabetic prefix from the rest of the call number
Splits into tokens on white spaces and periods.
Leaves first digit group as is.
Converts second digit group to 15-digit long group, padded on right with zeroes.
Converts each whitespace to an underscore.
Removes any remaining non-alphabetical, non-numeric, non-underscore characters.
The generic filing routine generates a sorted call number by following these rules:
Concatenates classification and item parts.
Removes any leading or trailing white spaces.
Converts each whitespace to an underscore.
Converts to uppercase.
Removes non-alphabetical, non-numeric, non-underscore characters.
The LCC filing routine generates a sorted call number by following these rules:
Classification splitting rulesSplitting rules determine how call numbers are split when printed on a spine label.
Note
Splitting rules are only used if your label layout specifies to split call numbers.
For example, a Dewey call number such as ‘636.8/07 SHAW’ will become
once printed on a spine label.
Values that are pre-configured in Koha are:
Dewey
LCC
Generic
Splitting rules are mapped to Classification sources. You can setup new splitting rules by using the ‘New splitting rule’ button. To edit, use the ‘Edit’ button.
When creating or editing:
Enter a code. The code is limited to 10 characters and must be unique.
Note
The code is not editable once it has been created.
Enter a description. The description is used in the drop-down list when creating or editing a classification source.
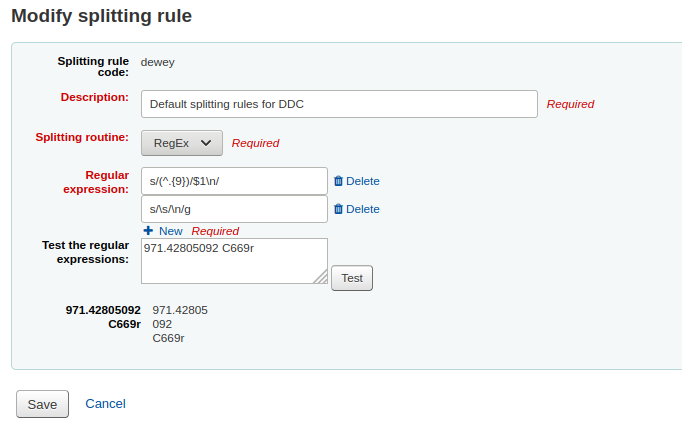
Choose an appropriate splitting routine - Dewey, Generic, LCC or RegEx
The Dewey splitting routine looks for the three digits and the decimal, puts it on one line with the other parts (Cutter, prefix, etc.) each on a separate line (generally split on spaces).
The Generic splitting routine splits on spaces.
The LCC splitting routine puts each component on a separate line.
The RegEx splitting routine allows you to create a custom splitting routine.
Some examples of RegEx splitting routines:
Split on spaces:
Split on equal signs (=):
Split on forward slashes (/):
Remove first split if call number starts with J or K:
Cut after 9 characters:
It is possible to mix and match RegEx splitting routines by clicking the ‘New’ link just under the RegEx input box.
For example, if you want to cut after nine characters AND split on spaces, you can write both and the call number ‘971.42805092 C669r’ will be split
Record matching rules are used when importing MARC records into Koha.
Get there: More > Administration > Catalog > Record matching rules
Note
Only staff with the manage_matching_rules permission (or the superlibrarian permission) will have access to this section.
The rules that you set up here will be referenced with you Stage MARC records for import.
It is important to understand the difference between ‘Match points’ and ‘Match checks’ before adding new matching rules to Koha.
Match points are the criteria that you enter that must be met in order for an incoming record to match an existing MARC record in your catalog. You can have multiple match points on an import rule each with its own score. An incoming record will be compared against your existing records (‘one record at a time’) and given a score for each match point. When the total score of the match points matches or exceeds the threshold given for the matching rule, Koha assumes a good match and imports/overlays according your specifications in the import process. An area to watch out for here is the sum of the match points. Double check that the matches you want will add up to a successful match.
Example:
Threshold of 1000
Match point on 020$a 1000
Match point on 022$a 1000
Match point on 245$a 500
Match point on 100$a 100
In the example above, a match on either the 020$a or the 022$a will result in a successful match. A match on 245$a title and 100$a author (and not on 020$a or 022$a) will only add up to 600 and not be a match. And a match on 020$a and 245$a will result in 1500 and while this is a successful match, the extra 500 point for the 245$a title match are superfluous. The incoming record successfully matched on the 020$a without the need for the 245$a match. However, if you assigned a score of 500 to the 100$a Match Point, a match on 245$a title and 100$a author will be considered a successful match (total of 1000) even if the 020$a is not a match.
Match checks are not commonly used in import rules. However, they can serve a couple of purposes in matching records. First, match checks can be used as the matching criteria instead of the match points if your indexes are stale and out of date. The match checks go right for the data instead of relying on the data in the indexes. (If you fear your indexes are out of date, a rebuild of your indexes would be a great idea and solve that situation!) The other use for a match check is as a ‘double check’ or ‘veto’ of your matching rule. For example, if you have a matching rule as below:
Threshold of 1000
Match point on 020$a 1000
Match check on 245$a
Koha will first look at the 020$a tag/subfield to see if the incoming record matches an existing record. If it does, it will then move on to the Match Check and look directly at the 245$a value in the incoming data and compare it to the 245$a in the existing ‘matched’ record in your catalog. If the 245$a matches, Koha continues on as if a match was successful. If the 245$a does not match, then Koha concludes that the two records are not a match after all. The Match Checks can be a really useful tool in confirming true matches.
When looking to create matching rules for your authority records the following indexes will be of use:
Index name
Matches MARC tag
LC-cardnumber
010$a
Personal-name
100$a
Corporate-name-heading
110$a
Meeting-name
111$a
Title-uniform
130$a
Chronological-term
148$a
Subject-topical
150$a
Name-geographic
151$a
Term-genre-form
155$a
Table: Authority indexes
Adding matching rulesTo create a new matching rule :
Click ‘New record matching rule’
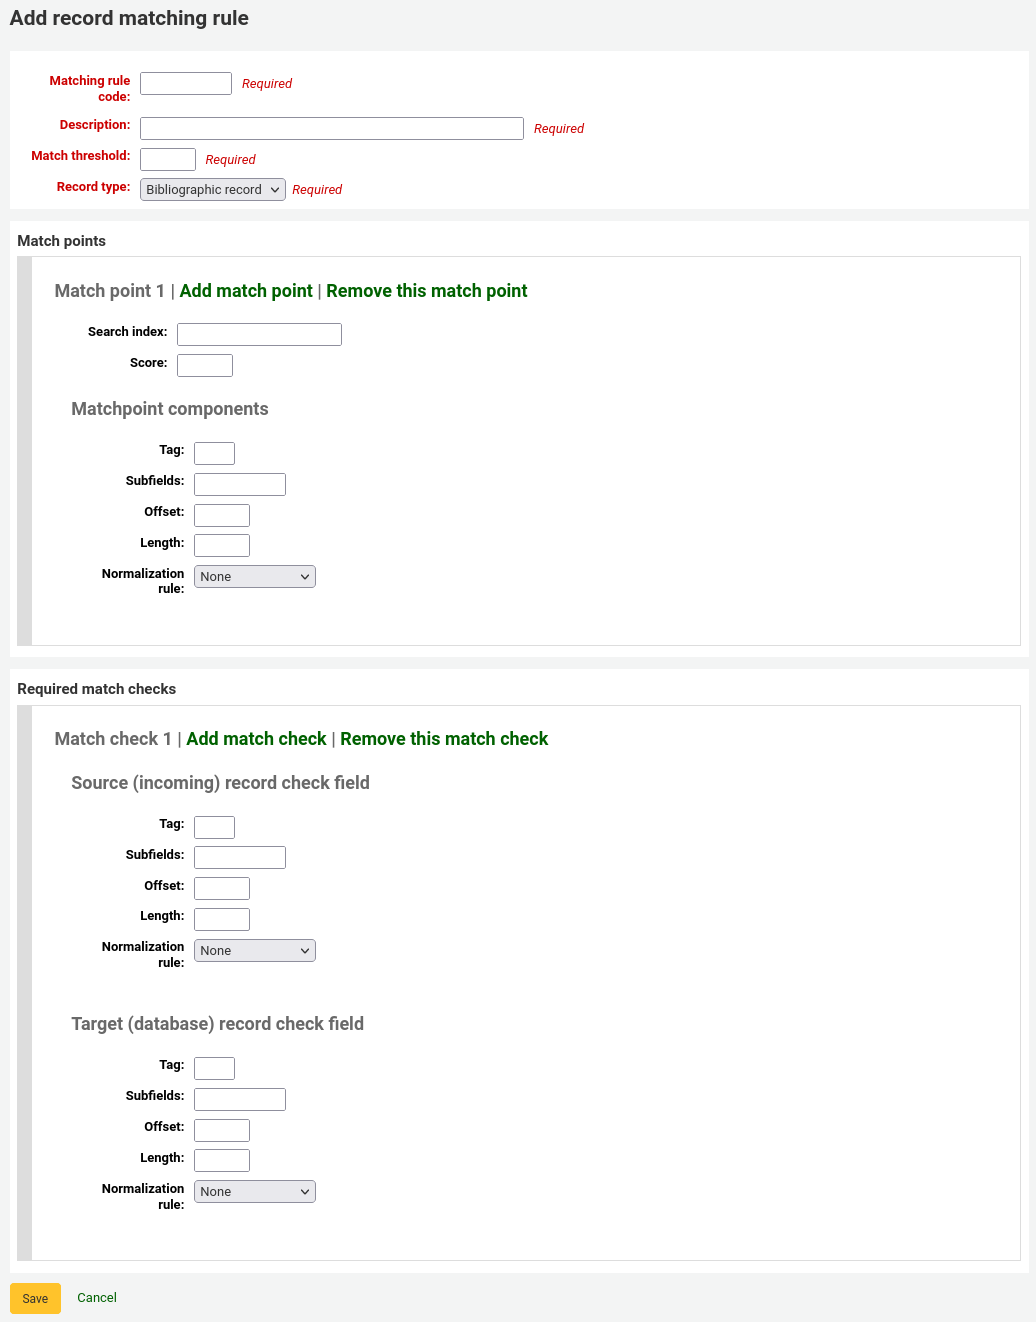
Choose a unique name and enter it in the ‘Matching rule code’ field
‘Description’ can be anything you want to make it clear to you what rule you’re picking
‘Match threshold’ is the total number of ‘points’ a biblio must earn to be considered a ‘match’
‘Record type’ is the type of import this rule will be used for - either authority or bibliographic
Match points are set up to determine what fields to match on
‘Search index’ can be found by looking at the index configuration on your system. For Zebra you might find the right index names in your ccl.properties file. You can also find useful information in the Koha search indexes chapter of this manual.
‘Score’ - The number of ‘points’ a match on this field is worth. If the sum of each score is equal or greater than the match threshold, the incoming record is a match to the existing record.
Enter the MARC tag you want to match on in the ‘Tag’ field.
Enter the MARC tag subfield you want to match on in the ‘Subfields’ field. For matching on controlfields like 001 the subfields input field can be left empty.
‘Offset’ - For use with control fields, 001-009
‘Length’ - For use with control fields, 001-009
There are currently several options for ‘Normalization rules’:
None - no normalization rule will be applied
Remove spaces
Uppercase
Lowercase
Legacy default - this option was added to maintain the behavior form before the other normalization rules became available.
ISBN - using this option will improve matching on ISBN. If your incoming records ISBN fields contain extra text, like ‘9780670026623 (alk. paper)’, they will still match correctly.
‘Required match checks’ - While match points work on the search index, match checks work directly on the data and can be used as the matching criteria instead of the match points or in addition to them to confirm true matches.
Sample bibliographic record matching rule: Control number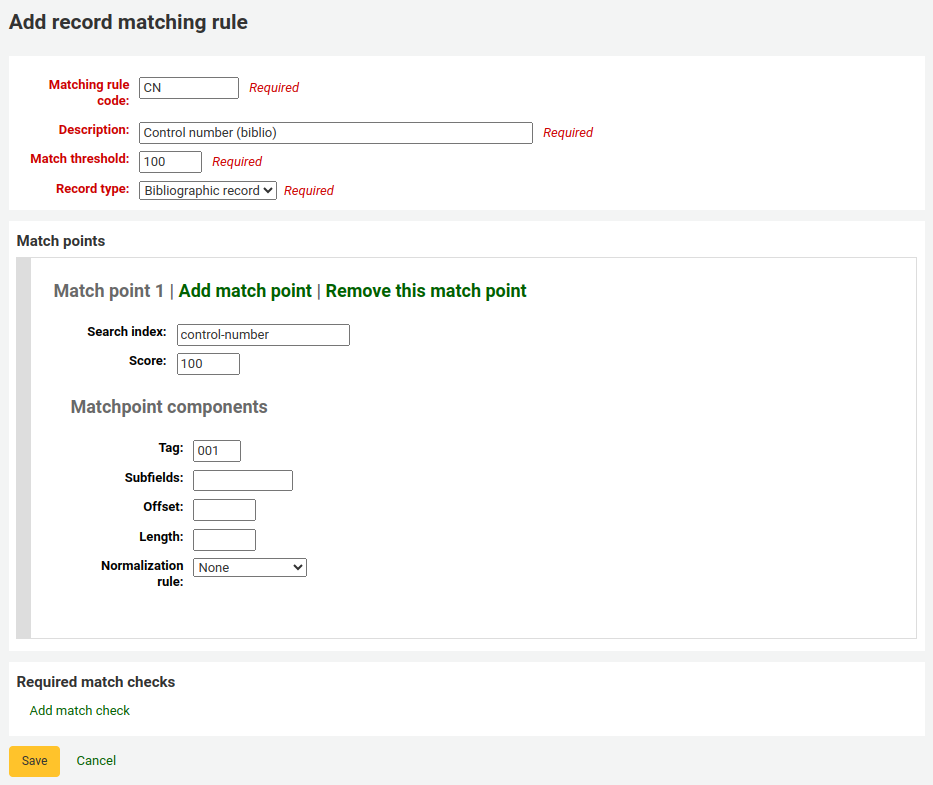
Match threshold: 100
Record type: Bibliographic record
Note
In order to match on the 001 in authority records, you will need to create a second rule, repeating all of these values and change just the record type to ‘Authority record’.
Matchpoints (just the one):
Search index: control-number
Score: 100
Tag: 001
Note
In MARC21, this field is for the control number assigned by the organization creating, using, or distributing the record.
Subfields: empty
Offset: 0 or empty
Length: 0 or empty
Normalization rule: None
Required match checks: none (click ‘Remove this match check’)
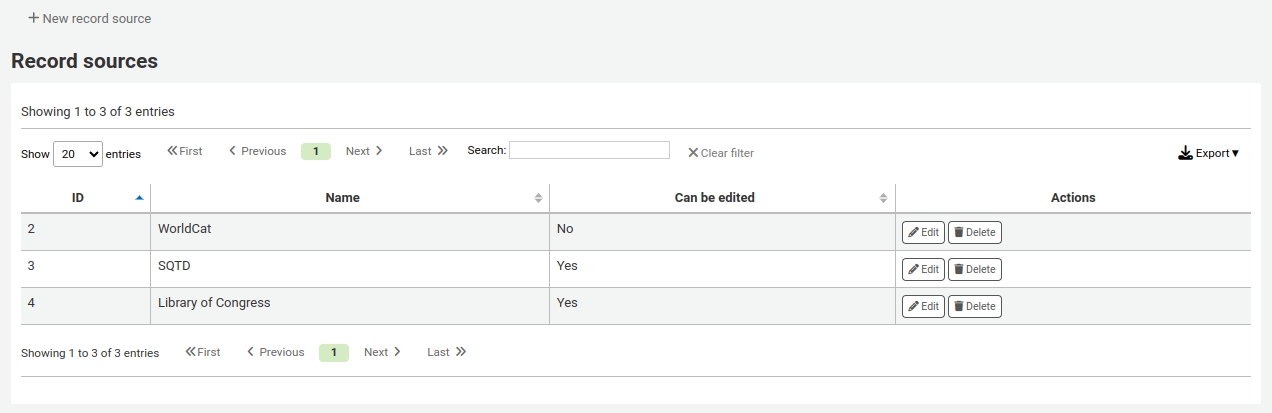
Record sourcesVersion
This section was added to Koha in version 24.05.
Record sources are used to indicate where records come from and optionally prevent records from specific sources to be edited in Koha.
This is particularly useful in instances where records are catalogued in another system and pushed to Koha. Sometimes, in those cases, it’s best to edit the records in the source system rather than in Koha.
Note
Only staff with the manage_record_sources permission (or the superlibrarian permission) will have access to this section.
To add a record source,
Click ‘New record source’
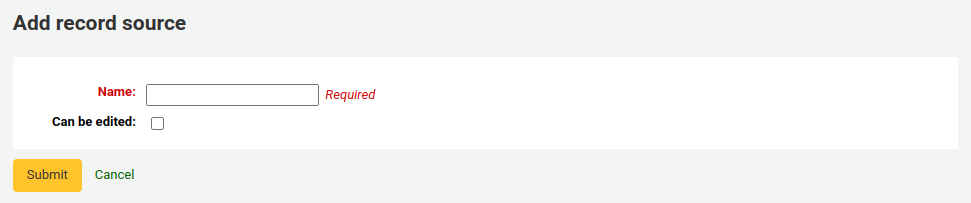
Fill out the form
Name: enter the name of the source
Can be edited: if this box is checked, records from this source will be editable in Koha. If it is not checked, only staff members with the edit_locked_records permission will be able to edit the records.
Click ‘Submit’
Editing a record sourceTo edit a record source, click the ‘Edit’ button next to the source.
To delete a record source, click the ‘Delete’ button next to the source and confirm.
Record overlay rules allow for defining rules for how incoming and original MARC records should be merged on a field tag and context basis when a MARC record is updated.
Note
Only staff with the manage_marc_overlay_rules permission (or the superlibrarian permission) will have access to this section.
Let’s first focus on understanding the concept of contexts.
Contexts are defined by “module” and “filter” enabling separate rule sets for different contexts.
By setting different filter values for these modules, rules are applied only when the filter value matches for a particular module. A wildcard; “*”, can be used to match all possible filter values.
There are three different context modules:
borrowerAllows for defining rules that will be applied if the currently logged in user’s borrower number matches the filter condition.
categorycodeAllows for defining rules that will be applied if the currently logged in users’s category code matches the filter condition.
sourceAllows for defining rules that will be applied if the record is updated in a particular part of Koha. The following update methods are supported:
batchimport
z39.50
intranet
bulkmarcimport
import_lexile
batchmod
A context is really nothing but a module and filter combination. Every time a record is updated i Koha, a context is set an filter values populated with context dependent values.
Examples of two different contexts are saving record in the staff client or the currently logged in user having a particular borrower number, for example “12”.
These two contexts are define as:
Only the rules of one context, that is a module and filter combination, are applied. If multiple contexts matches they are not merged together.
If we have the following rules:
And the context of the update where the rules are applied is:
Only the first two rules will be applied.
If instead the context of rule evaluation was:
Only the second rule would be applied, even though the first two rules also matches they will be discarded since the context match of that rule set is of lower specificity because of the wildcard.
Context specificity is ranked in the following way:
First all the rules are grouped into rule sets identified by a unique filter and module combination.
If one or more contexts have a non wildcard filter condition match, the rule set of the context with the module of highest specificity is selected. (The modules are listed in order of specificity above).
If no exact context match is found, but one or more wildcard matches are, the rule set of the context with the module of highest specificity is selected.
If no context matches the default behavior is to overwrite, the original record with the incoming record.
A rule consists of a three different parts:
ContextA module and filter to match against as described above.
TagA field tag expression for defining which tag(s) the rule should be applied on. Three different tag expressions are supported:
An exact tag, for example “650”.
A regular expression, for example “6..” matching all 6XX tags.
A wildcard, “*”, matching all tags
When rules for a specific context are evaluated, the most specific match is selected. The tag expressions above are listed in order of specificity.
ActionsEach rule defines a set of actions to take depending on the type of update. There are four types of update events: Added, Appended, Removed and Deleted. For each event an action is specified, whether to perform the update, or to skip it.
By enabling/disabling updates for these different events 16 different update behaviors can be defined. There are presets available for the most common/useful combinations:
Preset
Added
Appended
Removed
Deleted
Protect
Skip
Skip
Skip
Skip
Overwrite
Add
Append
Remove
Delete
Add new
Add
Skip
Skip
Skip
Add and append
Add
Append
Skip
Skip
Protect from deletion
Add
Append
Remove
Delete
ProtectThe “Protect” preset will prevent all updates on matching fields, protecting them from being overwritten.
Given this rule:
And the following original and incoming records:
The 650 field of the original record will retain its original value after the update (but since the default behavior if no rule matches is to overwrite, the 500 field will be added):
The “Overwrite” preset will allow all updates on matching fields.
Since the default behavior is to overwrite if no rule matches, adding a rule with the overwrite preset only makes sense if there is some other rule with a lower tag specificity with a different behavior, for example a wildcard tag rule.
So given these two rules:
And the following original and incoming records:
Incoming record:
All fields but 650 will be protected on the original record, and the resulting record will be:
The “Add new” allow updates only if the incoming field is new, that is there exists no fields with this tag in the original record.
Given this rule:
And the following original and incoming records:
The 650 in the incoming record will not overwrite the 650 field in the original record since the original record contains one or more 650 fields. The 500 field will be added since the default rule is to overwrite. The resulting record will be:
On the other hand, if the original record was:
The resulting record will be:
This is because there were no 650 fields in the original record, so adding new ones is permitted.
Add and appendIn the “Add and append” preset, appending is also permitted, but not removing or deleting.
So if we have the following rule:
And the following original and incoming records:
The resulting record will be:
Note that the “old” 650 field from the original record was not removed since we only allow adding or appending new values.
If we instead used the “Overwrite” preset the resulting record would instead be:
with the 650 field of the original record removed.
Protect from deletionThe preset “Protect from deletion” will allow all update operations except deletion. Deletion is defined as when there are no fields of the matching tag in the incoming record so that all of the fields with this tag would be removed on the original record.
So given the following rule:
And the following original and incoming records:
The resulting record will be:
On the other hand, if the incoming record was:
In this case the deletion of 650 would not be permitted and the value of the field on the original record would be protected. The resulting record would instead be:
To work with custom presets, a more complete understanding of the update events is required:
AddedFor a matching rule with a tag, the action configured for the “Added” event is applied for new fields in the incoming record if the original record has no fields with that tag. If the action is “Add” they will be added to the original record, if “Skip” they will be thrown away.
AppendedIf the two record have common fields with the rule tag, that is one or more fields with identical subfield and identifier values, the action configured for the “Appended” event is applied for fields found in incoming record but not in original record. If the action is “Append” they will be added to the original record, if “Skip” they will be thrown away.
RemovedIf the two records have common fields with the rule tag, the action configured for the “Removed” action is applied for fields found in original record but not in incoming record. If the action is “Remove” they will removed from the original record, if “Skip” they will be kept.
DeletedIf the original record have fields with the rule tag, but no fields with this tag is found in the incoming record, the action configured for the “Deleted” event is applied for the fields in the incoming record. If the action is “Delete” the fields will be removed from the original record, if “Skip” they will be kept.
OAI sets configurationOn this page you can create, modify and delete OAI-PMH sets
Note
Only staff with the manage_oai_sets permission (or the superlibrarian permission) will have access to this section.
To create a set:
Click on the link ‘Add a new set’
Fill the mandatory fields ‘setSpec’ and ‘setName’
Then you can add descriptions for this set. To do this click on ‘Add description’ and fill the newly created text box. You can add as many descriptions as you want.
Click on ‘Save’ button’
Modify/delete a setTo modify a set, just click on the link ‘Modify’ on the same line of the set you want to modify. A form similar to set creation form will appear and allow you to modify the setSpec, setName and descriptions.
To delete a set, just click on the link ‘Delete’ on the same line of the set you want to delete.
Define mappingsHere you can define how a set will be build (what records will belong to this set) by defining mappings. Mappings are a list of conditions on record content.
Fill the fields ‘Field’, ‘Subfield’ and ‘Value’. For example if you want to include in this set all records that have a 999$9 equal to ‘XXX’. Fill ‘Field’ with 999, ‘Subfield’ with 9 and ‘Value’ with XXX.
If you want to add another condition, click on ‘Add’ button and repeat step 1. You can choose between ‘and’ or ‘or’ Boolean operators to link your conditions.
Click on ‘Save’
To delete a condition, just leave at least one of ‘Field’, ‘Subfield’ or ‘Value’ empty and click on ‘Save’.
Note
Actually, a condition is true if value in the corresponding subfield is strictly equal to what is defined if ‘Value’. A record having 999$9 = ‘XXX YYY’ will not belong to a set where condition is 999$9 = ‘XXX’.
And it is case sensitive : a record having 999$9 = ‘xxx’ will not belong to a set where condition is 999$9 = ‘XXX’.
Build setsOnce you have configured all your sets, you have to build the sets. This is done by calling the script misc/migration_tools/build_oai_sets.pl.
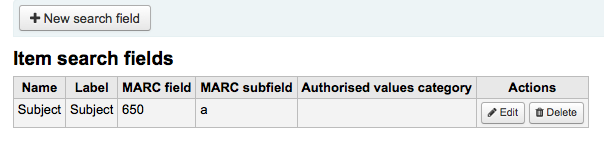
Item search fieldsFrom here you can add custom search fields to the item search option in the staff client.
Note
Only staff with the manage_item_search_fields permission (or the superlibrarian permission) will have access to this section.
To add a new search term simply click the ‘New search field’ button
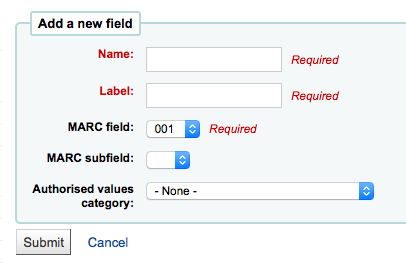
Name is a field for you to identify the search term
Label is what will appear on the item search page
MARC field allows you to pick which field you’d like to search in
MARC subfield is the subfield you’d like to search in
Authorized values category can be used to turn this search field in to a pull down instead of a free text field
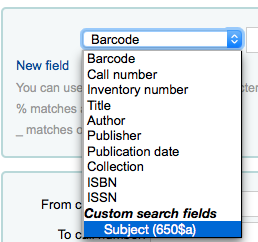
Once your new field is added it will be visible at the top of this page and on the item search page
Search filters are custom searches or filters that can be applied to search results.
This functionality is enabled on using the SavedSearchFilters system preference.
Note
This section will only be visible if the SavedSearchFilters system preference is enabled.
Note
Only staff with the manage_search_filters permission (or the superlibrarian permission) will have access to this section.
Search filters are added by searching the catalog through the staff interface.
This page is used to manage existing search filters.

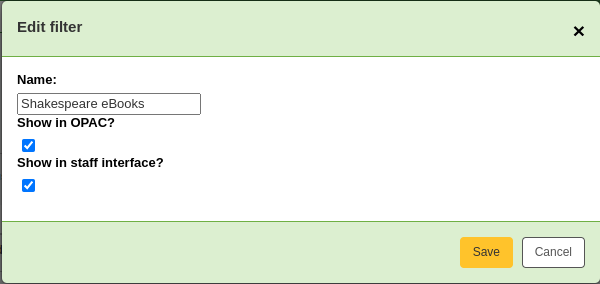
You can make changes to each search filter by clicking on the action buttons on the right.
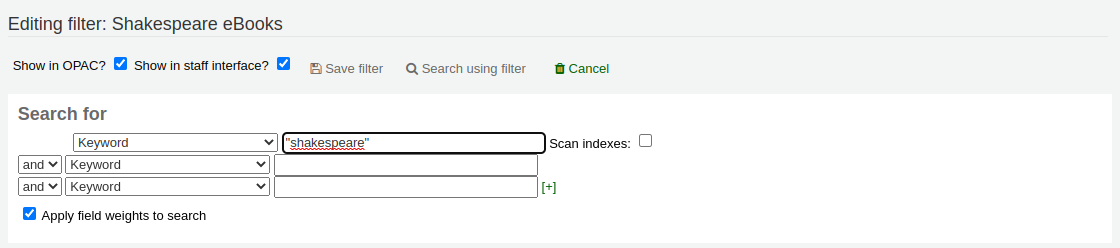
Edit filter: change the name of the filter, and its availability in the OPAC or staff interface
Edit search: clicking this button will bring you to the advanced search form, with the filter already applied. You can change the search parameters, and click ‘Save filter’ at the top of the page.
Delete: clicking this button will delete the filter.
Warning
There is no confirmation when deleting a search filter. Once you click ‘Delete’, the filter will be deleted immediately.
Note
Search filters can be used as pre-defined search URLs that you can use on your website or in HTML customizations.
Search filters are available through relatively short links.
<OPACBaseURL>/cgi-bin/koha/opac-search.pl?limit=search_filter:<Id of filter>
Use this URL anywhere to link directly to the search.